Grave of Saints
 Grave of Saints is a Location in Dark Souls 2. Accessed via the pit in Majula, this rat-infested area is home to the Rat King Covenant and its members can pull you into their world as a grey phantom. They will do their best to inflict Toxic damage and lure you in, using many Pharros' Lockstone contraptions to hinder you. The rats can petrify you if you let them attack you enough.
Note: This area can be skipped by use of the Silvercat Ring and enough health, if one makes it all the way to the bottom of The Pit in Majula, or by paying laddersmith Gilligan 12,000 souls to build the largest ladder to get to the bottom of the pit.
General Information
- Previous: Majula
- Next: The Gutter
- Recommended Levels: 45 to 55
- Boss: Royal Rat Vanguard
- Bonfires: Harval's Resting Place, Grave Entrance
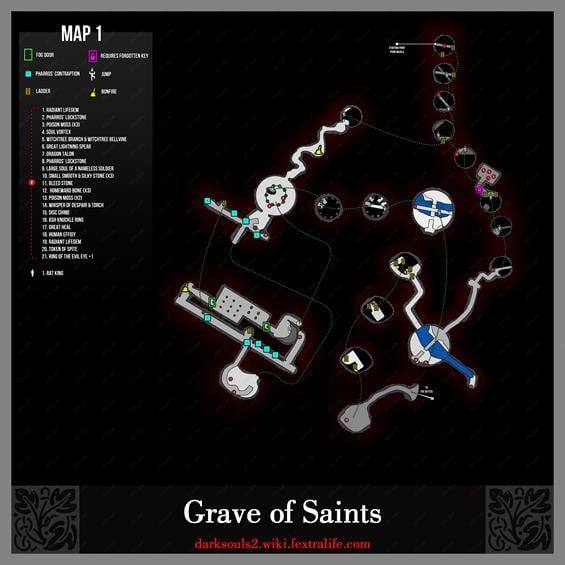
Grave of Saints Map
NPCs in the Grave of Saints
Items
Consumables- Repair Powder
- Large Soul of a Nameless Soldier
- Warmth
- Small Smooth & Silky Stone
- Homeward Bone x3
- Poison Moss x2
- Whisper of Despair
- Torch x1
- Pharros' Lockstone
- Sublime Bone Dust
- Ash Knuckle Ring
- Armor Of Aurous (Random drop from Rhoy)
Enemies
- Hollow Prisoner
- Corpse Rat
- Rhoy the Explorer (Scripted Invasion)
- Undead Citizen (Mummies)
- Syan Knight
- Crystal Lizard - near/on rope bridge at the end of the level
Boss
Notes
- If the player has already joined the Rat Covenant via the Rat King in the Doors of Pharros, after defeating the Royal Rat Authority boss, then no enemies will be hostile towards the player in this zone. Nor will the Dark Spirit Rhoy the Explorer invade the player.
- Using a Bonfire Ascetic on the first bonfire here (Harvel's Resting Place) will respawn the Dark Spirit Rhoy the Explorer. Doing this makes Rhoy a useful target to farm Awestones.
- It appears that the spawn limit for non-unique enemies in this area has been removed (needs additional confirmation).
Grave of Saints Walkthrough
Start to Rhoy Invasion
After coming into the area from The Pit in Majula, the first bonfire, Harval's Resting Place will be an obvious find. On your way in, two Hollow Prisoner will sit around, get rid of them so they dont join your fights against Corpse Rats later on. After dealing with them, enter the large chamber, which has a dry fountain in the middle due to a hole in the base. There is treasure and a very interesting looking skeleton in the fountain but you can't access this area yet. More importantly, upon entering, several Corpse Rats will sneak out of small holes around the room and attack. Individually they should pose no threat, however, groups can be dangerous, because their attacs build up petrification. Inside this chamber is a skeleton with a Large Soul of a Nameless Solider.
Continue into the lightend-up area and up a small stairs, then take care of more Rats coming from the right. This way brings us further down the progress path, so we ignore that direction for now and go left instead. This way leads to another snickering Hollow Prisoner, as well as a corpse, holding 3x Small Smooth & Silky Stones. Back at the junction, you will notice a Pharros' Lockstone face on the floor, which opens a bridge right next to it. This is about the only worthwhile Contraption, if you have no interest in joining the Rat King Covenant. Activate it and cross the bridge to arrive at a large room filled with petrified rats. There is a corpse with 2x Poison Moss up ahead, but be carefull, as 3 more Rats will crawl out from the opening left of the corpse. After taking care of them and taking the Moss, go up a set of stairs, leading to a skeleton holding Whisper of Despair and a Torch.
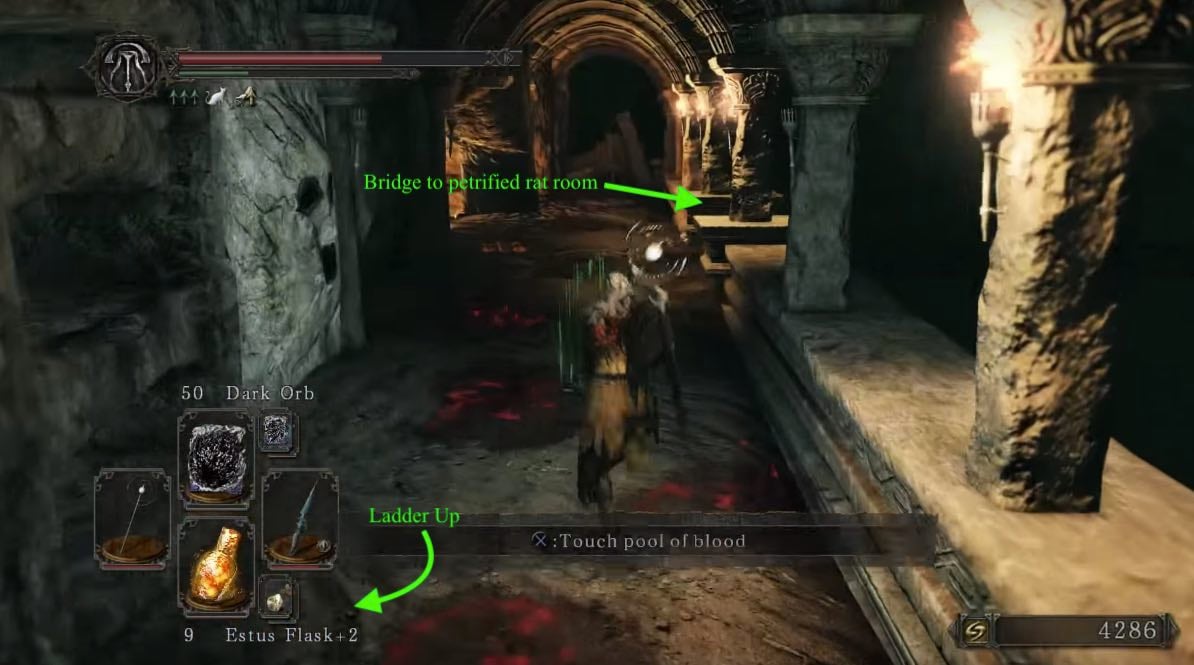
Further down the way leads to a doorway, blocked with a bridge like the one you just crossed that can be lowered with another Pharros' Lockstone on the floor above. However, we recommend against wasting a lockstone here, as you will be reaching the area across later. Heading back to the hall where you lowered the bridge and take the way we ignored before. On your way down, you will come to a Pharros' Lockstone face in the wall and a ladder. This one creates a waterfall that obscures vision and extinguishes torches and is intended to help Rat King Covenant members, as are the majority of Lockstones in this area.
Rhoy to Royal Rat Boss
Heading up the ladder will trigger the scripted invasion of Rhoy the Explorer (Only if you play offline). Here's what you need to know:
- He is relatively fast but is not a tremendous threat on his own; allowing rats to join the fray does cause problems as they will fall and crawl to sneak up on you.
- He drops a random piece of equipment when killed:
- Shotel +5
- Armor of Aurous Warmth (pyromancy)
- Heavy Crossbow +5
After defeating him and the three Rats coming from the left, you can inspect this new section, which mostly looks like the floor below but with several Pharros' Lockstone holes. The one in the floor right away lowers the bridge mentioned earlier, but as with most of the Contraptions here, it only is usefull for Members of the Rat King Covenant, or for dealing with them (having more ways you can go). Moving to the left leads to a tomb with 3 more Rats and a skeleton holding 3x Homeward Bone. Other lockstones will create acid pools (at the areas with the statues of rats holding jars) that damage armor; these are more traps to help covenant members.
Heading in the other direction leads to a the Grave Entrance bonfire and mist door, while the door leads to the boss fight.
BOSS FIGHT: Royal Rat Vanguard
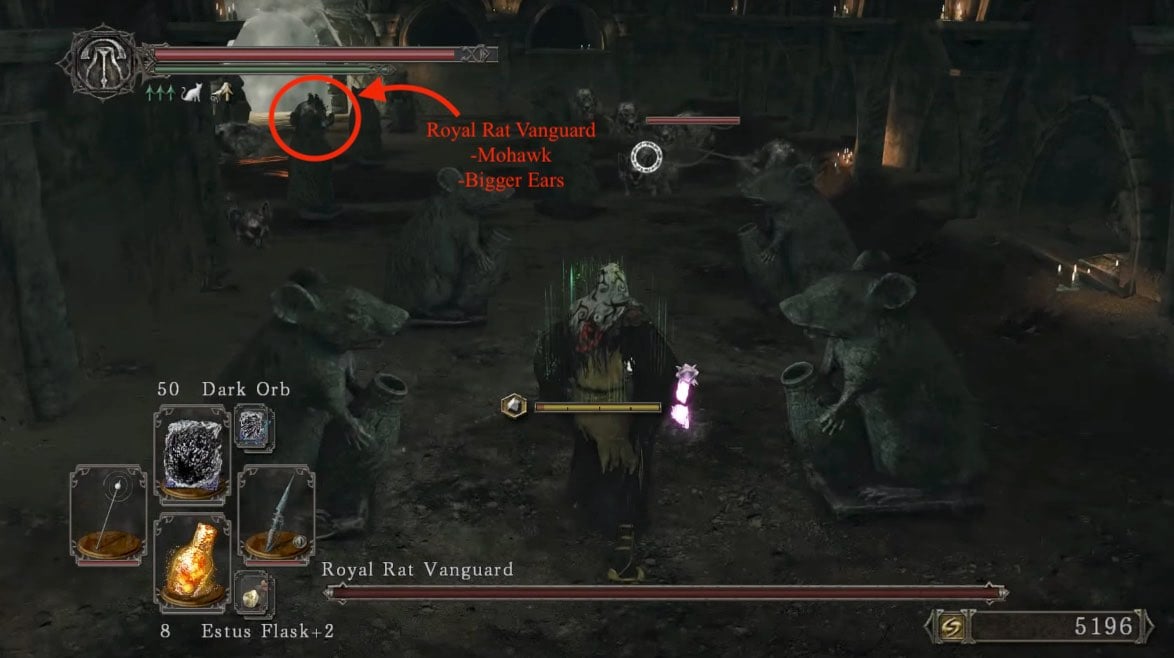
When you first enter the boss fight, you will be swarmed by regular rats. Killing a number of them will trigger the Vanguard's entry. While it is not easily distinguishable, look for a rat with bigger ears and a mohawk. Once you've spotted the Vanguard, kill it to cease the continuous attack of rats.
Rat King and Coffin Ladder
After defeating the boss, the room leads to a door and The Rat King will respect the murdering of his Vanguard, allowing you to join the Rat King Covenant. You are given the ring Crest of the Rat. If you have entered the covenant the area rats and hollows will no longer attack you as you are now one of them.
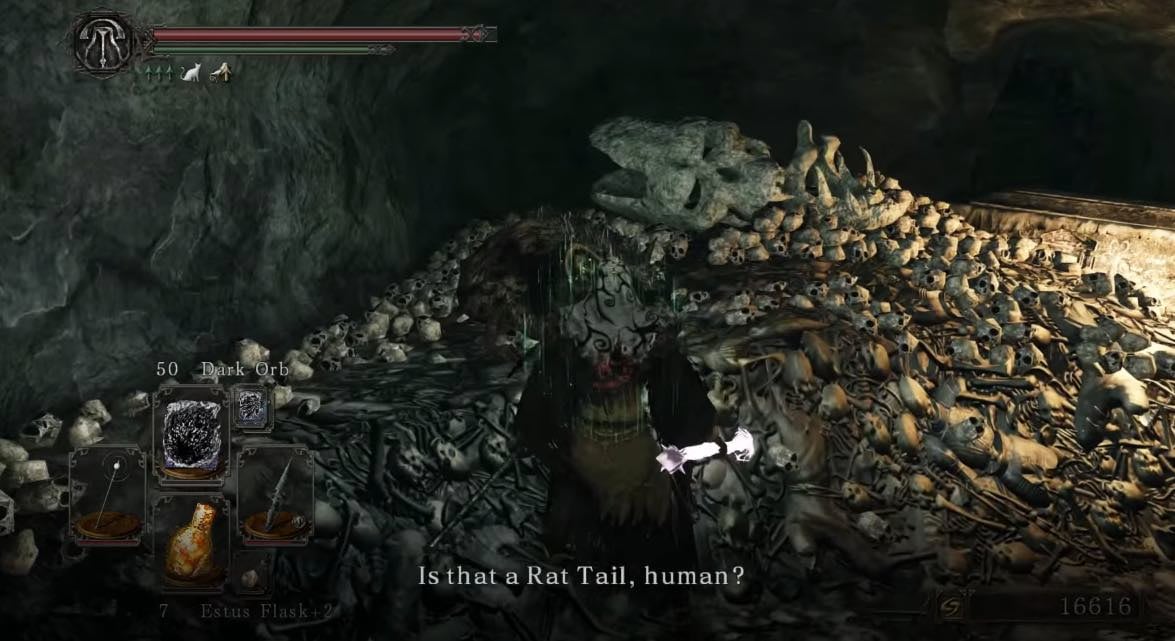
A hole in the floor after The Rat King drops down to the center fountain which was inaccessible before. Take a look at the very interesting skeleton before you do; while it's essentially useless, it's still a nice touch. Below is a corpse with a Pharros' lockstone. The only way out is down which leads to a pit with coffins jutting out as ledges to jump down. This leads to a stone bridge above a broken wooden one.
Wooden Bridge to The Gutter
If you're quick enough, the broken wooden bridge holds a Crystal Lizard. Note that there's a separate access to The Gutter area from The Pit in Majula, and the Crystal Lizard is fairly easy to get from this entry. The skeleton on the bridge also holds a Bleed Stone. You can jump from the bridge to a small ledge with a corpse yields the Disc Chime. Alternately, drop down to the wooden bridge below. On one end of the wooden bridge past the gap is a chest containing Ash Knuckle Ring. Get a good running start and jump over.
Note: The stairway on the other end of the bridge leads back to an entrance ledge in The Pit in Majula. The Crystal Lizard will spawn on the stairs just before the bridge. It will run across the bridge and fall through the hole, so make sure to kill it quickly.
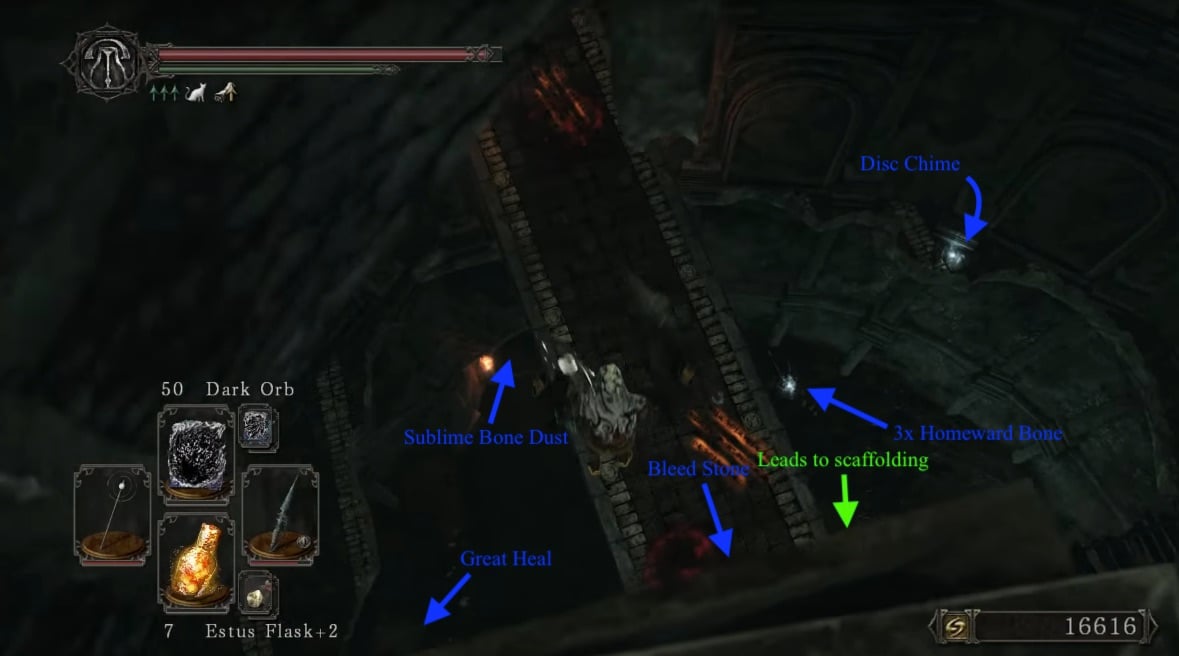
Jumping down from either the Disc Chime ledge or the wooden bridge, will land you in a water pit. Get out of water as it slows your movement, not the movement of the 3 exploding Rupturing Hollows that are coming from one tunnel though. Another thing to note is if you hang out on the wooden bridge for a while, before jumping down, Rupturing Hollows will come out for you to snipe. One tunnel has water (NG+ there will be 2x Phantoms in the water tunnel, 1x Lightning Mage, 2x Knight) and the other does not. The one with water has a Syan Soldier guarding a chest that contains a Sublime Bone Dust.
The other tunnel (where the Rupturing Hollows came from) has a ladder and scaffolding further down. After the first drop...you're down there. You can't reach the ladder again. There are two choices down. When facing the pit, a ladder to the right leads to another ladder and a corpse with a Human Effigy.
The other direction leads to ladders down, passing a corpse with a Radiant Lifegem, near the bottom. Make sure to find this, as there is then another ladder with no way back up. A chest at the base holds a Token of Spite.
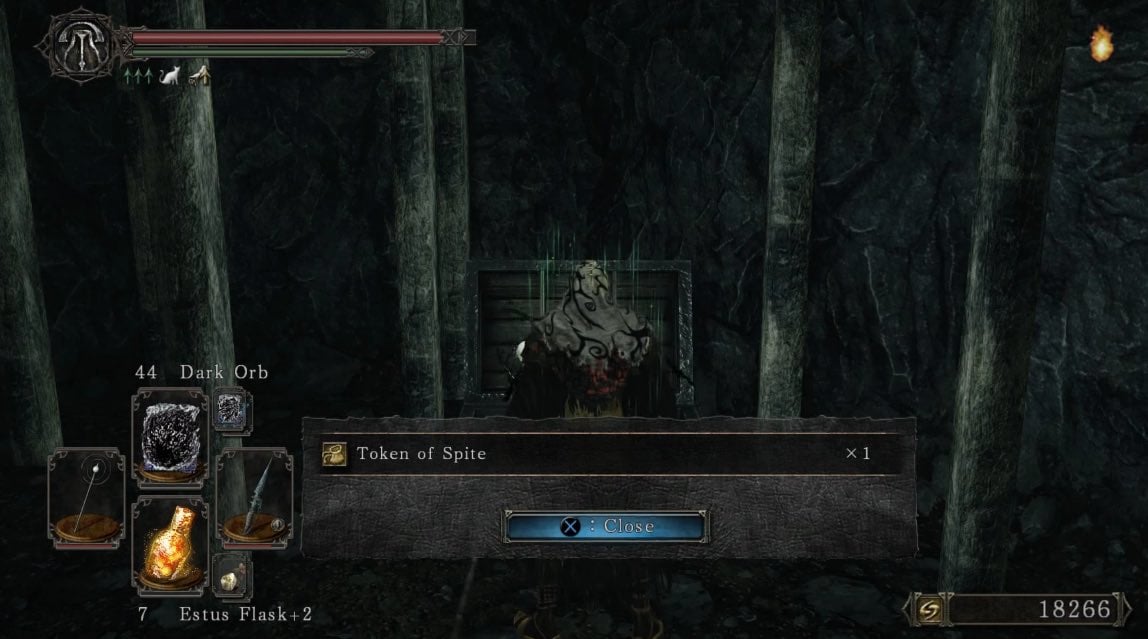
A tunnel here leads out to The Gutter. Bring torches.
General Information
- Previous: Majula
- Next: The Gutter
- Boss: Royal Rat Vanguard
- Recommended Levels: 45 to 55
- Boss: Royal Rat Vanguard
- Bonfires: Harval's Resting Place, Grave Entrance
Grave of Saints Map
NPCs in the Grave of Saints
- Head Bell Keeper Puppet
- Drifter Swordsman Aidel (NPC Summon)
Items
Consumables- Repair Powder
- Large Soul of a Nameless Soldier
- Warmth
- Small Smooth & Silky Stone
- Homeward Bone x3
- Poison Moss x2
- Whisper of Despair
- Torch x1
- Pharros' Lockstone
- Great Heal
- Armor Of Aurous(Random drop from Rhoy)
- Ash Knuckle Ring
Enemies
- Hollows
- Plagued Rats
- Rhoy the Explorer (Scripted Invasion)
- Undead Citizen (Mummies)
- Crystal Lizard - near/on rope bridge at the end of the level
Boss
Notes
- If the player has already joined the Rat King Covenant via the Rat King in the Doors of Pharros, after defeating the Royal Rat Authority boss, then no enemies will be hostile towards the player in this zone. Nor will the Dark Spirit Rhoy the Explorer invade the player.
- Using a Bonfire Ascetic on the first bonfire here (Harvel's Resting Place) will respawn the Dark Spirit Rhoy the Explorer. Doing this makes Rhoy a useful target to farm Awestones.
- The tunnel with water, opposite the one with Great Heal, will contain 2x Phantoms, 1x Lightning Mage, and 2x Knights, in NG+
Grave of Saints Walkthrough
Start to Rhoy Invasion
After coming into the area from The Pit in Majula, the first bonfire, Harval's Resting Place will be an obvious find. A Hollow stands by the entrance to a large chamber. Kill him before he sneaks up on you. The large chamber has a dry fountain in the middle due to a hole in the base. There is treasure and a very interesting looking skeleton in the fountain but you can't access this area yet. More importantly, upon entering, several Rats will sneak out of small holes around the room and attack. Individually they should pose no threat, however, groups can be dangerous and cause poisoning. Inside this chamber is a skeleton with a Large Soul of a Nameless Solider.
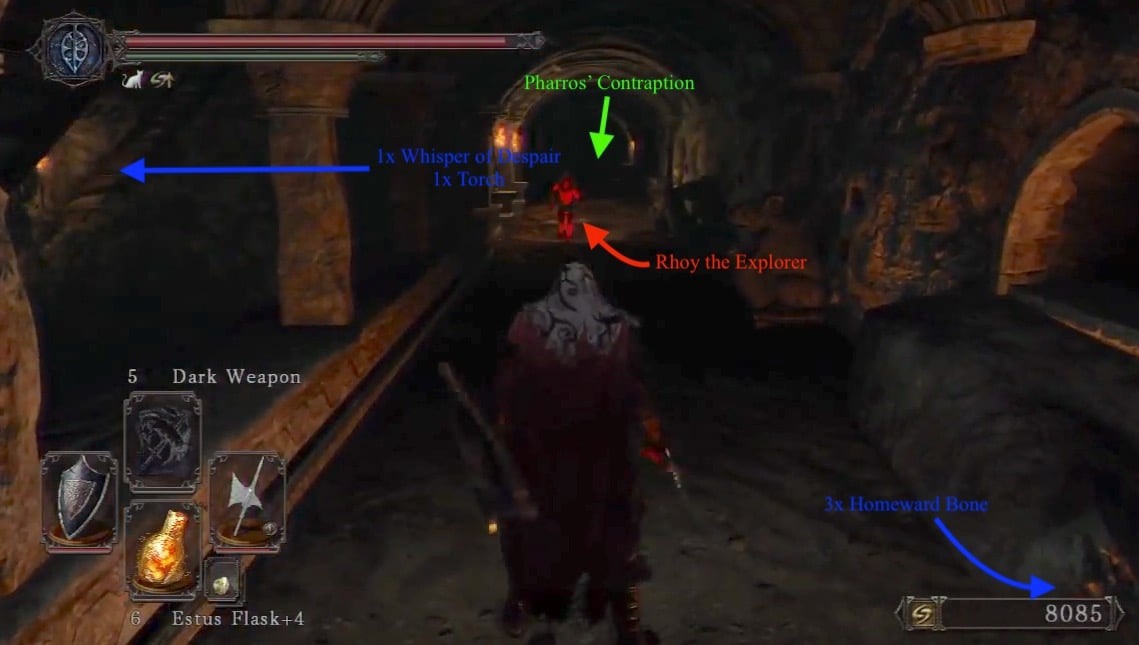
Exiting via a small stair leads up to a hall area where you can immediately identify a Pharros' Lockstone face on the floor, which opens a bridge right next to it. This is about the only worthwhile Contraption, if you have no interest in joining the Rat Covenant. Activate it and cross the bridge to arrive at a large room with filled with petrified rats, and a small group of live ones crawl out. There is a corpse with 2x Poison Moss, a set of stairs up, and a skeleton with Whisper of Despair and a Torch.
This ends with a door, blocked with a bridge like the one you just crossed that can be lowered with another Pharros' Lockstone on the floor above. However, we recommend against wasting a lockstone here, as you will be reaching the area across later. Heading back to the hall where you lowered the bridge, the right hand side (left hand from the stairs) ends with a Abandoned Hollow just hanging about, and a corpse with holding a whopping 3x Small Smooth & Silky Stone. Heading in the other direction, you will come to a Pharros' Lockstone face in the wall and a ladder. This one creates a waterfall that obscures vision and extinguishes torches and is intended to help Rat King Covenant members, as are the majority of Lockstones in this area.
Rhoy to Royal Rat Boss
Heading up the ladder will trigger the scripted invasion of Rhoy the Explorer. Here's what you need to know:
- He is relatively fast but is not a tremendous threat on his own; allowing rats to join the fray does cause problems as they will fall and crawl to sneak up on you.
- He drops a random piece of equipment when killed:
- Shotel +5
- Armor of Aurous Warmth (pyromancy)
- Heavy Crossbow +5
- You need to play offline for Rhoy the Explorer to invade you, otherwise you won't get invaded.
The Rat King
After defeating Roy, you can inspect this new section, which mostly looks like the floor below but with several Pharros' Lockstone holes. The one in the floor right away lowers the bridge mentioned earlier -I wouldn't use it. Moving to the left leads to a tomb with a giant skeleton. A smaller skeleton in this area holds 3x Homeward Bone. Other lockstones will create acid pools that damage armor; these are more traps to help covenant members. Heading to the other direction leads to a the Grave Entrance bonfire and mist door, while the door leads to the boss fight.
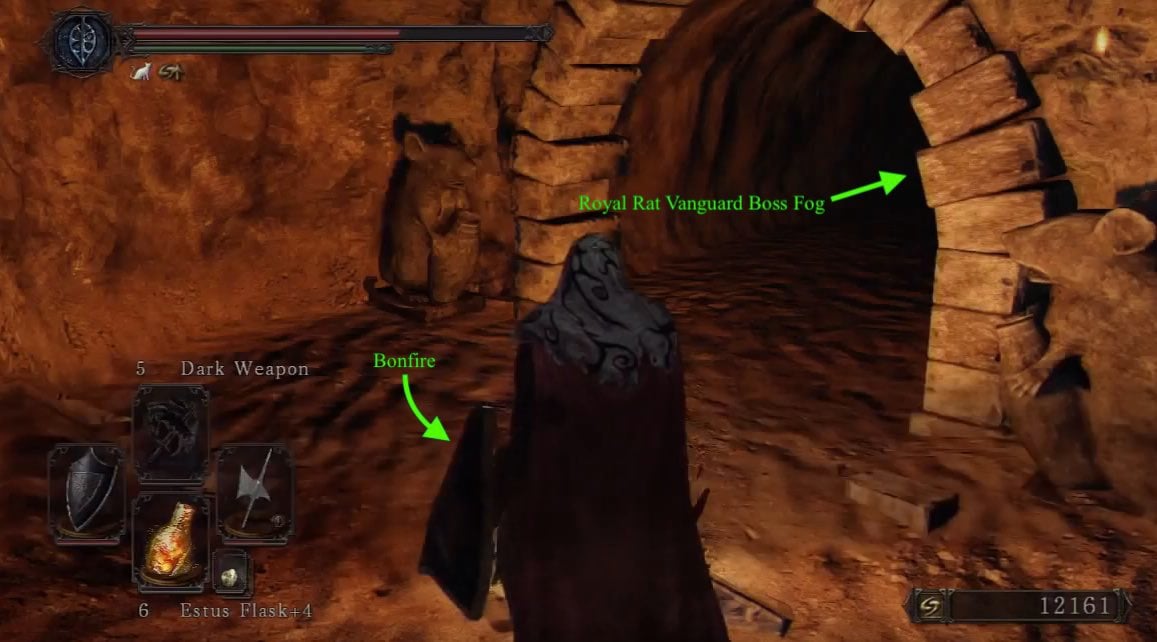
From the bonfire, there is also a direct passage to the boss fog.
BOSS FIGHT: Royal Rat Vanguard
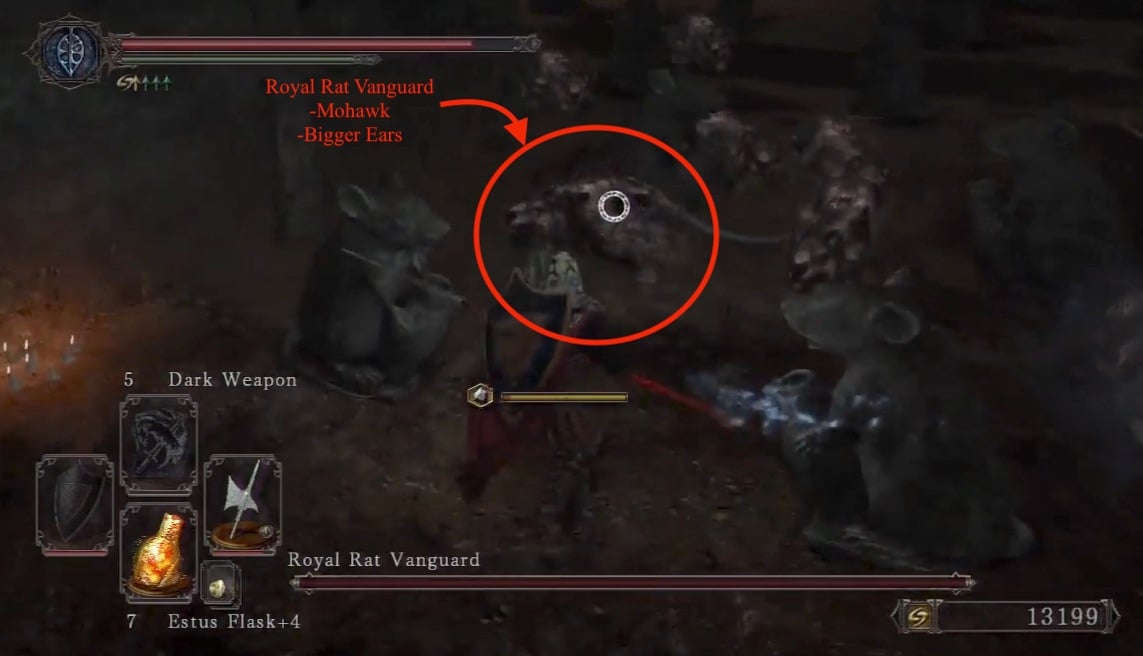
Getting to the Wooden Bridge
After defeating the boss the room leads to a door and The Rat King who will respect the murdering of his Vanguard and allows you to join the Rat King Covenant. You are given the ring Crest of the Rat. If you have entered the covenant the area rats and hollows will no longer attack you as you are now one of them.
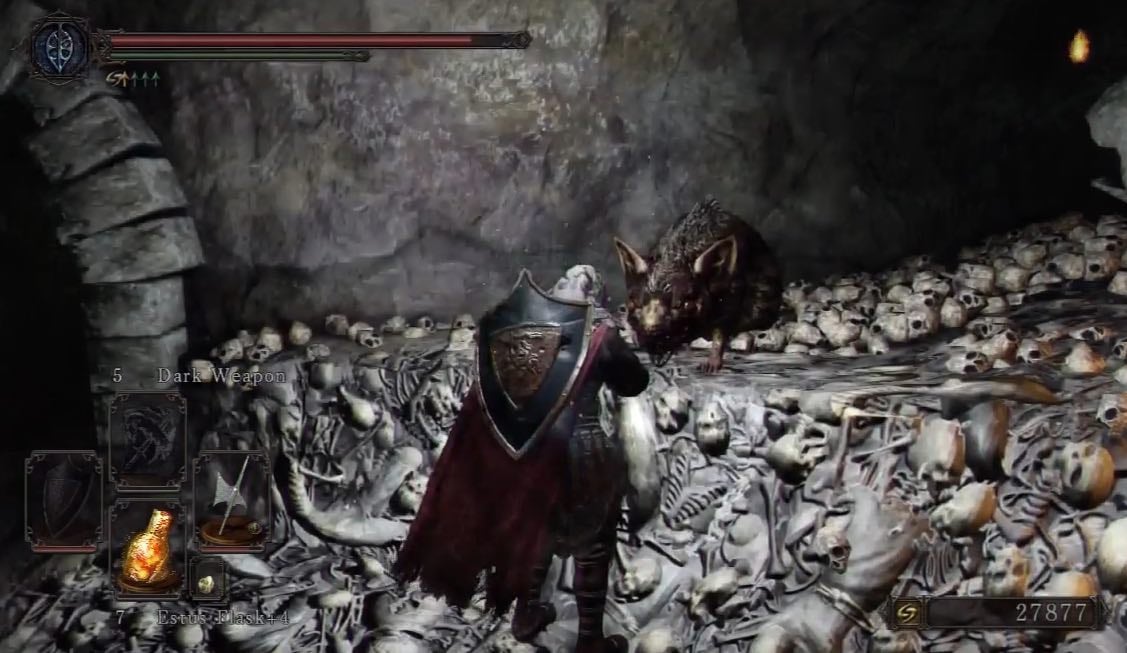
A hole in the floor after The Rat King drops down to the center fountain which was inaccessible before. Take a look at the very interesting skeleton before you do. There's nothing that happens but it's a nice touch. Below is a corpse with a Pharros' lockstone. The only way out is down which leads to a pit with coffins jutting out as ledges to jump down. This leads to a stone bridge above a broken wooden one.
Heading to The Gutter
If you're quick enough, the broken wooden bridge holds a Crystal Lizard. Note that there's a separate access to The Gutter area from The Pit in Majula, and the Crystal Lizard is fairly easy to get from this entry. The skeleton on the bridge also holds a Bleed Stone. You can jump from the bridge to a small ledge with a corpse yields the Disc Chime. Alternately, drop down to the wooden bridge below. On one end of the wooden bridge past the gap is a chest containing Ash Knuckle Ring. Get a good running start and jump over.
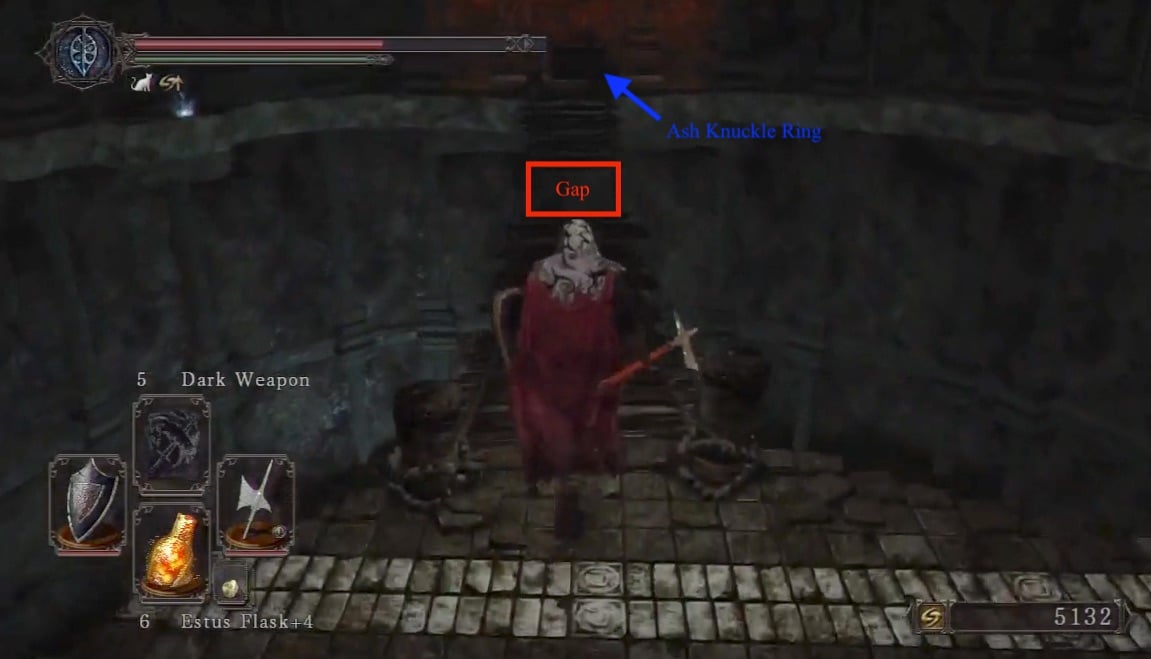
Note: The stairway on the other end of the bridge leads back to an entrance ledge in The Pit in Majula. Another Crystal Lizard will also spawn on the stairs just before the bridge. It will run across the bridge and fall through the hole, so make sure to kill it quickly.
Jumping down from either the Disc Chime ledge or the wooden bridge, will land you in a water pit. Get out of water as it slows your movement and six exploding Rupturing Hollows are waiting in the two tunnels to the sides. Another thing to note is if you hang out on the wooden bridge for a while, before jumping down, Rupturing Hollows will come out for you to snipe. One tunnel has water and the other does not. The one with water contains a Skeleton with Great Heal.
The other tunnel has a ladder and scaffolding further down. After the first drop...you're down there. You can't reach the ladder again. There are two choices down. When facing the ladder, a ladder to the left leads to another ladder and a corpse with a Human Effigy.
The other direction leads to ladders down, passing a corpse with a Radiant Lifegem, near the bottom. Make sure to find this, as there is then another ladder with no way back up. A chest at the base holds a Token of Spite.
A tunnel here leads out to The Gutter. Bring torches.
 Anonymous
Gilligan said “the grave of *A* saint” lies below Majula, so who’s grave is it?

 Anonymous
A word of caution to those joining rat king covenant. If you use a pharaoh lockstone to lower a bridge while summoning a player to your world and you get owned and die, you may lose progress on the bridge being dropped. Also make sure you pick up all lost souls before putting on the ring. Dying to summon Phantoms counts as a PVE death and you will lose all those souls. Learn from my mistakes friends until next time friends

 Anonymous
 Anonymous
Wasted three lockstones in this area. Used four, turned out I only really needed one.

 Anonymous
Rhoy doesn't only have random drops, he also drops just a damn effigy at times.

 Anonymous
Is this the same location as Doors of pharros? Because in my game I have that name and I defeated royal rat authority in this place

 Anonymous
You should have said bring torches when we were at the bonfire. Not at the bottom where you say there's no way up..

 Anonymous
The Grave of 5 billion ****ing pharros lockstone contraptions

 Anonymous
Rats, rats, we're the rats. We sneak at night and prey at night, weee're the rats! I'm the giant rat that makes all of the ruuules. Let's see what kind of trouble we can get ourselves into!

 Anonymous
be careful of the camera, walking by random pillars and corners will twist it around and make you walk off the edge into the water. it sucks

 Anonymous
what does the white water do (right before the main ladder) I thought it was breakage but it doesn't (maybe only to invaders idk), I'm just wondering if it's for cover or actually useful. Thank you for the help

 Anonymous
boss in ths area provides leveling exploit. Just keep killing the rats..ignore the boss rat. They are slow, so if you are out of resources, you can easily port out..

 Anonymous
So Im with the Way of the Blue. And trying to kill everything 12 times. And notice this place is endless. no matter how many times I do it they enemys are always there to kill. What happen to 12 kill and no more respawn.

 Anonymous
I didn't even know there was one particular rat I had to hit on the boss, just swung wildly until everyone left.

 Anonymous
Highly recommend to explore Grave of Saints after Doors where you can join Rat covenant. Just walk through pick up all items kill area boss and be done with it.

 Anonymous
I like how at the end it end with a sentences....bring torches

 Anonymous
how many crystal lizards are here? one or two? i'm a bit confysed from the guide.

 Anonymous
So every time I use great resonant soul (hex) I loose 500 souls. Idk if is the same for all hexes

 Anonymous
in '' wooden bridge to the gutter" section of the guide, how many crystal lizards are there? one or two? i'm a bit confused from the guide.

 Anonymous
Can someone fix the broken maps on all these pages or something?


Grave of sword saint
4
+11
-1