Heide's Tower of Flame
 Heide's Tower of Flame is a location in Dark Souls 2. This is an overview of this area.
General Information
- Previous: Forest of Fallen Giants
- Next: Cathedral of Blue / No-Man's Wharf
- Recommended Levels: 30 to 40
- Bosses: Dragonrider
- Bonfires: Heide's Ruin, Tower of Flame
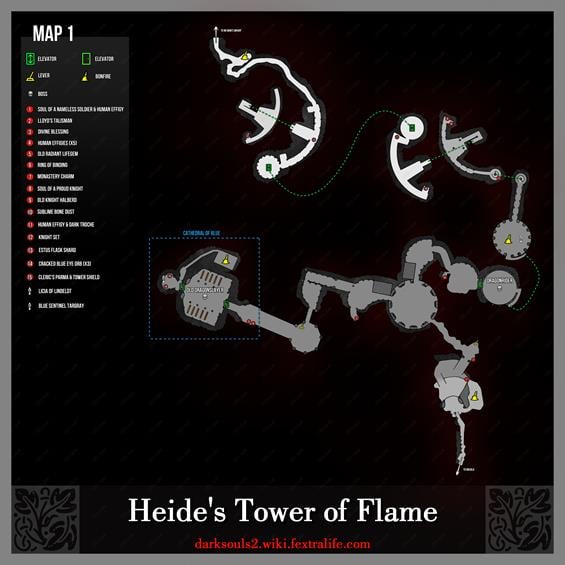
Heide's Tower of Flame Map
NPCs in the Heide's Tower of Flame
Licia of Lindeldt
Items
Consumables- Sublime Bone Dust
- Human Effigy x2
- Divine Blessing x1
- Soul of a Nameless Soldier x1
- Old Radiant Lifegem x1
- Dark Troches x1
- Soul of a Proud Knight x1
- Estus Flask Shard x1
- Petrified Dragon Bone x1
- Monastery Charm x1
- Lloyd's Talisman x1
Enemies
Boss
New Game+ Enemies
- Black Phantoms
Notes
- Once the Dragonrider is slain, the Heide Knight's in the area will no longer sit around, and will patrol areas near their original resting place. They have incredibly long aggro ranges, and you should be able to pull them into clearings without also getting the Old Knight's.
- Very common area for invasions.
- Most enemies can be sprinted past easily, save for the two on either side of the fog.
Heide's Tower of Flame Walkthrough
Accessing from Majula
To the left of the cliff where the Victor’s Stone is, there is a large stone archway, with a staircase going down a tunnel. Coming to a circular room, there is a pillar in the center with a symbol on it. Examining it mentions that the the contraption does not move. Licia of Lindeldt is able to later open a path to Huntsman's Copse after encountering her in Heide's Tower of Flame.
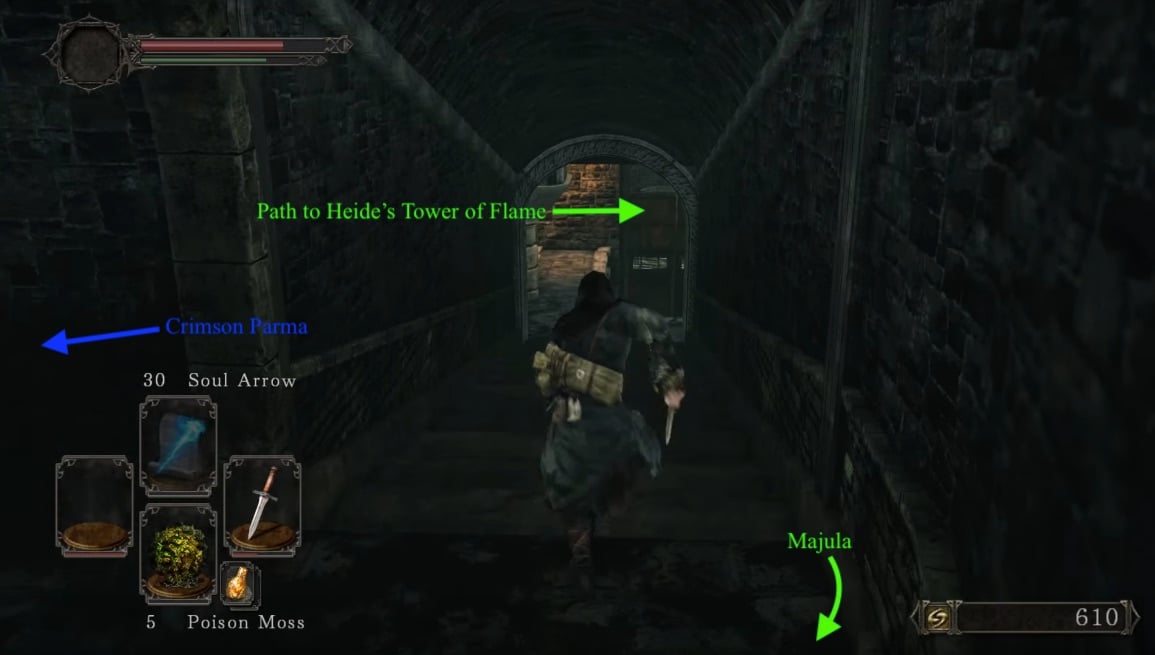
Going to the right down the hallways to a spiral staircase, on the left there is a chest with Crimson Parma. Continuing down the stairs takes you to a room which will bring you to a pull chain on the ledge on the left, which raises the big door below. Going through the door leads to a waterway, and up the stairs is another pull chain to open the door should you wish to go back and further on a corpse with Soul of a Lost Undead and Broken Thief Sword. Going down the hallway takes you to the entrance of Heide's Tower of Flame.
Abundance of Old Knights
As you enter through the waterway from Majula, you are greeted with a beautiful vista of the flooded towers and sprawling walkways. On your left, as soon as you exit, is a Heide Knight sitting. He won't aggro until you kill the boss of the area. Straight ahead is a round platform with a Old Knight wielding a large greatsword, but you may find a staircase to the right which leads down to a bonfire, just before him. Going straight up the stairs you encounter a mace wielding Old Knight. Behind, draped along the railing is a corpse with a Soul of a Nameless Soldier and a Human Effigy. There is also a Heide Knight resting in the area, which as mentioned earlier, won't engage you unless you engage it first or after you kill the Dragonrider.
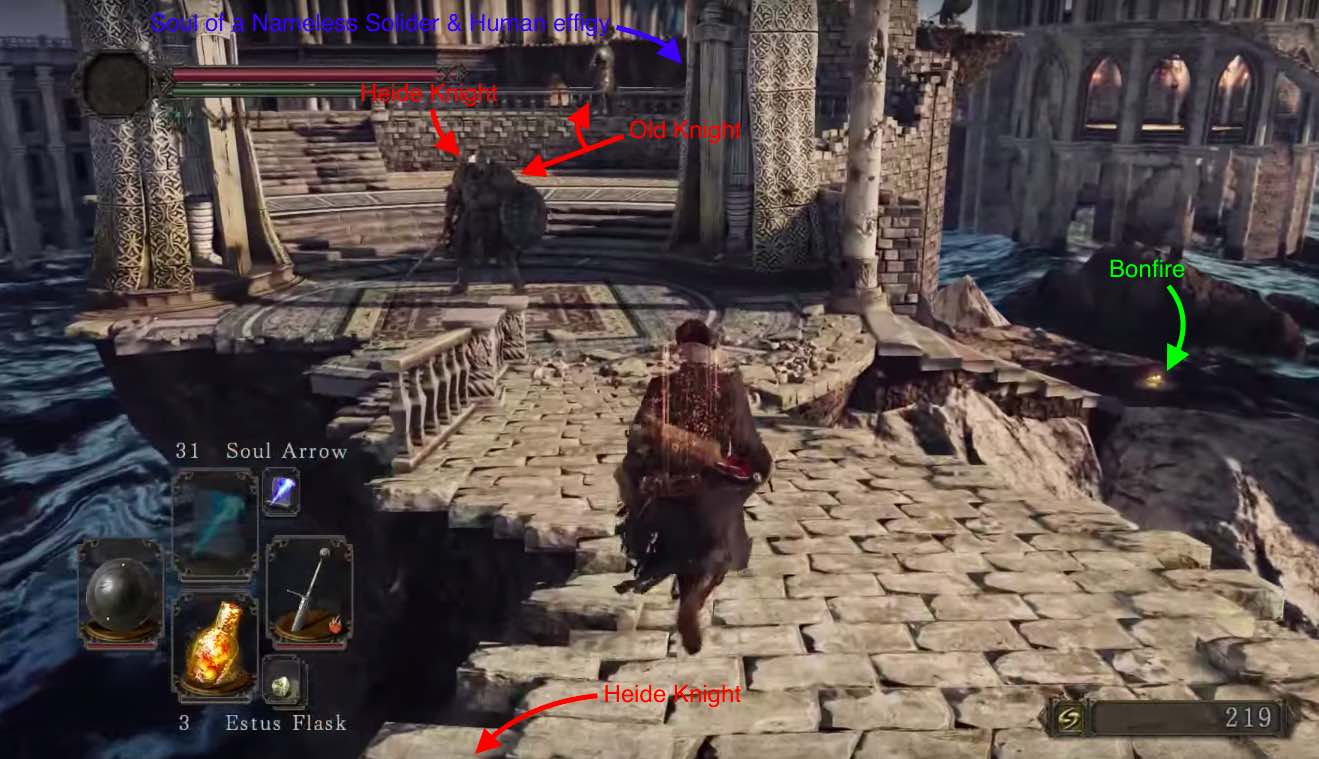
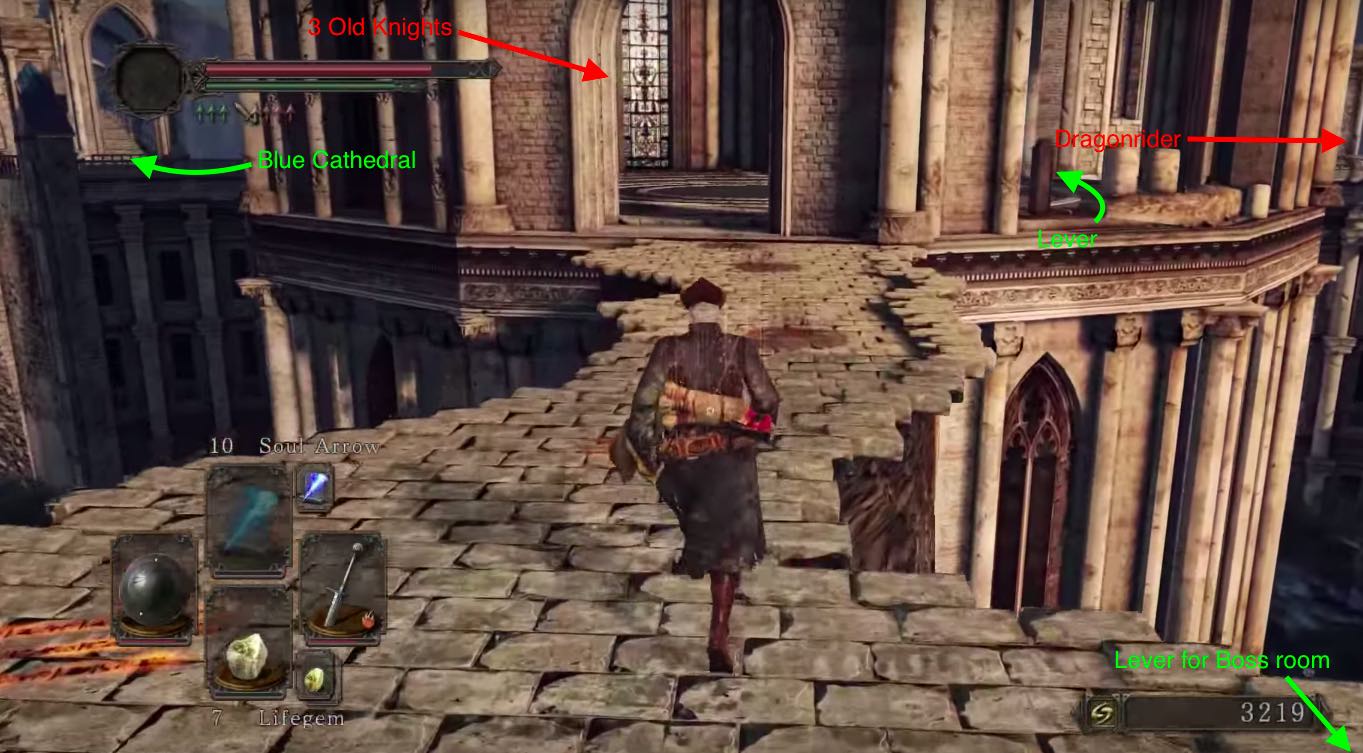
Proceeding upstairs bring you through an archway another platform with an Old Knight who wields a greatsword and shield. After killing him, approach the contraption in the ground raising a post with a lever. Pulling the lever raises the outer ring of the platform on the tower directly across from the lever. Laying in front of one of the columns of the arch is a corpse with a Lloyd’s Talisman. Going left from the lever leads across a long walkway and into a tower where three Old Knights wait.
This can be a fairly difficult fight early in the game, and it's advisable to lure the middle Old Knight wielding a greatsword out onto the walkway first. The other two Old Knights are happy to wait for you to dispatch the first one, but will both try to rush you together once their comrade is dead. A good way to deal with this encounter in melee is to get close enough to provoke both into attacking at the same time. These Old Knights almost always use the same three-slash attack pattern, and dodging around both of them while they do this will give you some openings. Alternatively, if you can manage to lure them onto a ledge then knock them down, it would make for an easier confrontation. After dealing with these three nuisances. a lever pop out the ground on the right of the entrance in this tower. You can proceed down either side of the tower.
To the Dragonslayer
Going to the left brings you to an encounter with another Old Knight and an always hostile Heide Knight. (In NG+. 3 Black Phantoms wielding a Halberd guard the way, once killed, each of them drop a Cracked Blue Eye Orb and a Token of Fidelity). On the left, you'll find a broken dead-end staircase that leads down close to the water. At the bottom of these stairs you'll find a corpse with a Divine Blessing. Straight ahead of where you entered, a stairway up to another level and another Heide Knight await. A shade summon-sign for Devotee Scarlett can be found on the right before the stairway, but only if you have summoned her before at Earthen Peak After passing a railing-less platform, you will encounter the Dragon. The easiest way to kill it is using a bow from the lower area, although you can guess that this may be very tedious and may take a while.
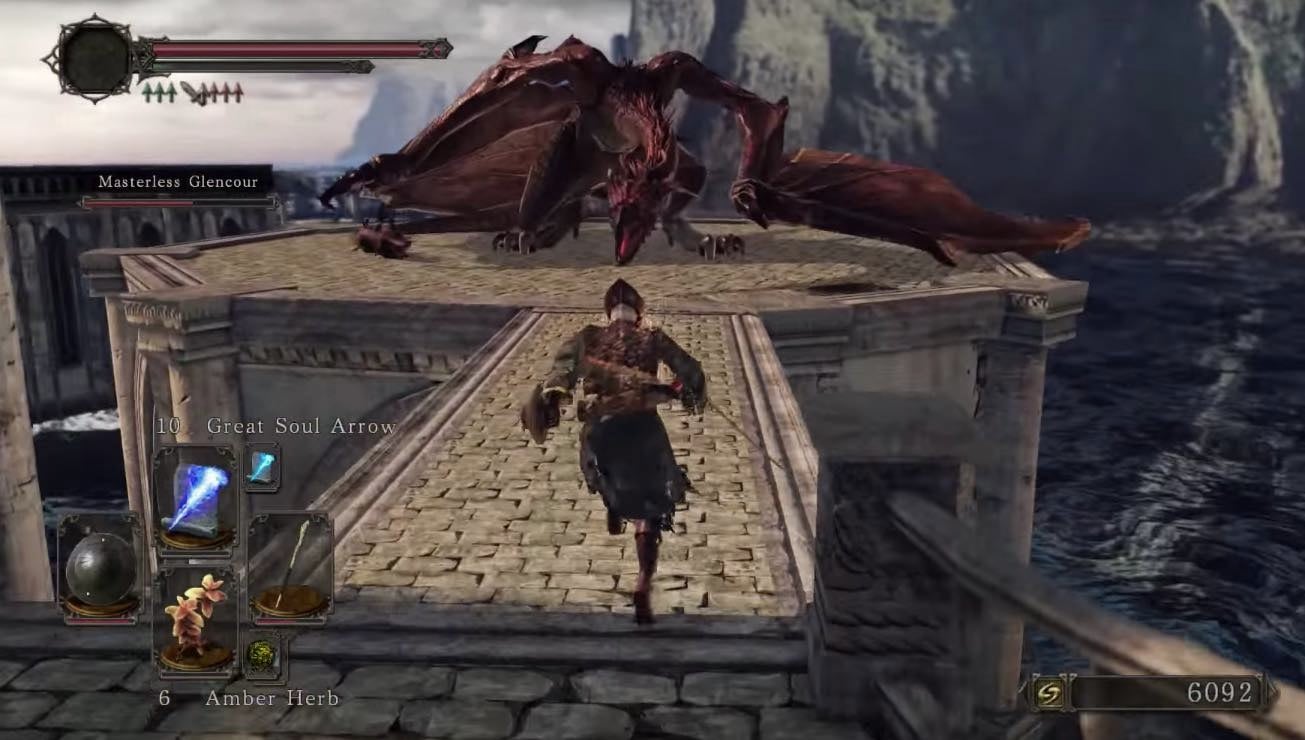
Once defeated, it will drop a Petrified Dragon Bone and a Watchdragon Parma. On the platform where the dragon was is another contraption which raises when you approach. Pulling the lever lowers the bridge allowing the player access to the Cathedral of Blue and face off against the Old Dragonslayer.
To the Dragonrider
Going to the right leads to a walkway with a Heide Knight sitting against the railing, and a staircase down to another platform and an Old Knight. (In NG+. a Black Phantom with a Chariot Lance appears on the platform, it drops a Token of Spite when killed). On this lower platform, you'll find a Heide Knight resting on a chest containing the Ring of Binding, and the mist straight ahead. Going through the mist will take you to the fight with Dragonrider Boss. If you are in human form you can summon an NPC phantom named Masterless Glencour; there is an NPC summon sign outside and to the right of the boss mist.
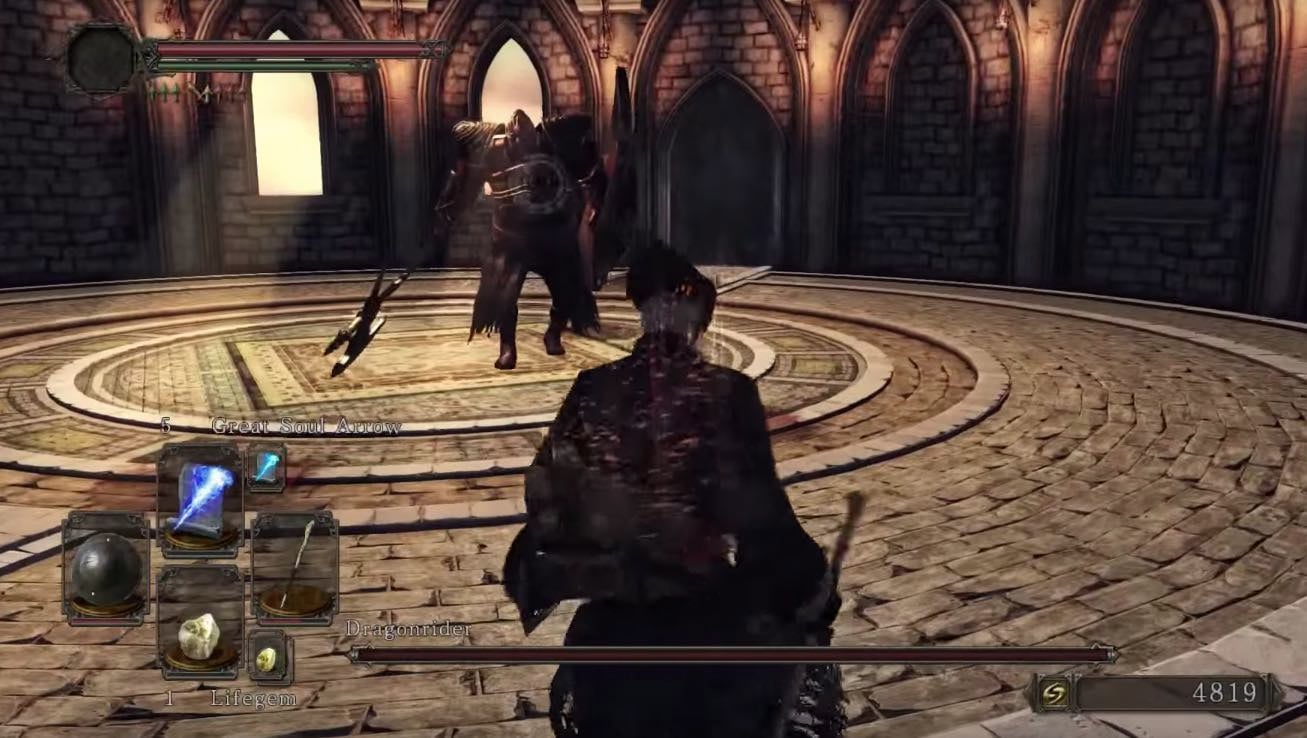
BOSS FIGHT: Dragonrider
A few notable things about this boss fight:
- He wields a halberd and greatshield.
- He is not particularly fast and becomes a timing pattern easily dispatched.
- Circling around to his back will keep you safe from his sweep attacks and leaves him open for attack.
- He can be staggered after several hits.
- He can also be attacked via bow if you aim at him from where the first lever appears. Once you have gotten him to almost zero health he will turn around and face you with his shield. Once he does this all it is is a matter of getting to him. He should die with just one hit.
To No Man's Wharf
After killing boss, proceed through the doorway and up the stairs. You come to a platform inside the tower with a bonfire. Nearby is the merchant NPC Licia of Lindeldt who sells miracles. After you exhaust her dialogue, she will move to Majula, in the room with the mysterious contraption, and can open the path to Huntsman's Copse. She will also give you the Saint's Set and the Idol's Charm, if your faith is up to level 30.
You can kill her however, and when you leave and reload, you''ll find the Idol's Chime and Rotunda Lockstone in her place.
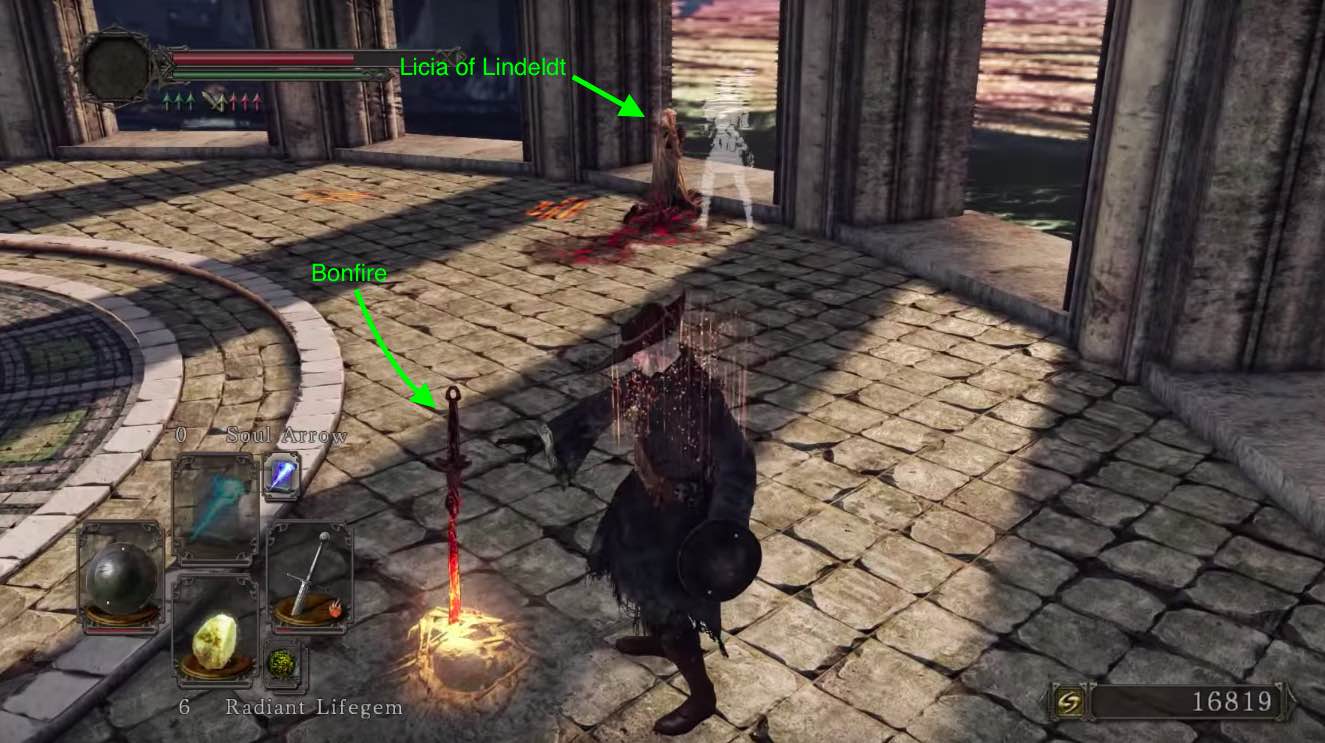
From the tower, exit straight onto a walkway and into another tower with a spiral staircase. Descend down and hidden behind the staircase is a corpse with a Monastery Charm. Go through the doorway and down the hall.
On your right the hallway opens up and you meet an Old Knight guarding a doorway. Kill the Old Knight and continue straight to the end of the hall where you find a corpse hanging over the railing with a Human Effigy and a Dark Troche. Close by are two corpses with a Soul of a Proud Knight and an Old Knight Halberd. Go back down the hall and into the doorway the Old Knight had been guarding.
Down the flights of stairs brings you to the next level down. Going left leads to a dead end where a Syan Soldier protects a metal chest that contains 1x Sublime Bone Dust. To the right is a hallway which leads to a round room with a pressure plate elevator in the center. Stand on the plate and descend to the next level down.
At the bottom, head out into the flooded corridors, passing the first small alcove to find a larger area to your left. This area holds a Basilisk and a few Hollow Infantry that rise up from the waters. There is a doorway behind these enemies that is blocked by a petrified enemy. If you unpetrify it and go up the stairs you will find a Primal Knight and a corridor. A body hang on the railing and it holds 1x Estus Flask Shard, going left leads to a dead end at an iron door. Going right to the end of the hallway brings you to an iron chest in the alcove to the right which contains the Knight Set of armor.
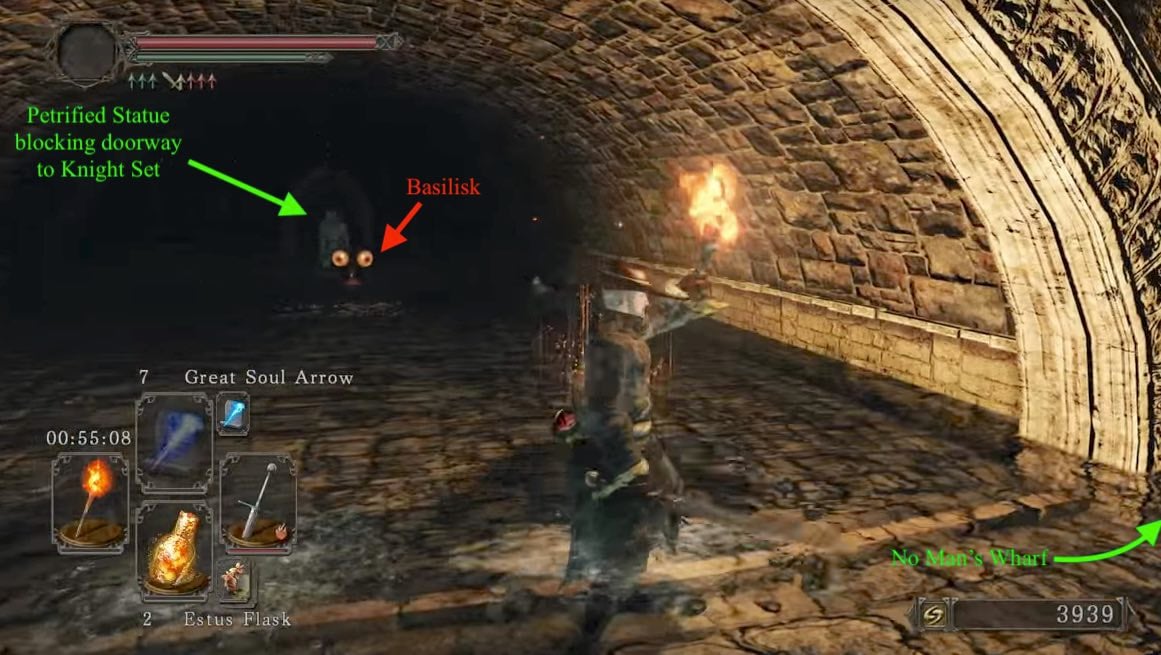
Continue and at the end of the hallway, a knocked out hole in the wall leads to path and a bonfire. Continuing on from here will bring you to No-Man’s Wharf.
General Information
- Previous: Forest of Fallen Giants
- Next: Cathedral of Blue / No-Man's Wharf
- Recommended Levels: 30-40
- Bosses: Dragonrider
- Bonfires: Heide's Ruin, Tower of Flame
Heide's Tower of Flame Map
NPCs in the Heide's Tower of Flame
Licia of Lindeldt
Items
Consumables- Sublime Bone Dust
- Human Effigy x7
- Divine Blessing x1
- Green Blossom x3
- Soul of a Nameless Soldier x1
- Lloyd's Talisman x1
- Old Radiant Lifegem x1
- Cracked Blue Eye Orb x3
- Monastery Charm x1
- Dark Troches x1
- Soul of a Proud Knight x1
Enemies
Bosses
New Game+ Enemies
- Black Phantoms (NG+)
Notes
- Very common area for invasions.
- Most enemies can be sprinted past easily, save for the two on either side of the fog.
Heide's Tower of Flame Walkthrough
Accessing from Majula
To the left of the cliff where the Victor’s Stone is, there is a large stone archway, with a staircase going down a tunnel. Coming to a circular room, there is a pillar in the center with a symbol on it. Examining it mentions that the the contraption does not move. Licia of Lindeldt is able to later open a path to Huntsman's Copse after encountering her in Heide's Tower of Flame.

Going to the right down the hallways to a spiral staircase, on the left there is a chest with Crimson Parma. Continuing down the stairs takes you to a room which will bring you to a pull chain on the ledge on the left, which raises the big door below. Going through the door leads to a waterway, and up the stairs is another pull chain to open the door should you wish to go back and further on a corpse with Soul of a Lost Undead and Broken Thief Sword. Going down the hallway takes you to the entrance of Heide's Tower of Flame.
Abundance of Old Knights
As you enter through the waterway from Majula, you are greeted with a beautiful vista of the flooded towers and sprawling walkways. Straight ahead is a round platform with an Old Knight wielding a large greatsword. Just before confronting him, there is a staircase to the right which leads down to the first bonfire of the area. After passing the first enemy, head straight up the stairs to encounter another one. Killing him guarantees a Sublime Bone Dust drop, and he does not respawn (his drop will also disappear if you are killed before picking it up, preventing development of your Estus Flask). On the right, draped along the railing is a corpse with a Soul of a Nameless Soldier and a Human Effigy.
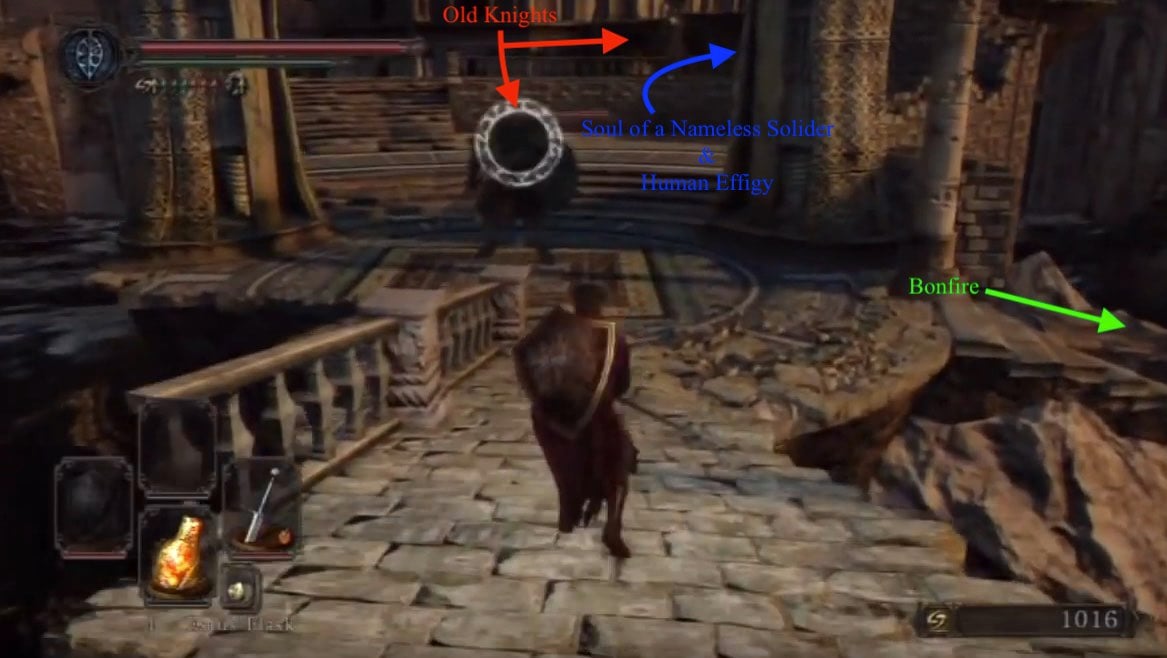
Proceeding upstairs bring you through an archway another platform with yet another Old Knight who wields a greatsword and shield. Approaching the cliff directly in front of the arc, will raise a post with a lever, from the ground. Pulling the lever raises the outer ring of the platform on the tower directly across from the lever. Laying in front of the right column of the arch you've just come from is a corpse with Lloyd’s Talisman. Continue down the long walkway to enter a tower base where three more Old Knights await.
This can be a fairly difficult fight early in the game, and it's advisable to lure the middle Old Knight wielding a greatsword out onto the walkway first. The other two Old Knights are happy to wait for you to dispatch the first one, but will both try to rush you together once their comrade is dead. A good way to deal with this encounter in melee is to get close enough to provoke both into attacking at the same time. These Old Knights almost always use the same three-slash attack pattern, and dodging around both of them while they do this will give you some openings. Alternatively, if you can manage to lure them onto a ledge then knock them down, it would make for an easier confrontation. After dealing with these three nuisances. a lever pop out the ground on the right of the entrance in this tower. You can proceed down either side of the tower.
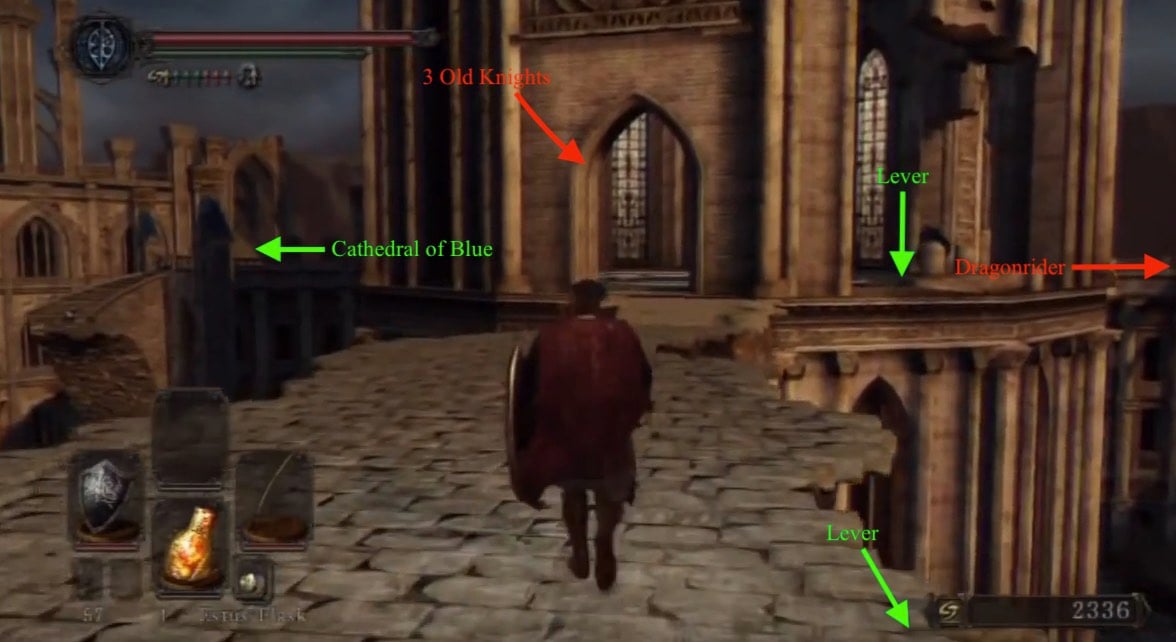
To the Dragonslayer
Going to the left will bring you to two more Old Knights. (In NG+. 3 Black Phantoms wielding a Halberd guard the way, once killed, each of them drop a Cracked Blue Eye Orb and a Token of Fidelity). On the left of this area, you'll find a broken dead-end staircase that leads down close to the water. At the bottom of these stairs you'll find a corpse with a Divine Blessing.
Straight ahead of where you entered is a stairway up to another level and into a railing-less platform with a Old Knight who wields a sword and shield. On the platform is another contraption, which also raises when you approach. Pulling the lever lowers the bridge allowing the player access to the Cathedral of Blue and Old Dragonslayer Boss fight. At the top of the bridge on the left is a corpse with an Old Radiant Lifegem and an iron chest containing a Ring of Binding and 5x Human Effigies.
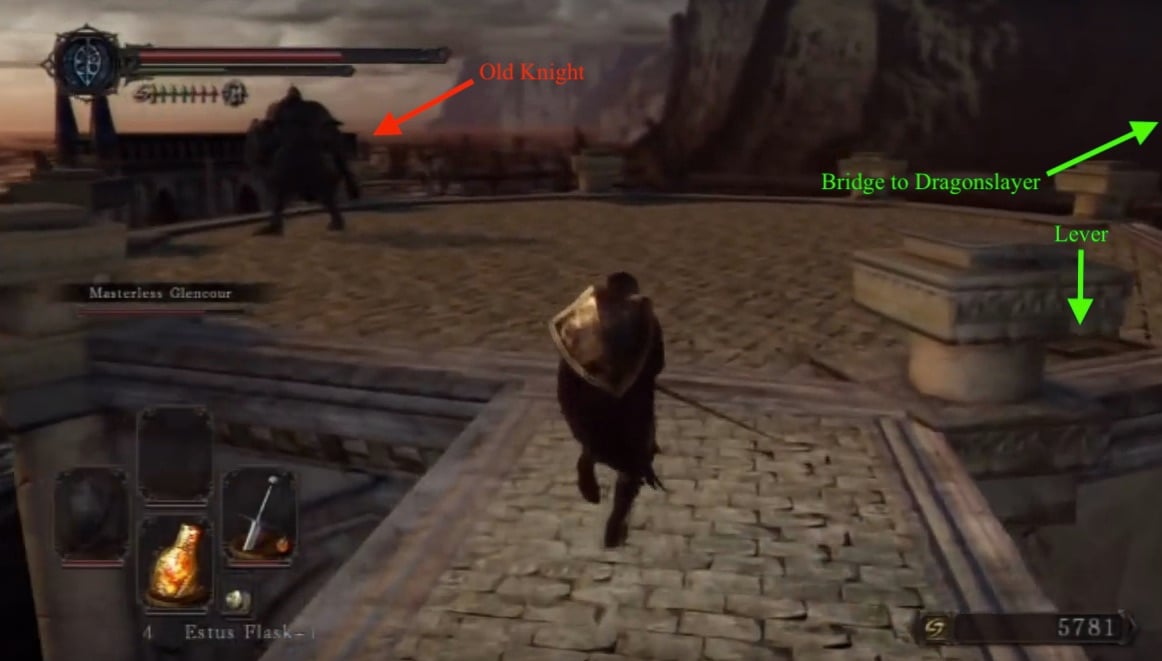
To the Dragonrider
Going to the right leads to a walkway and a staircase down to another platform and a sentinel. (In NG+. a Black Phantom with a chariot lance appears on the platform, it drops a Token of Spite when killed). The chest on the right contains 3x Green Blossom. Going through the mist takes you to the boss of this area; if you are in human form, you can summon an NPC phantom named Masterless Glencour right outside the mist.
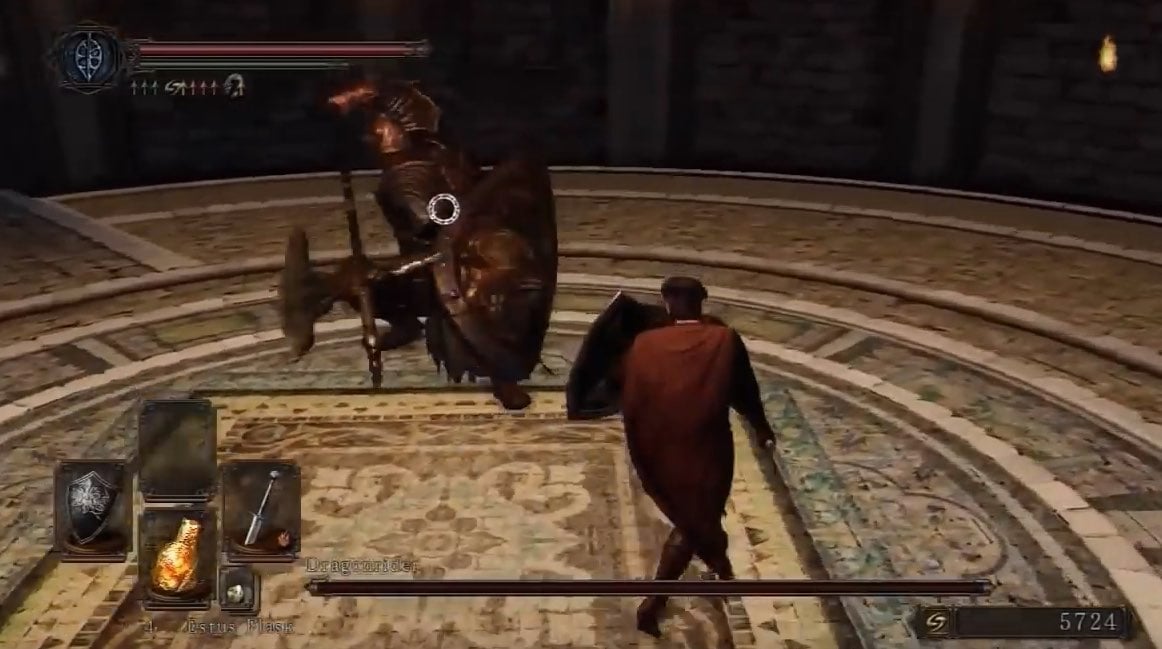
BOSS FIGHT: Dragonrider
A few notable things about this boss fight:
- He wields a halberd and greatshield.
- He is not particularly fast and becomes a timing pattern easily dispatched.
- Circling around to his back will keep you safe from his sweep attacks and leaves him open for attack.
- He can be staggered after several hits.
- He can also be attacked via bow if you aim at him from where the first lever appears. Once you have gotten him to almost zero health he will turn around and face you with his shield. Once he does this all it is is a matter of getting to him. He should die with just one hit.
To No Man's Wharf
After killing boss, proceed through the doorway and up the stairs. You come to a platform inside the tower with a bonfire. Nearby is the merchant NPC Licia of Lindeldt who sells miracles. After you exhaust her dialogue, she will move to Majula, in the room with the mysterious contraption, and can open the path to Huntsman's Copse. She will also give you the Saint's Set and the Idol's Charm, if your faith is up to level 30.
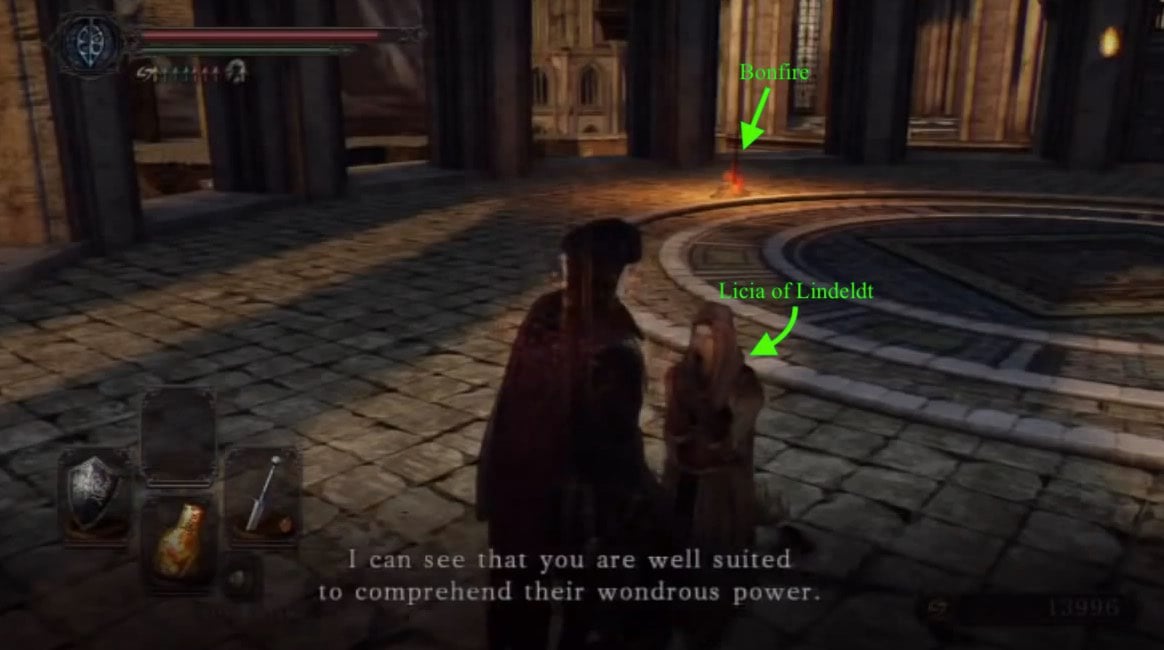
You can kill her however, and when you leave and reload, you''ll find the Idol's Chime and Rotunda Lockstone in her place.
From the tower, exit straight onto a walkway and into another tower with a spiral staircase. Descend down and hidden behind the staircase is a corpse with a Monastery Charm. Go through the doorway and down the hall.
On your right the hallway opens up and you meet an Old Knight guarding a doorway. Kill the Old Knight and continue straight to the end of the hall where you find a corpse hanging over the railing with a Human Effigy and a Dark Troche. Close by are two corpses with a Soul of a Proud Knight and an Old Knight Halberd. Go back down the hall and into the doorway the Old Knight had been guarding.
Down the flights of stairs brings you to the next level down where you encounter an Old Knight. The left passage leads to a dead end so we'll head right to find yet another Old Knight, and beyond a hallway which leads to a round room with a pressure plate elevator in the center. Stand on the plate to descend to the next level down.
At the bottom, go through the doorway into the flooded hall. An Old Knight will stand in a room on the left, in front of a doorway. Past the doorway and up the stairs, the left path leads to a dead end at an iron door. Going right to the end of the hallway brings you to an iron chest in the alcove to the right, which contains the Knight Set of armor. Go back down the stairs and return to the lowest level. Head left and at the end of the hallway, a knocked out hole in the wall leads to path and a bonfire where the NPC Lucatiel of Mirrah stands in rest against a stone spire. Continuing on will bring you to the location No-Man’s Wharf.
 Anonymous
 Anonymous
Do not burn an ascetic here to cheese dragonrider twice, youll regret it deeply later when you wanna get to the Ornstein cosplayer

 Anonymous
Cheese the dragon real quick with poison arrows from the lower area then run behind the wall when it flaps up to spit fire, you won't need a leveled up bow or anything its pretty quick and easy.

 Anonymous
If you're having trouble with this area, you can bait the knights (big and little) into falling into the water by agroing them and then standing on the small ledge directly to the left of the entrance to the three-knight room. Most of the time, the enemies will try to get to you, take a big swing, and then fall. Just keep your shield up because you may have to tank a couple of hits before the go in the drink.

 Anonymous
The trick to the watchdragon (besides plinking with 123,000 souls worth of arrows) is this: Use a ranged attack to pull the Heide knight wielding a spear down the stairs. Kill it. They are trivialized by great hammer pancake R2s, but if that's not an option, blocking with a sturdy shield and backstabbing the end of their swing-swing-lunge combo works well. Once the knight is dead and the dragon is still asleep, walk to save stamina. The instant it starts moving, sprint. Depending on your stamina economy you'll either safely reach its ankles, have to dodge roll once, or get burned but make it. Once you're at its feet it's easy. If you somehow wake the dragon, reset. Do not try to cross the platform while the dragon is awake.

 Anonymous
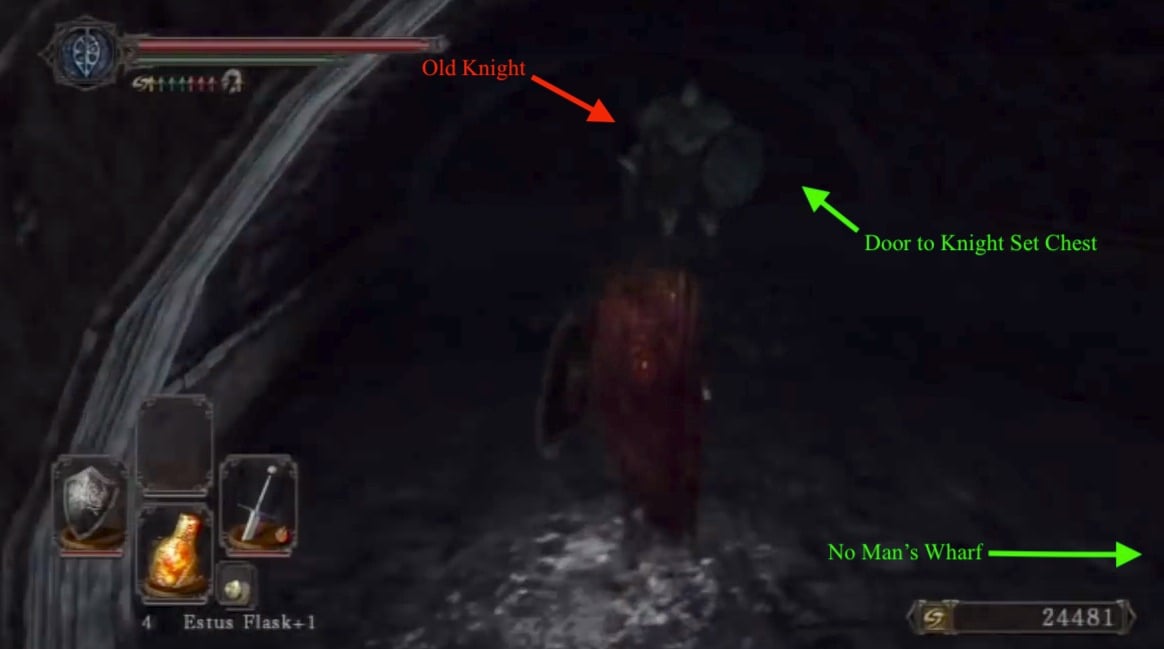
Yes, thank you for providing that picture of the player standing next to a bonfire with Lucia nearby. I was wondering what those two objects were but they are helpfully labelled.

 Anonymous
The Syan Soldier is not listed as an enemy. Somebody edit this

 Anonymous
 Anonymous
 Anonymous
 Anonymous
Masterless Glencour is another shade you can summon. He's just outside of the Dragonrider arena. I was able to summon him, clear all enemies, and kill the dragon with him. Resummoning Masterless Glencour for the Dragonslayer can also be done, and you can clear all the way to the grey mist if needed with time left for the fight (assuming the dragon has been dealt with). I found Masterless Glencour great in both fights and knocked both of them out. He's a loyal boi, so plz take care of him.

 Anonymous
If you want to farm the drip of the Heide Knights with the covenant of champions do NOT kill the Dragonrider, did that and now I have to do it NG+. It's a pain.

 Anonymous
 Anonymous
The two heide knights closest to the dragonslayer were aggro before i had killed the dragonrider. I hadnt even attacked them!

 Anonymous
A little throry about how heide sank: heide was built on a basin near the sea, with walls surrounding the coast city. one day they decided to build a monastery, and the laborers extracted the stone blocks from the caverns in the doors of pharros. Such stone was blessed (or cursed) with an endless stream of water flowing out of them. The water didn't sprout until the stone was settled so no one noticed until it was too late. Once the monastery was built, the flood came tearing the ground and walls apart. The coast city sunk under the water's added weight and the sea water entered. The blessed stone stopped sprouting clear water and everything got lost under the deep blue waters of the ocean.

 Anonymous
Here's the thing with the drake: start running straight to it from the stairs and dodge in the last second. If any enemy followed you it will be scorched. Now the drake isn't nearly as dangerous at close range, just make sure it doesn't push you off the platform.

 Anonymous
I would killing the old lion boy wake up the crusaders or is it only the dragon rider?

If you kill dragonrider before the dragon you'll make the fight and path to the dragon actual cock and ball torture

 Anonymous
The Heide knights with the swords are no sweat if you use a lance and spam R2. Don't try it on the guy near the dragon with a halberd though.

 Anonymous
 Anonymous
I'm on my second playthrough and somehow the levers are not there, not any of the three. The spot where they're supposed to be is clearly marked but the levers are missing. Does anyone know why?

 Anonymous
I find it insanely funny that a single heide knight is harder than both bosses of the area. I suppose 3 bosses if you also count the dragon. Not just this area, these knights are harder than probably like 10 bosses of the game. Imagine playing Dark Souls 1 and getting to Sen's Fortress and it being filled with Skeleton Beasts for then at the end getting the Iron Golem. This is how this area feels like.

 Anonymous
I don’t like how they redid this area tbh. There’s so many heide knights that they just feel like filler now, and the dragon feels completely out of place and shouldn’t be there.

 Anonymous
I have no idea there was a hellkite wyvern on the bridge before the old dragonslayer.
its missing on my game and is replaced with old knight guarding the lever
 Anonymous
played through sekiro bloodborne and ds1 and 3 areas in to ds2 i encounter the worst designed area ive seen in a from software game

 Anonymous
If you use arrows or bolts on the dragon it makes it easy. When he's about to fly just run away then come back and keep shooting him. Shoot the dragon where you picked up the divine blessing.

 Anonymous
****ing lame ass bullshit area. I can't even get to the dragon without having ****ing dozens of knights following me and taking away a third of my health with a single hit. I can't run past them because then when I'm fighting the dragon they just follow me and kill me, and I also can't kill them all before fighting the dragon because they all gang up on me and kill me in a few hits even though I have 1,300 health and decent armor. And I don't have the estus and lifegems to waste just to ****ing tank their hits so I can fight the ****ing dragon. No wonder people say this is the worst Dark Souls, the PvE in this is bullshit and feels like ****. I've played through every ****ing soulsborne game other than this one but it's just such a boring bullshit slog. Guess I'm skipping on this game.

 Anonymous
If you miss the watchdragon parma you must burn an ascetic at heide's ruin to revive the drake

 Anonymous
the dragon is bullshit he flies up then breathes undodgable fire that hits you THREE times and kills you what the **** b team

 Anonymous
Killing all enemies permanently spawns an iron chest near ornstein with 5 human effigies next to the corpse infront of the fog wall

 Anonymous
For the area with the three knights: shoot the *right* knight with your bow. This will aggro the middle two-handed knight and the right one which you shot. The middle one will reach you much before the right one, so that you have some time. As soon as you kill the two-hander knight, the left one will aggro. This way, you get them singled out with a bit of a breather in between. Much easier than taking two at once.

 Anonymous
The draong isn't THAT hard, you don't really need to snipe him (though that is an infallible way if you can do it), if you get under his legs he just stomps like the last giant and occacionally flies and shoot fire. I don't know how to avoid that attack but at base hp (Saint) I could just power through it with estus flask (You probably won't need it for anything else, just be careful of standing near the ledges because it can push you to death

So..I killed the Hellkite dragon with my bow and later on soul arrows. And the item drop fell in the water. Please tell me there's some other way to get the drops without going into NG+ or using a Bonfire Ascesic to maybe force a respawn.

 Anonymous
I just looked it up and "Heide" is pronounced something like "h-eye-de" (ˈhaidə). It's a german word and it means "pagan". In the japanese version of the game it's spelled ハイデ (ha-i-de).

 Anonymous
Hi, I have the SoTFS and finished all three DLC's on PC (Steam) , yet the drake and heide tower doesn't appear on my game why?

 Anonymous
PS4 SotFS, Just downloaded from PSN. This is my first time playing on PS4. Still a piece of cake to get Dragonrider to jump off the ledge. Start with Bonfire Ascetic and you can do it twice in a row. That's a good boost at the beginning of the game.

 Anonymous
It says: " If you are human, there is summon sign for a shade in that area." But I cannot find any summoning sign on that area (going to Dragonslayer) . Am I missing something?

 Anonymous
the dragon isnt there for me. if you kill the dragonrider then go back does it despawn?

 Anonymous
 Anonymous
who are the little crusader looking dudes who are really easy to parry?

 Anonymous
 Anonymous
 Anonymous
The freaking mace-wielding sentinel DOES respawn (on SotFS), much to my repeated dismay.

The bird-head statues that everyone has talked about remind me of greek mythos. Zeus (god of lightning/gwyn's real-life myth) has a sacred animal form of an eagle. The statue heads are that of an eagle's. Also, the guard for their swords has a slightly more elaborate swirl/spiral design than gwyn's greatsword. It also bears design characteristics similar to that of gwyn's. Also, heide is a land sub-section in drangleic. All the stuff named after it makes that obvious.
Silver knights in ds3 use a lightning based strong attack. So, heide is a time-warped version of anor londo. Most of it fell into the sea after centuries of erosion, much like most of izalith was lost to the lava.
 Anonymous
Playing SotFS edition on Xbox 360 (although the game appears to have reverted to vanilla DSII in terms of item placements and whatnot) and the first staircase towards the Cathedral of Blue after the room with three giant knights is consistently causing my system to crash. Help?

 Anonymous
 Anonymous
In case anyone else is having difficulties with these 3, lure the middle one with the greatsword out down the stairs to the platform where you fought second guy, mich easier to dispatch and safer than the walkway, then hide from the other 2 that come out afterwards, LET THEM FULLY RETURN TO THEIR PLATFORM, for when you go back in you can engage them individually, the other one wont gang up on you unless you get close, so fight thebone of the left first and hug the wall. Goodbluck!

Whoever just updated the walkthrough of the area for X1, PS4 and D11: I was literally about to put mine up lol. Good timing

 Anonymous
So I understand the the guy with the Rudy judge mace stops spawning after you kill him the first time but has anyone had any other baddys stop spawning on the becaes for me literaly everyone in this area has for me the last person in this area left is old dragon slayer can some on help

After taking out the middle guy, the other two will come at you but you can run back towards the beginning and they'll give up and go back to where they started. Then you can kite them separately.

On the railing-less platform in the ps4 version, there is not a sentinel for me it is a large drake. I sniped it with my short bow. I could hit it 4 times and then it would shoot a fireball at me. Is the wiki just wrong or is there another reason I fought a drake and the walkthrough claims it should be a sentinel?

 Anonymous

Would have been a way better place if those stupid heide knights didnt turn it into a gankfest
0
+10
-1