Sinners' Rise
 Sinners' Rise is a small area in Dark Souls 2 featuring a flooded passage with strong enemies called Undead Aberrations and exploding mummies. Finishing the Belfry Luna before attempting the boss here will give the player the opportunity to make the fight more accessible.
General Information
- Previous:Belfry Luna
- Next: Huntsman's Copse
- Recommended Levels: 95 to 105
- Bosses: Lost Sinner
- Bonfires: The Saltfort
Sinners' Rise Map
NPCs
- Lucatiel Of Mirrah (NPC summon)
- Sellsword Luet (NPC summon)
Items
Consumables- Pharros' Lockstone
- Fragrant Branch of Yore
- Elizabeth's Mushroom
- Bleed Stone
- Fire Seed
- Large Soul of a Lost Undead x1
- Human Effigy x1
- Large Soul of a Nameless Soldier x1
- Soul of a Proud Knight x1
- Radiant Lifegem x1
- Smooth & Silky Stone x1
Equipment
Enemies
- Rupturing Hollow (Mummy)
- Undead Aberration
- Flexile Sentry
- Heide Knight
- Royal Swordsman / Archers
Boss
Notes
- ??
Sinners' Rise Walkthrough
Getting to Sinners' Rise
From the room that holds Straid's Cell bonfire, the door on the right of it is unlocked using the Bastille Key. In here, you'll find a skeleton with a Petrified Dragon Bone, and 3x Firebombs. The door in the cell leads to a hole dropping you down onto the bridge below; you can get to the same bridge from back in the room below Straid's Cell bonfire (at the bottom of the stairs, a pull-lever opens an archway gate to the bridge, which is protected by a bowmen). Just outside this gate and to the right is a short path to a Royal Soldier, protecting a corpse with 8x Lifegem. After killing the soldier, you can sprint across the bridge to the fog gate and kill the Gaoler waiting there. Enter the fog gate to enter Sinners' Rise.
Saltfort Bonfire
Once you proceed through the mist, there may be an archer directly above you, ready to take aim. Quickly rush out the door and up the ladder here, to take care of it mano-a-mano. You may have also noticed the only bonfire in Sinners' Rise, The Saltfort bonfire - don't worry to much though, this area isn't massive. To the right immediately after you climb the ladder is a doorway with a very small ledge which holds a corpse containing a Large Soul of a Lost Undead.
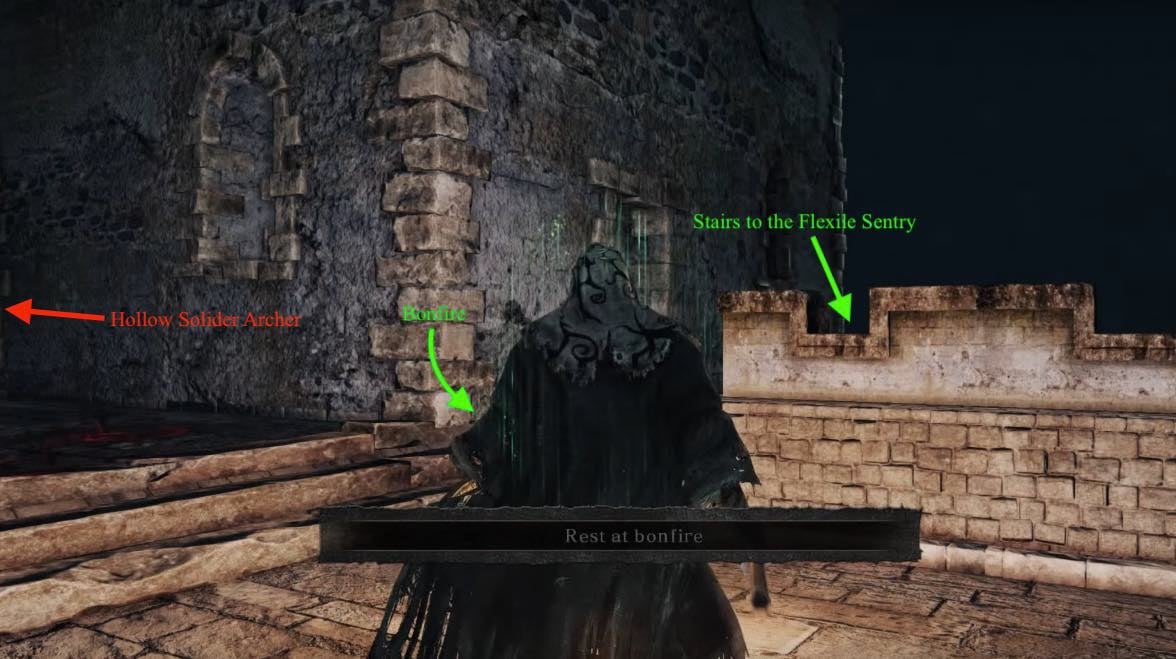
Flexile Sentry
From the Bonfire go back down the ladder and continue down the stairs. In the doorway to the left are 3 Royal Swordsmen, 2 using a cross-bow. Take them out, then step outside again and move around the edge of the building to find a broken part of the stairs where you find another archer and a corpse with a Human Effigy, then head back into the building. In the middle of the room you'll find a descending lift. While riding the lift down, keep an eye out for a platform just before you reach the bottom in which you can fall onto, to loot the corpse holding 5x Lacerating Knife here. From this platform, it is safe enough to jump off to the floor below.
You are now in a dark, water-filled dungeon area. The first enemy you're going to see is a respawning Flexile Sentry (as well as 2 Undead Aberrations in NG+). If you are in Human form, the NPC Lucatiel of Mirrah can be summoned. Her sign is behind the lift you just rode, but it is recommended to save her for the boss fight. Continue through the doorway.
In the alcove on the left is a corpse holding Blossom Kite Shield, while the right alcove may seem empty, located in the left corner of the back wall is a Hidden Door accessible by pushing the "use" button. This door leads to outside, and a quite watery death should you move too far forward. Instead, look to your left and hug the wall to reach a corpse holding the Northern Ritual Band and a Bleed Stone. Backtrack to the middle and carry on.
Finding the Sinner
The alcove on the right has a Large Soul of a Nameless Soldier. Continue on and soon you will reach a set of stairs on either side of you, both lead to cells, and a Rupturing Hollow waiting on the bottom of the right stairs. There are a total of four cells, two on the ground floor and another two on the upper balconies, as well as a Rupturing Hollow on each of the upper balconies. The first left cell on the watery level contains 2 Rupturing Hollows, the second cell a corpse with a Pharros' Lockstone and a Soul of a Proud Knight. In each of the cells on the right, there is a Rupturing Hollow. The one on the upper left level, the first door leads to a seemingless empty cell, but when you attack the left corner after entering, you will reveal a hidden corpse with a Smooth & Silky Stone. The second door (which can also be unlocked by the Bastille Key) leads to a resting Heide Knight and a corpse with a Fire Seed. You can kill the Knight for a Heide Spear, if you wish. The cell on the opposite side contains a Sellsword Luet summon sign which you could use for the upcoming boss fight. You can now either open one of the doors on the balconies with the Bastille Key or open the middle door on water level with the mechanism on the right of the door. Be sure to take care of all the Rupturing Hollows before using the mechanism to lift the gate, otherwise any you did spare will all come flooding in. Once the gate is lifted, a straight path will lead to the boss mist.
Before heading in, turn to the left and follow the narrow path between the stairs to reach a corpse with a Radiant Lifegem. You'll then find two sets of stairs on either side. At the top of both stairs are locked gates (on NG+ there will be a red Mummy in front of each door). Again, if you have the Bastille Key you can open these. In each room you will find a line of oil which you can light with your torch. Lighting both rooms will provide light in the boss area - highly recommended. The right hand stairway room holds a Smooth & Silky Stone.
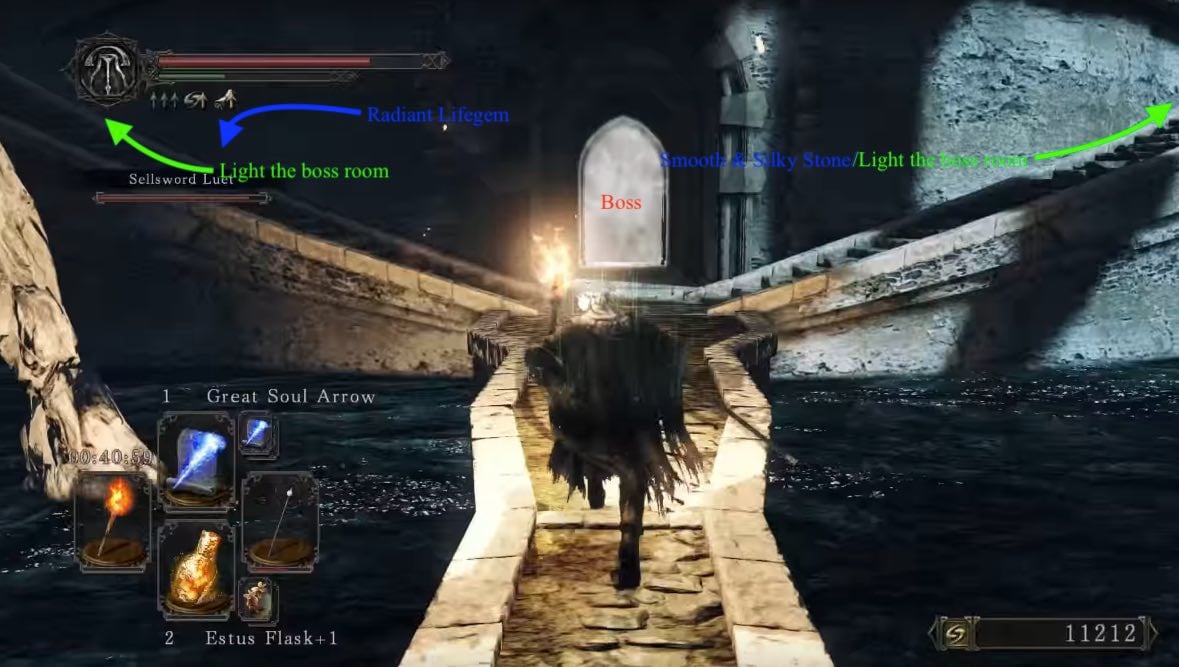
When you are ready, head to the boss' mist.
BOSS FIGHT: Lost Sinner
Rounding Up
After defeating the Lost Sinner, open the door on the opposite side of the room and move down the stairs towards the Primal Bonfire. Before entering the room with the bonfire, you will find a chest to your left which holds a Fragrant Branch Of Yore and an Elizabeth Mushroom. Be aware that the wall opposite of the chest isn't an illusory wall, people may leave countless messages but it isn't. The textures are just weird and ripped. From here light the primal bonfire to warp back to Majula. The next target is Huntsman's Copse.
General Information
- Previous:Belfry Luna
- Next: Huntsman's Copse
- Recommended Levels: 95 to 105
- Bosses: Lost Sinner
- Bonfires: The Saltfort
Sinners' Rise Map
NPCs
Items
Consumables- Pharros' Lockstone
- Fragrant Branch of Yore
- Sublime Bone Dust
- Elizabeth's Mushroom
- Bleed Stone
- Fire Seed
- Large Soul of a Lost Undead x1
- Human Effigy x1
- Lacerating Knife x5
- Large Soul of a Nameless Soldier x1
- Soul of a Proud Knight x1
- Radiant Lifegem x1
- Smooth & Silky Stone x1
Enemies
- Rupturing Hollow (Mummy)
- Undead Aberration
- Royal Swordsman/Archers
Boss
Notes
- ??
Sinners' Rise Walkthrough
Getting to Sinners' Rise
From the room that holds Straid's Cell bonfire, the door on the right of it is unlocked using the Bastille Key. In here, you'll find a skeleton with a Petrified Dragon Bone, and 3x Firebombs. The door in the cell leads to a hole dropping you down onto the bridge below; you can get to the same bridge from back in the room below Straid's Cell bonfire (at the bottom of the stairs, a pull-lever opens an archway gate to the bridge, which is protected by three bowmen). Just outside this gate and to the right is a short path to a Royal Soldier, protecting a corpse with 8x Lifegem. After killing the soldier, you can sprint across the bridge to the fog gate and kill the Gaoler waiting there. Enter the fog gate to enter Sinners' Rise.
Saltfort Bonfire
Once you proceed through the mist, there'll be multiple archers directly above you, ready to take aim. Quickly rush out the door and up the ladder here, to take care of it mano-a-mano. You may have also noticed the only bonfire in Sinners' Rise, The Saltfort bonfire - don't worry to much though, this area isn't massive. To the right immediately after you climb the ladder is a doorway with a very small ledge which holds a corpse containing a Large Soul of a Lost Undead.
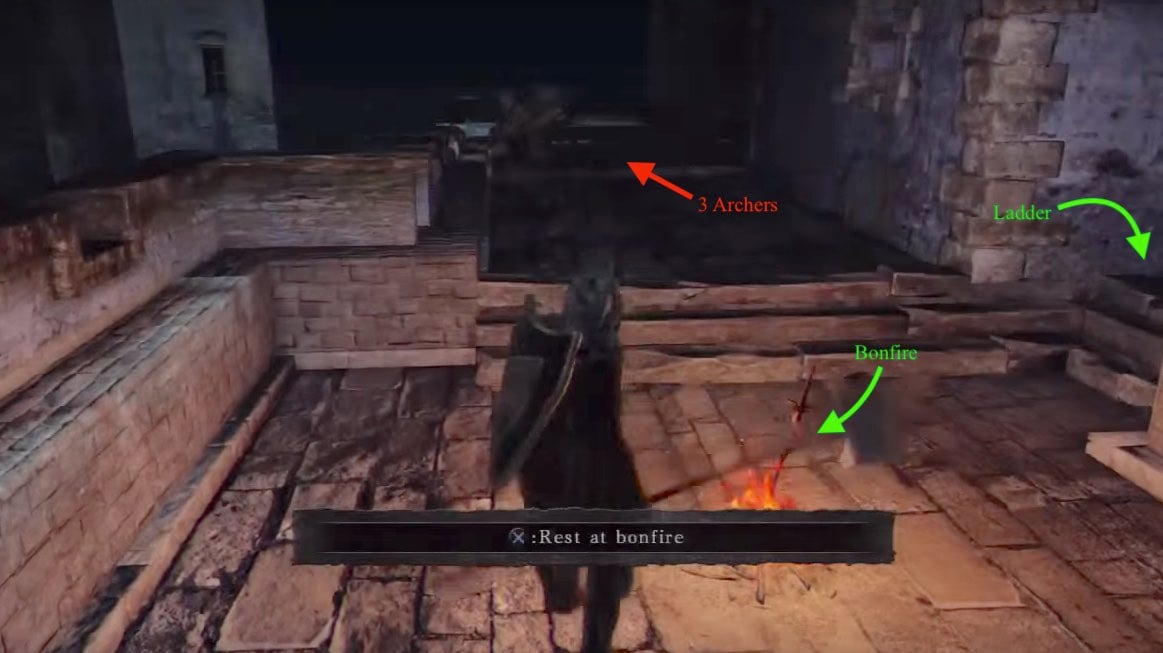
Undead Aberrations
From the Bonfire go back down the ladder and continue down the stairs, taking out any enemies at the bottom. Before entering the doorway to your left, move around the edge of the building to find a broken part of the stairs, there is a corpse holding a Human Effigy there. Proceed into the building to arrive at its ground level. This floor holds a few royal swordsmen/archers. In the middle of the room you'll find a descending lift. While riding the lift down, keep an eye out for a platform just before you reach the bottom in which you can fall onto, to loot the corpse holding 5x Lacerating Knife here. From this platform, it is safe enough to jump off to the floor below.
You are now in a dark, water-filled dungeon area. If you are in Human form, the NPC Lucatiel of Mirrah can be summoned. Her sign is behind the lift you just rode. There are a total of 3 Undead Aberrations (huge, malformed, dragon-esque creatures), so here are a few tips and notes on these enemies in the area:
- Block their attacks and counter only when safe.
- An easy way to kill these Giants is to send the elevator back up after riding it down, opening a hole in the floor. The lure the Giants into the room one at a time. If you stand close to the hole in the floor, you can let the Giants get close enough to attack, then as they're attacking run to the opposite side of the hole.
- Most of the time, the attack or the pursuit after the attack will cause the Giant to fall into the hole and die. Just be careful not to fall into the hole yourself.
- Another easy way would be to lure the giants near the elevator platform, keep your shield up and strafe towards and away the giant. Eventually he will roll towards you and onto the platform, run up and step on the pressure plate to send him upwards. On his way up he will try to jump and nearly die landing on the walkway above you. He can't get down from here so either leave him or shoot him with a few arrows.
- Surprisingly enough this enemy can be back-stabbed.
The first one will come in from the left, as soon as you pass the doorway. In the alcove the first came from is a corpse holding Sublime Bone Dust. On the alcove on the right enter the empty alcove where another Undead Aberration can break through one of these walls, so proceed with caution. Located in the left corner of the back wall is a Hidden Door accessible by pressing the "use" button. This door leads to outside, and a quite watery death should you move too far forward. Instead, look to your left and hug the wall to reach a corpse holding the Northern Ritual Band and a Bleed Stone.
Finding the Sinner
Returning from the alcove continue on and watch both ways for the last Undead Aberrations. The alcove on the right has a Large Soul of a Nameless Soldier. Continue on and soon you will reach a set of stairs on either side of you, both lead to cells. There are a total of four cells, two on the ground floor and another two on the upper balconies. The second left cell on the watery level contains a corpse with a Pharros' Lockstone and a Soul of a Proud Knight. The one on the upper left level, second door (which can also be unlocked by the Bastille Key) leads to a corpse with a Fire Seed. You can kill the Knight for a Heide Spear, if you wish. The cell on the opposite side contains another Fire Seed. Be sure to take care of all the Rupturing Hollows before using the mechanism to lift the gate, otherwise any mummies you did spare will all come flooding in. Once the gate is lifted, a straight path will lead to the boss mist.
Before heading in, turn to the left and follow the narrow path between the stairs to reach a corpse with a Radiant Lifegem. You'll then find two sets of stairs on either side. At the top of both stairs are locked gates (on NG+ there will be a red Mummy in front of each door). Again, if you have the Bastille Key you can open these. In each room you will find a line of oil which you can light with your torch. Lighting both rooms will provide light in the boss area - highly recommended. The right hand stairway room holds a Smooth & Silky Stone.
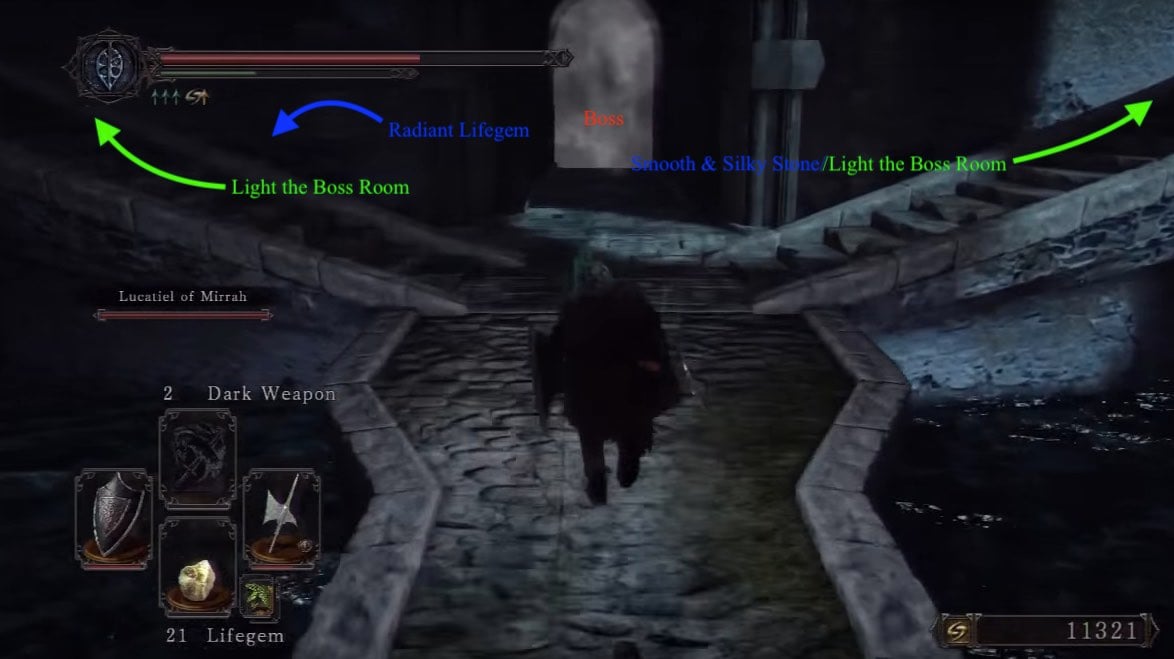
When you are ready, head to the boss' mist.

BOSS FIGHT: Lost Sinner
Rounding Up
After defeating the Lost Sinner, open the door on the opposite side of the room and move down the stairs towards the Primal Bonfire. Before entering the room with the bonfire, you will find a chest to your left which holds a Fragrant Branch Of Yore and an Elizabeth Mushroom. Be aware that the wall opposite of the chest isn't an illusory wall, people may leave countless messages but it isn't. The textures are just weird and ripped. From here light the primal bonfire to warp back to Majula.
 Anonymous
The recommended level (95-105) is clownish. This area is gated by the Ruin Sentinels, which serve as a perfect build/skill check. If you clear that boss, you are ready for Sinners' Rise, whatever your SL.

 Anonymous
 Anonymous
All the enemies in the area are susceptible to yearn spell, except dogs and the nimble shadow.

 Anonymous
"Recommended Levels: 95 to 105"
Bro I beat this whole area at level 50 with a falchion what are you talking about
 Anonymous
How did you go from Belfry Luna and Lost Bastilel (both 55 to 65) to 95-105? Where did the level jump of 30 come from?

 Anonymous
What’s with the whole “Huntsman’s Copse next area” thing? Can you actually get to Huntsman’s from here?

 Anonymous
**** bonfire placement 3 Royal swordsman(with crossbow) Im now forced to despawn them good game But this place sucks

 Anonymous
If I missed the primal bonfire achievement here, can I bonfire ascetic this zone to try and get it ?
(this would also work with Black Gultch, Iron Fortress and the last primal bonfire zone I still don't know yet)
 Anonymous
I didn't get the achievement for lighting up the primal bonfire...

 Anonymous
Recommended level 95 - 105?
Lol okay, if you don't want any challenge whatsoever.
 Anonymous
 Anonymous
I don't know if my game glitched, but I didn't see a Heide knight and there was only one fire seed in the 8 cells at the end of the flooded area. Also; the two dark phantoms on the stairs before the sinner were the spear guys, not the mummies. Playing on PS3 NG+.

 Anonymous
The Flexile Sentry before the boss is a nice way to farm Titanite Chunks. I fought it maybe15-20 times and got 3. BUT, it seems if you light the oil for the boss it stops respawning.. i needed 1 more chunk and i'd have had a +10 wep for the boss but...

 Anonymous
 Anonymous
Level 95-105? Seems a bit steep, I got through here and past the Lost Sinner at lvl 70

Went here and beat up the sinner with a +9 morning star before even knowing how to get to the belfry area, guess it's time to figure out how to get there for the bastille key.

 Anonymous
 Anonymous
 Anonymous
 Anonymous
There is a flexioe sentry added in SotFS edition, drops 2.5K souls and nothing else from what I can tell


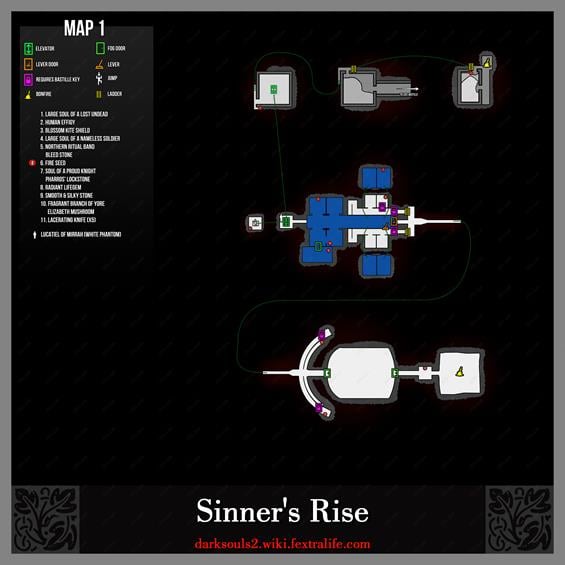
Yeah why is the recommended level 95 to 105, this area is not THAT hard relax
1
+10
-1