The Lost Bastille
The Lost Bastille is a location in Dark Souls 2.
General Information
- Previous: No-man's Wharf
- Next: Belfry Luna
- Recommended Levels: ?? to ??
- Bosses: Ruin Sentinels Yahim, Ricce and Alessia
- Bonfires: Exile Holding Cells, McDuff's Workshop, Servants' Quarters, Straid's Cell, The Tower Apart
- Clearing this area opens ??
- Must unlock ?? for multiplayer
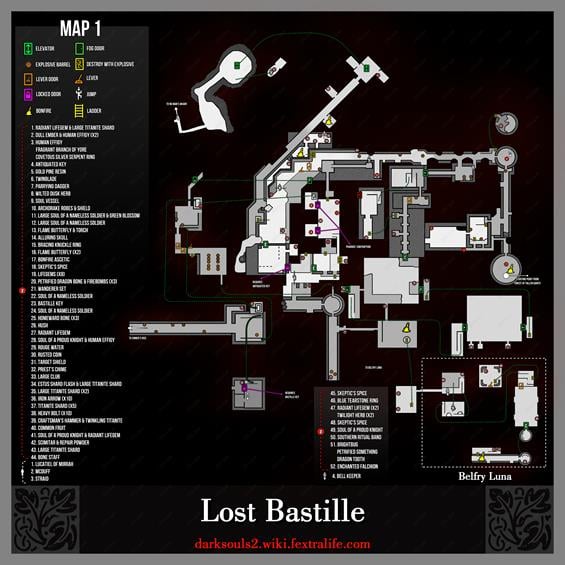
Lost Bastille Map
NPCs on Lost Bastille
- Lucatiel of Mirrah
- Steady Hand McDuff
- Straid of Olaphis (boss souls merchant)
Items
Consumables- Estus Flask Shard
- Large Titanite Shard x4
- Human Effigy x2
- Alluring Skull x1
- Soul of a Brave Warrior x2
- Gold Pine Resin x1
- Iron Arrows x10
- Heavy Bolt x10
- Titanite Shard x5
- Hush Sorcery(Hidden wall in 3 Sentinel boss room)
- Rouge Water x1 (Hidden wall at top of stairs in 3 Sentinel boss room, watch out for Mummy enemy.)
- Repair Powder x1
- Flame Butterfly x6
- Twinkling Titanite x1
- Radiant Lifegem x3
- Antiquated Key
- Soul of a Proud Knight x1
- Homeward Bone x3
- Rusted Coin x1 (Hidden wall in 3 Sentinel boss room)
- Soul of a Nameless Soldier x1
- Large Soul of a Nameless Soldier x3
- Green Blossom x1
- Torch x3
- Soul Vessel (Use Pharros' Lockstone behind door unlocked with the Antiquated Key)
- Bonfire Ascetic x1
- Large Club
- Target Shield (Hidden wall in 3 Sentinel boss room)
- Bracing Knuckle Ring
- Golden Wing Shield
- Scimitar (Ride the roof of No-man's Wharf's elevator entrance after boat ride)
- Craftman's Hammer (In McDuff's workshop, light the sconce near the anvil and rest at a bonfire. The chest he was sitting on at the start will now be free to open with this inside.)
- Covetous Silver Serpent Ring
- Wanderer Set (Three Mummies from well shortly after Servant's Quarter's bonfire)
- Archdrake Robes (Behind breakable wall near exploding barrels on the upper floor of the room leading to the Pharros Contraption behind the door unlocked with the Antiquated key)
- Archdrake Shield
- Bone Staff
- Parrying Dagger
- Twinblade
- Priest's Chime
Enemies
- Royal Swordsman
- Stray Hounds
- Undead Jailer
- Prisoners
- Mummy
- Drops:
- Boss: Ruin Sentinels: Alessia, Risse, and Yahim
Lore Notes:
- Example lore note
- Example lore note
- Example lore note
Notes
- ??
- ??
- ??
- ??
- ??
Lost Bastille Walkthrough
A full walkthrough including all the items, enemies and bosses goes here. You can add links, images. and other details.Tricks & Tips
- You can get to Sinners' Rise without fighting the Ruin Sentinels or the Pursuer, by making a tricky jump. The jump is at the tower in Lost Bastille where Lucatiel of Mirrah is found leaning against the wall inside. Starting from McDuff's bonfire, make your way up the stairs and down the path, and you will see a ladder leading to the top of the tower. Climb the ladder by carefully walking up to it from the broken railing. After you climb it, stand in the circular window and look down, you'll see the path that you normally get to after beating the Pursuer and using the nest to fly there (The Tower Apart). Carefully roll out of the window to land on top of the broken railing (the railing across from the ladder), where you can do another roll and land on the path that leads to the Tower Apart bonfire. From there, go to the chest with the Antiquated Key. Once you have the key, you can skip the Ruin Sentinels fight. (See Antiquated Key if you don't know where to use it).
- You can also trigger the fire barrels on the Tower Apart path to unlock the door and get the Antiquated key this way. Use fire arrows or a firebomb.
Access From No-man's Wharf
The Lost Bastille can be accessed from two directions. The ship from No-man's Wharf or being carried in by the Eagle after The Pursuer boss fight in the Forest of Fallen Giants (see Access from Pursuer). Taking the ship brings you to a small rocky shoreline with an entrance into a walled structure. An elevator brings you to a stairway with cells lining either side. After reaching the top of the elevator you can ride the top of the elevator back down to access a small break in the wall with a corpse (step on the elevator switch, quickly exit the elevator, then jump onto the top of the elvator). This corpse has a Scimitar and Repair Powder x1. After the corpse, drop back down through a hole into the elevator room. After coming back up the elevator, several items can be found in the cells including a Soul of Proud Knight, Radiant Lifegem, and Common Fruit x2. Near the top of the stairs on the left is the Exile Holding Cells bonfire.
Access from Pursuer Boss Fight
The Lost Bastille can also be accessed after The Pursuer boss fight in the Forest of Fallen Giants. After defeating the boss, examining the nest nearby prompts his eagle friend to come get you and carry you to The Tower Apart bonfire in the Bastille. This is a short area guarded by Knights and Dogs and consists of negligible geographic size. Shortly after the bonfire ledge can be followed around the next build to a corpse with Radiant Lifegem x1 and Titanite Shard x1. From here double back and drop in one of the windows to catch the crossbow knight off guard. Below are three dogs and numerous powder kegs. Through the door on the lower level is a chest in an open area containing the Antiquated Key and the Covetous Silver Serpent Ring. Return to the room and climb up the other ladder to confront a Mummy guarding the walkway. The locked door at the end leads to the tower with Lucatiel of Mirrah. It can be opened from this side and provides access to the rest of the level.
Heide Knight to McDuff
From the Exile Holding Cells bonfire (see Access From No-man's Wharf), head up the stairs to your left. Upon reaching the top of the stairs you will find yourself on a walkway/wall. The first enemy of the area is a Heide Knight wielding a spear. He will not attack unless provoked and upon his death gives you the Heide Spear. Immediately after this is a small group of barrels and crates that can be destroyed to see a break in the wall. Directly below is a large Undead Jailer on a scaffolding. You can drop down on him and use a plunging attack. However, you will want to finish him quickly as the scaffolding will likely break leading to both of you falling below. Two Stray Hounds will join the fray making this a good approach only for aggressive players (kill that Mummy quick, I mean it).
Alternatively, following the walkway will lead to a ladder that places you in the same courtyard. Another option (recommended path first time) is to jump down a small break in the walkway. Following the path to the right leads to a corpse that carries a Soul of a Brave Warrior and a Human Effigy. Going back the other way leads to the same courtyard. One of the Stray Hounds will aggro shortly after entering the courtyard and the other dog will attack if you walk toward the corner directly in front of you. Once the Undead Jailer notices you it will drop down and can be fought normally. After exiting the small room with the ladder to fight this trio, you'll notice another scaffolding along the wall. Break it to access a corpse with an Alluring Skull. There is also a small passage past the mummy's platform. At the end is a chest containing an Estus Flask Shard and a Large Titanite Shard.
Near the broken section of the wall you'll notice a boarded up doorway you can break open. See Boarded-Up Room for this area. Continuing in the other direction will lead you to more Stray Dogs and a pull mechanism to open a large gate that you will surely not miss. Two more Dogs will greet you here. You may notice a conspicuous barrel right in front of you. Hold onto that thought for a minute. Turning a corner leads to another stairway. At the base of the stairs is a locked door. At the top of the stair is a Undead Jailer who is just waiting to roll a barrel at you. It looks harmless but the Bastille has many explosive barrels. This is one of them. Shooting the Mummy with an arrow will lead to him rolling the barrel down. If it explodes on the wall at the end of the stair it will reveal another passage. If the barrel explodes before the wall and the wall is still intact, moving to Majula and back to The Lost Bastille will respawn the barrel. Otherwise The Lost Bastille key acquired after the Belfry Luna will open the locked door located here. The Mummy will descend to engage you in combat. You can use his wide attack radius to your advantage by having him swing near the barrel I asked you to remember from before. This one also explodes doing significant damage to the Mummy and knocking him down. This is a trick that can be used often in this level and is hilarious...
After killing the Mummy, the wall that he just exploded was hiding McDuff's Workshop bonfire, and allows you to the other side of the locked door mentioned above. Video of how to explode the wall manually here. This turns out to be McDuff's workshop. McDuff is a seemingly senile Blacksmith muttering about finding an Ember. There are several chests in this room that contain Iron Arrow x10, Heavy Bolt x10, Titanite Shard x5 and Large Titanite Shard x2. McDuff is sitting on one chest which cannot be opened right away. Lighting the sconce in his room will prompt him to move to his anvil the next time you return. The chest can now be opened (Craftsman's Hammer and Twinkling Titanite) but McDuff still refuses to interact in any meaningful way. Finding the Dull Ember in the area Iron Keep and giving it to him, will allow McDuff to work on weapons for you, including infusing elemental stats onto them.
Dogs and Lucatiel
Exiting this area and continuing up the stairs leads to another walkway. An Stray Hound right in front of you will attack. As you walk forward there will be another dog to your right in hiding. Kill him and claim a Gold Pine Resin on a corpse. You will also notice a window in front of you that can be used to shoot a couple Royal Knights in the building across from you. This will make a coming battle slightly easier. If you look down into the chasm you will see an odd closed door built into the wall. Opening that from the other side leads to a shortcut to the next boss fight. You can's use it now but, once open, simply run forward toward the open door and continue pressing forward while falling.
For now though you need to continue back along the walkway. Another Dog and Mummy will provide little additional challenge. At this point you can move forward or across a broken stone to another area to your right. Continuing along forward (recommended path first time) leads to a tower with Lucatiel of Mirrah just hanging out. Speak with her and she will show you her true face and gives you a Human Effigy . She claims she doesn't know what it's for. Another door leads out but is unable to be opened from this side (until you destroy the obstruction on the other side of the door with a firebomb from the walkway just to the right of the door you came in). Continue back outside and look to the right of the door you came in. A ladder there can be accessed by using a broken section of wall nearby to climb up. Up top a corpse will be generous and carry a Large Titanite Shard.
Royal Soldier Swarm and Approach to Sentinels
It's time to cross that broken stone to the small open area across the chasm! Make sure you have healing items and your weapon isn't about to break. You can return to the previous walkway by passing through a broken section of the small stone wall. This will provide a convenient retreat for the coming encounter. You will quickly come to a door following a small open area. Upon opening that and stepping inside you will be swarmed by Knights. If you were able to kill the two earlier with projectiles through the window that will be two less to the battle. A similar tactic: before you step through the door, if you look carefully, you can see a knight straight ahead, in the distance (inside the building). Shooting it with a ranged attack will pull two of the knights out, minimizing the upcoming swarm. Using the door as a choke point can be very effective. However, they use large two handed swords and can hit through each other meaning you need to be ready to backpedal and continue the fight. After beating these guys you will find yourself in a large room with stairs heading down and a path to your left. Following the path to your left leads to more Knights in a small room (if they didn't all empty out before) and a pull mechanism. It may be advisable to NOT pull this lever as it opens a gate which we'll discuss again later. If you DO open the gate there are two more Knights and a short hallway filled with cells.
Following the hall leads to the Ruin Sentinels Boss Fight. Heading down from the large room that prompted the knight swarm will lead to the door in the wall mentioned above as a shortcut(a shortcut to heaven! DO NOT enter this door or you will fall to death). A corpse carries a Soul of a Proud Knight and a Human Effigy . A ladder off to the side of the room will lead you back up to the hallway before the boss fight. Once the door in the wall is open, it can be used to bypass the majority of Knights with the exception of the two directly in the hall. If you opened the gate I warned you not to, there will be a swarm in the hallway instead of just two. The lever can not be undone so once it's pulled you will face the Knight swarm every time. Note that some players report being able to walk past these two knights, and the entire swarm, without them attacking at all. In any case, you can outrun them if you just want to fight the bosses. In a cell by the Mist Door (with back to Mist Door, it's the third on the left) there is a skeleton with Radiant Lifegem x2 and if you're in Human Form you can summon the Phantom Pilgrim Bellclaire who will assist you with her sorcery. Please see Ruin Sentinels to Belfry Luna for information regarding the boss fight and location after.
Boarded-Up Room
(To get to the start of this section, see Heide Knight to McDuff). If you break the boarded wall here, and head in, you will find a small room with makeshift wooden walls littering the place. These can be broken. A Knight is hiding behind one. There are two doors on the same wall. One can be opened immediately and has two Small Mummies in it. Watch out as they appear to trip in front of you: this causes an area of effect explosion which does heavy damage, but only to you. They will get right back up and fight. Killing them and entering the room nets you Flame Butterfly x2. The other door can be opened with the Antiquated Key: see Access from Pursuer for details on obtaining the Antiquated Key.
Opening the door with the Antiquated Key will lead to 4 Dogs attacking you in a small courtyard. A well is a central feature in this area. A rock tied to a rope tempts you to strike it. Doing so raises a large cage with three more of the Small Mummies in it. Defeating them yields the Wanderer Set. A building nearby has a door; behind the well is a separate entry from a ladder and eaves.. Entering the door leads to a Royal Soldier carrying their usual sword. A Royal Soldier archer above will add his piece to the fight. From the door, there is an elevation which prevents you from accessing the Royal Soldier. Taking the ladder from outside the room (behind the well), allows you to kill him, then drop down to take care of the sword knight; however, a second sword knight will come in behind. Back outside the room, from the eaves atop the ladder behind the well, you will notice explosive barrels near where the archer was. Blowing them up with fire arrows or firebombs reveals a hole in the wall which holds Archdrake Robes and Archdrake Shield. A ladder, in the same room, but on the lower elevation, has a corpse with a Large Soul of a Nameless Soldier and a Green Blossom, and you may be able to use this as a sniper spot for the next room. From the elevation with the archer, there is a short tunnel blocked by barrels. Smashing them will lead to a room with two statues, one of which is quite large. Two Knights will try to take you out. Also prominent in this room is the presence of a Pharros' Lockstone face, and three chests. The chest on the left contains the Bone Staff. The first chest on the right holds a Parrying Dagger and the last chest has the very fast dex weapon Twinblade. A ladder exiting the room will place you above and behind the Mummy who tries to roll the barrel at you in Heide Knight to McDuff. (NG+: A Black Phantom Dog appears shortly after climbing the ladder). The Pharros' Lockstone (which you may want to skip for now unless you're very flush with lockstones) will create two ghostly visages on the walls to indicate hidden passages. The one on the left holds a chest containing a Soul Vessel: the only way to get to this is using the Pharros' Lockstone. The one on the right leads to:
Cell Elevator Bottom
This room is accessible using a Pharros' Lockstone at the end of the Boarded-up Room sequence, or, from Cell Elevator Top. This room holds a small torture cell, which is actually an elevator which leads to Cell Elevator Top. This room has a chest with Wilted Dusk Herb. There is corpse holding a Bonfire Ascetic when you take the elevator up. Take the elevator to the top, roll and land to pick it up. Note: Very risky, best equip Ring of Life Protection before trying.
Ruin Sentinels to Belfry Luna
The Ruin Sentinels boss fight is a triple threat fight, pitting the player against three sentinels (Yahim is first and can be fought by itself, followed by Alessia and Ricce). After defeating this boss a small door exits the room. However there are multiple secret doors among the walls here so look and press around (these are opened, not destroyed, so press the "use" key - X on PS3). From below the ledge where you fight Yahim and looking to the center of the room, an illusory wall on the left leads to a ladder and a chest with Hush. Going around the corner is another illusory wall with a chest behind it. It holds the Target Shield. There is another secret door on this wall that leads to an empty room. A third and final one on this wall has a corpse with a Rusted Coin. When you are done you will find staircase leads to ledges seen when you fell into the arena and met Yahim up close. A secret door at the top of these stairs (left hand side) opens up on an exploding mummy and a chest with Rouge Water (NG+: Crimson Water). After walking onto the ledges after the stairs, a corpse with Homeward Bone x3 is on a smaller area that can be accessed by jumping.A secret door on this ledge will look very familiar as it leads to the chest with Hush in it. A doorway from the main ledge leads to a short corridor with cells on either side. A corpse with a Soul of a Nameless Soldier is on the right. A small mummy in the last cell on the left explodes, causing moderate damage. This leads into a room with the Servants' Quarters bonfire, a ladder down, and a short stairway up leading to a door. The ladder leads to a small room with one dog and a corpse with the Large Club. A chest holds a Priest's Chime. A Pharros' Lockstone can be used which does the normal ghostly visage on a wall. This leads to the area Belfry Luna.
Mummy Swarm to Sinners' Rise
The door leads to a parapet with a large Mummy to your left and a corpse with a Human Effigy. To the right is a tower with two paths: a doorway to the left and stairs leading up. The doorway path will net all possible loot: it leads to a short walk with a mummy, and an area with a broken wall; the break in the wall leads to a roof with a corpse holding a Flame Butterfly x3. This roof overlooks a courtyard with Stray Dogs x4, and a well, an area accessible on the ground from the Boarded-Up Room using the Antiquated Key. You can jump a gap here which takes you to another roof where rests a corpse with a Large Soul of a Nameless Soldier. You cannot return by jumping but a ladder leads up to a one-way drop to a hallway. To the right is a petrified person (non-revivable I believe [I did not find one (x2). Online interaction w/petrify mummy?]) and a small mummy lying in wait in a large room with many barrels. Continuing through this room leads to the stairwell in the tower where the paths split before. A door in the room with barrels opens into a wall of dirt with a skeleton inside. The skeleton can be smashed but this appears to be a dead end.
Around the corner, back near the on-way drop from the ladder, a pull mechanism opens a gate with three small mummies waiting for you. One of the mummies has a yellow glowing chest and will cause petrify buildup with his explosions. Take care of them and you can enter a room filled with caged urns that look like Russian nesting dolls. The large pile of urns in the center of the room holds two Kamakaze Mummies. There's another on a ledge just above the door as you enter the room. There's a caged area in the room that you cannot access from here. Straight across the room from the entry is a doorway leading to a hall with an illusory walls at the end. This leads to another hallway with another illusory wall on the left hallway wall, which in turn leads to some ramparts above the entry to Lost Bastille from theExile Holding Cells bonfire. You'll see an item glinting across a jumpable gap, but head left beforehand to find a Bracing Knuckle Ring, head back and do a jump (hard to jump back!) across the gap where you'll find a Flame Butterfly and a Torch. Instead of trying to jump back, take a one-way trip to the right and drop down to a narrow ledge running along the wall. Keep following it all the way to the end, where you'll find a Soul of a Brave Warrior and a Golden Wing Shield. Drop down here to land on the stairway above McDuff's Workshop bonfire. The run back from here's not too bad: use the shortcut to the Ruin Sentinels arena, and you're halfway there.
Back in the room with the caged urns, head up the stairs to another room with two Kamakaze Mummies. A shackled corpse holding a Skeptic's Spice is housed behind the door on this level. Continuing up the stairs, you'll reach an open-air room with Kamakaze Mummies x5, one of which is a yellow-belly petrifier. They can be fought individually by pulling one at a time. After clearing the mummies you will notice Straid's Cell bonfire in one of the cells, but it is blocked by a petrified NPC. He is Straid of Olaphis, and you need a Fragrant Branch of Yore to free him and unblock the bonfire.The locked door to the right can be opened with the Bastille Key found in Belfry Luna. Inside the cell is a skeleton with a Petrified Dragon Bone (I got miracle Resplendent life instead in NG+) and 3 Firebombs. The door in the cell leads to a hole dropping you on the bridge below. You can get to the same bridge from back in the room below Straid's Cell bonfire; here, at the bottom of the stairs, a pull-lever opens an archway gate here to the bridge, which is protected by three bowmen. Just outside this gate and to the right is a short path to a Royal Soldier, protecting a corpse with Lifegem x8. After killing the soldier, you can sprint across the bridge to the fog gate and pull the lever to continue onto Sinners' Rise. But, before that, if you haven't already, go back down the stairs to:
Cell Elevator Top
Back in the room below Straid's Cell Bonfire, there's a door opening to a room with a cell elevator. A corpse has a Skeptic's Spice x1. A corpse on a ledge below can be accessed by jumping (or rolling), and has a Bonfire As cetic. Continuing to drop down leads to Cell Elevator Bottom.
Video Walkthroughs
General Information
- Previous: No-man's Wharf/Forest of Fallen Giants
- Next: Belfry Luna, Sinners' Rise
- Recommended Levels: 55 to 65
- Bosses: Ruin Sentinel
- Bonfires: Exile Holding Cells, McDuff's Workshop, Servants' Quarters, Straid's Cell, The Tower Apart
- Clearing this area opens ??
- Must unlock ?? for multiplayer
Lost Bastille Map
NPCs on Lost Bastille
- Lucatiel of Mirrah
- Steady Hand McDuff
- Straid of Olaphis (boss souls merchant)
Summons
Items
Consumables- Dull Ember
- Estus Flask Shard
- Large Titanite Shard x4
- Human Effigy x2
- Alluring Skull x1
- Soul of a Brave Warrior x2
- Gold Pine Resin x1
- Iron Arrows x10
- Heavy Bolt x10
- Titanite Shard x5
- Hush Sorcery (Hidden wall in boss room)
- Rouge Water x1 (Hidden wall at top of stairs in boss room, watch out for Rupturing Hollow enemy.)
- Repair Powder x1
- Flame Butterfly x6
- Twinkling Titanite x1
- Radiant Lifegem x3
- Antiquated Key
- Soul of a Proud Knight x1
- Homeward Bone x3
- Rusted Coin
- Soul of a Nameless Soldier x1
- Large Soul of a Nameless Soldier x3
- Green Blossom x1
- Torch x3
- Soul Vessel (Use Pharros' Lockstone behind door unlocked with the Antiquated Key)
- Bonfire Ascetic x1
- Large Club
- Target Shield
- Golden Wing Shield
- Scimitar (Ride the roof of No-man's Wharf's elevator entrance after boat ride)
- Craftman's Hammer (In McDuff's workshop, light the sconce near the anvil and rest at a bonfire. The chest he was sitting on at the start will now be free to open with this inside.)
- Covetous Silver Serpent Ring
- Wanderer Set
- Archdrake Robes
- Archdrake Shield
- Bone Staff
- Parrying Dagger
- Twinblade
- Priest's Chime
- Bracing Knuckle Ring
Enemies
Drops
Boss
Notes
- ??
Lost Bastille Walkthrough
Access From No-man's Wharf
After defeating the Flexile Sentry, proceed to the next room and up a ladder to find a chest and a strange contraption; the chest contains a Pyromancy Flame and a Fireball, while examining the contraption triggers a cinematic showing the player sail the ship to the next area.
The ship will land you at a rocky shoreline with an entrance into a walled structure, if you continue left after the dock. In here, find an elevator and two Varangians. Defeat them quickly then take the lift up to a stairway, with cells lining either side. After getting off the elevator at the top, trigger then quickly step out and jump on top of it, as it's lowering, to ride it back down. This time, you have access to a small break in the wall with a corpse. This corpse holds a Scimitar and Repair Powder. Drop down the hole here to return to the bottom floor elevator room. At the top, find a including a Soul of Proud Knight and a Radiant Lifegem in the cell next to the lever. Also find 2x Common Fruit on this level. A small doorway here leads upstairs to the Exile Holding Cells bonfire.
Access From Pursuer Boss Fight
After defeating the Pursuer, continue forward through the gap in the stone head. Through the hole in the floor immediately ahead, if you down down, you will find the Drangleic Set, Drangleic Shield, and Drangleic Sword. Continue one more drop and you will be near the beginning of your ascent towards the Pursuer. If you head all the way back up to the room past the boss, past the gap in the floor then go up the stairs to the right you will see a nest which you can use. An eagle will take you to The Tower Apart bonfire in the Bastille.
This is a short area guarded by Royal Swordsmen, Undead Jailers and Stray Hounds and consists of negligible geographic size. In the bonfire room there are 2 metal chests which contain the Dull Ember and 2x Human Effigy. Shortly after the bonfire, a ledge can be followed around the next build to a corpse with a Radiant Lifegem and a Large Titanite Shard. From here double back and drop in one of the windows to catch the crossbow knight off guard. Below are three dogs and numerous powder kegs. Through the door on the lower level is a chest in an open area containing a Human Effigy, a Fragrant Branch of Yore and the Covetous Silver Serpent Ring. A Pursuer will spawn when you get near the chest, kill it and it will drop a Twinkling Titanite. On the left of the chest there is a gap in the wall which leads to a dead end, go there and attack the wall, you will kill a zombie stuck in that wall, it drops Smooth & Silky Stone. Return to the room and climb up the other ladder to confront a Gaoler guarding the walkway. The door at the end leads to the tower with Lucatiel of Mirrah and a chest that contains the Antiquated Key. Head to the "Lucatiel of Mirrah" section to continue with the walkthrough. NOTE: You can't go back to the Tower Apart bonfire. If you want to travel back to Majula, the best way is to blow up the wall leading to McDuff's Workshop (defeat the Gaoler without blowing up the barrel, then push it down yourself. If it doesnt explode, move it towards the wall and blow it up with a Firebomb.) Alternatively, you can try to go through the rest of the area, or teleport back to the bonfire with a homeward bone or by dying.
Heide Knight to McDuff
From the Exile Holding Cells bonfire, head up the stairs to your left. Upon reaching the top of the stairs you will find yourself on a walkway/wall. The first enemy of the area are 2 Royal Swordmen shooting arrows at you (one directly in front of you, the second on the left, at a higher position). On approaching the Swordman in front of you, find a small group of barrels and crates that can be destroyed to see a break in the wall. Directly below is another Swordman on a scaffolding. Before dropping a plunging attack, deal with the Swordman straight ahead first. When you do jump down, finish him quickly as the scaffolding will likely break leading to both of you falling below. Prepare for 5 Stray Hounds and an Undead Jailer greeting you down there as well.
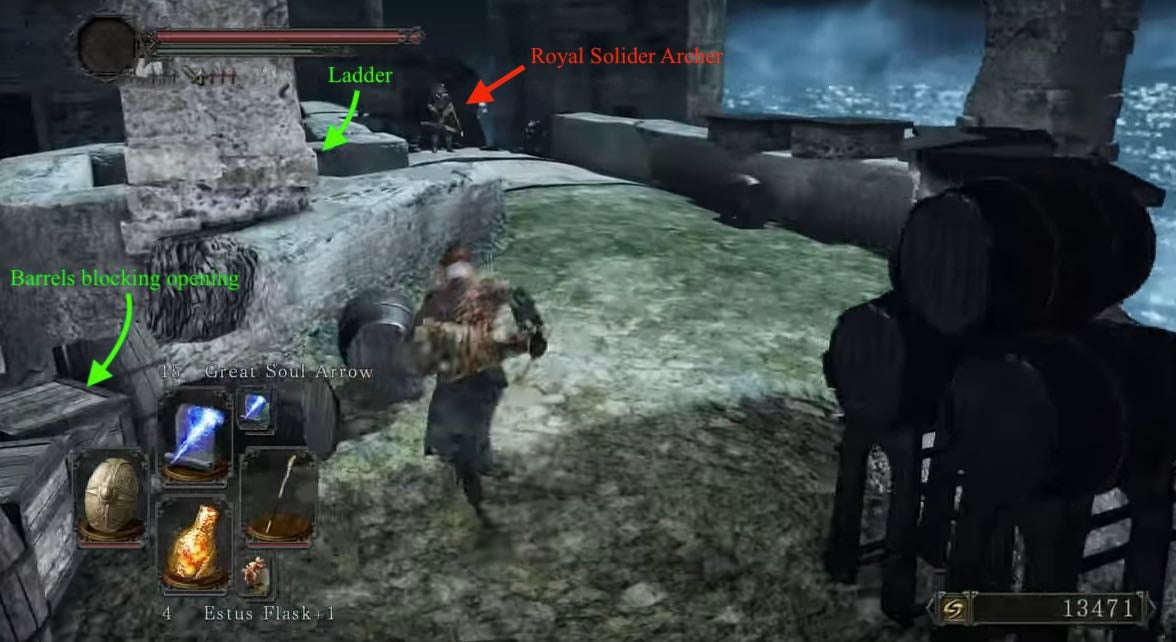
Alternatively, following the walkway will lead to a ladder that places you in the same courtyard. Another option (recommended path first time) is to jump down a small break in the walkway. Following the path to the right leads to a corpse that carries a Soul of a Brave Warrior and a Human Effigy. Going back the other way leads to the same courtyard (beware of another Royal Swordman on the left scaffolding when entering the courtyard this way, as well as the Pursuer appearing once you drop down to the ground) . One of the Stray Hounds will aggro shortly after entering the courtyard and the other dog will attack if you walk toward the corner directly in front of you. Once the Royal Swordman notices you it will drop down and can be fought normally. After exiting the small room with the ladder to fight these enemies, you'll notice another scaffolding along the wall. Break it to access a corpse with an Alluring Skull. If you go left from the room with the ladder, there will be two ways open for you. The samll passage on the left (behind the scaffolding) has a chest containing an Estus Flask Shard and a Large Titanite Shard. From here, you will see a bonfire through the gap of the wall. This is the bonfire of McDuffin's Workshop. Go to the right path and you will notice two more Stray Hounds behind a gate. Turn right to pull the lever and open the gate, dealing with tose. You can now either try your luck to get to the bonfire without the Bastille Key, or you can go back to where the Pursuer appeared. On the very right, you will see sa boarded wall here, which you can easily break.
Boarded Up Room
If you break the boarded wall, head inside, wher you will find a small room with makeshift wooden walls littering the place. These can be broken, but be carefull, the one right in front of you when entering the room hides a Rupturing Hollow. Watch out for when it trips as this causes an area of effect explosion which does heavy damage, but only to you. Behind the other wooden wall lies an open door, which contain 2 more Rupturing Hollows, but be carefull, as the one on the right tends to explode. Killing them and entering the room nets you 2x Flame Butterfly. The door on the right can be opened with the Antiquated Key.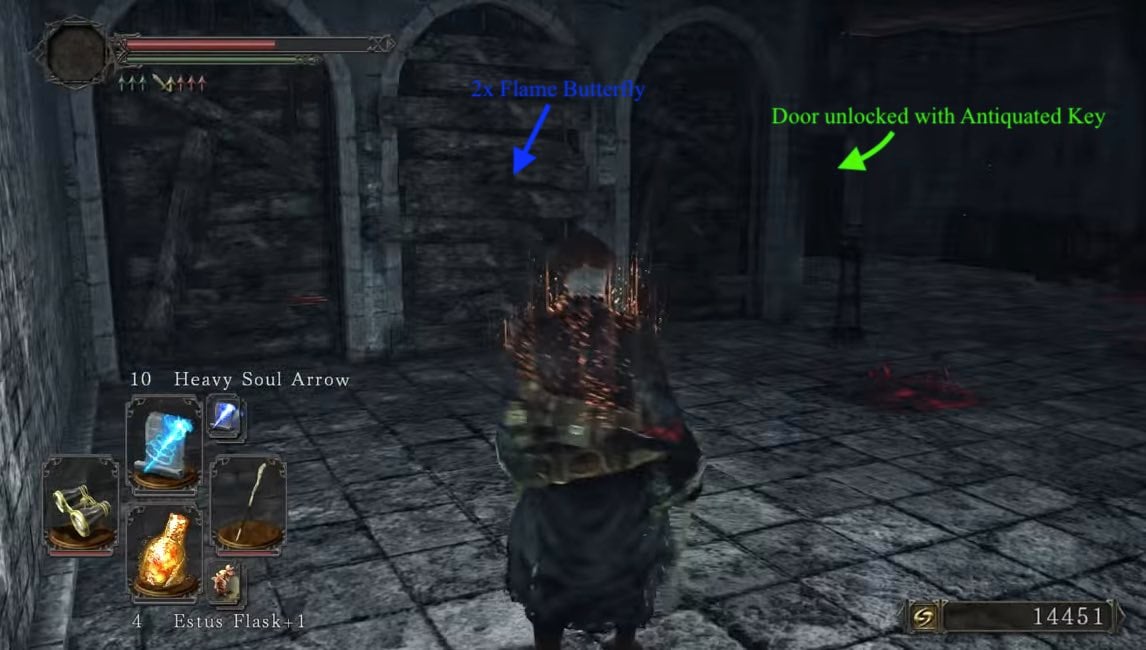
If you have obtained the Key, this door will lead to two Hounds attacking you in a small courtyard. A Royal Swordsman waits in ambush and will drop down from the roof above. The well here works the same as the well back in Majula, so give the rock a good smack. Doing so raises a large cage with three more of the Rupturing Hollows and the Wanderer Set in it.
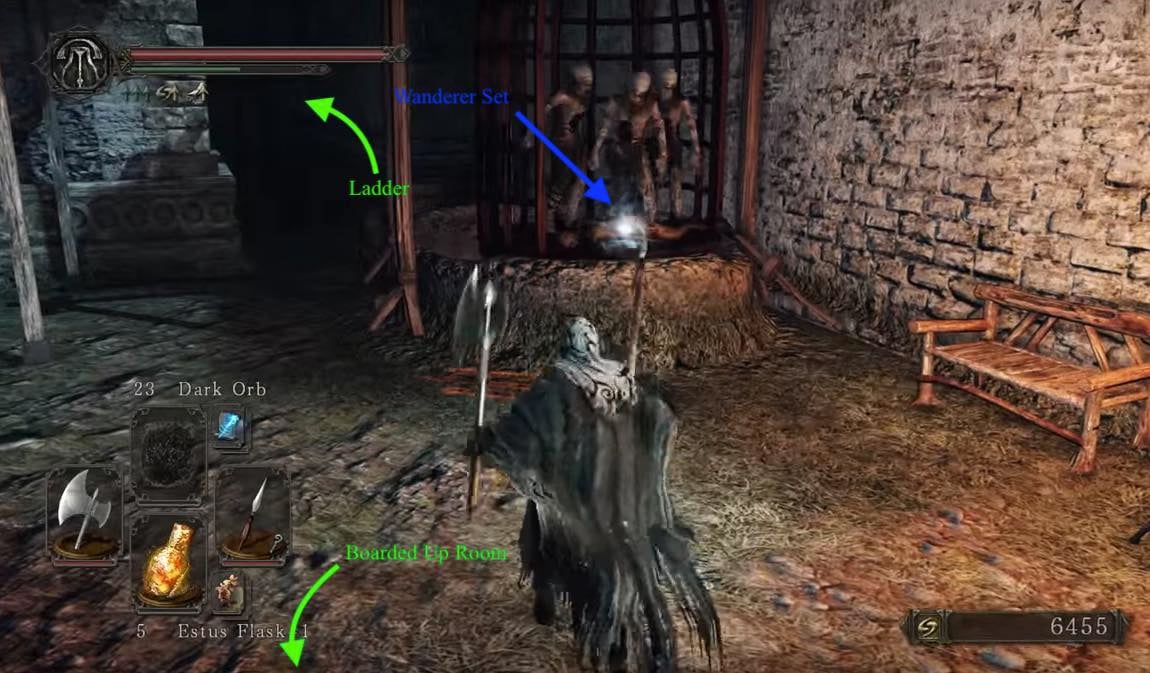
The Building in front of you contains 3 Royal Swordmen, 1 on the ground and 2 more above with crossbows. You can either go through the door or go through the passage on the right and up the ladder to deal with those 3. Back outside the room, from the eaves atop the ladder behind the well, you will notice explosive barrels near where the archer was. Blowing them up with fire arrows or firebombs reveals a hole in the wall which holds Archdrake Robes and Archdrake Shield. A ladder, in the same room, but on the lower elevation, has a corpse with a Large Soul of a Nameless Soldier and a Green Blossom, and you may be able to use this as a sniper spot for the next room. From the elevation with the archer, there is a short tunnel blocked by barrels. Smashing them will lead to a room with two statues, one of which is quite large. Be aware that there is a Nimble Shadow (Suspicious Shadow) hanging on the ceiling. Also prominent in this room is the presence of a Pharros' Lockstone face, and three chests. The chest on the left contains the Bone Staff. The first chest on the right holds a Parrying Dagger and the last chest has the very fast dex weapon Twinblade. The Pharros' Lockstone (which you may want to skip for now unless you're very flush with lockstones) will create 1 ghostly visage on the wall to indicate a hidden room. The hidden room holds a chest containing a Soul Vessel. Further up the same wall is an opening - beware the Nimble Shadow on the ceiling. You will notice a ladder exiting the room, which we ignore for now and instead turn left, to enter a small room with a chest and an open cage. The chest includes a Wilted Dusk Herb. The cage can be entered, which reveals that it is actually a lift, which brings you up The ladder will place you above and behind the Gaoler on top of the stairs near McDuff's Workshop. (NG+: A Black Phantom Dog appears shortly after climbing the ladder).
McDuff's Workshop Bonfire
Going back to the courtyard, instead of going to the small left passage, go the right way this time. This will lead you to more Stray Dogs and a pull mechanism to raise a large gate that you will surely not miss. Two more Dogs will greet you here. You may notice conspicuous barrels in this area (as you may already have noticed, these are more of the explosive barrels scattered all around Lost Bastille), try to leave some unharmed for now and turn the corner to another stairway. At the base of the stairs is a locked door, which can be opend with the Bastille Key, opening the way to McDuff's Workshop. If you don't have the key yet, an alternative way into openening the way involves the Gaoler waiting at the top of the stairs. Shooting him with an arrow will lead to him rolling a explosive barrel down. If it explodes on the wall at the end of the stair it will reveal another passage to McDuff's Workshop. If the barrel explodes before the wall and the wall is still intact, heading to Majula then back will respawn the barrel. The Gaoler will descend to engage you in combat where you can use his wide attack radius to your advantage by having him swing near the barrel previously highlighted. This one also explodes doing significant damage to the Gaoler and knocking him down. This is a trick that can be used often in this level and is always hilarious.
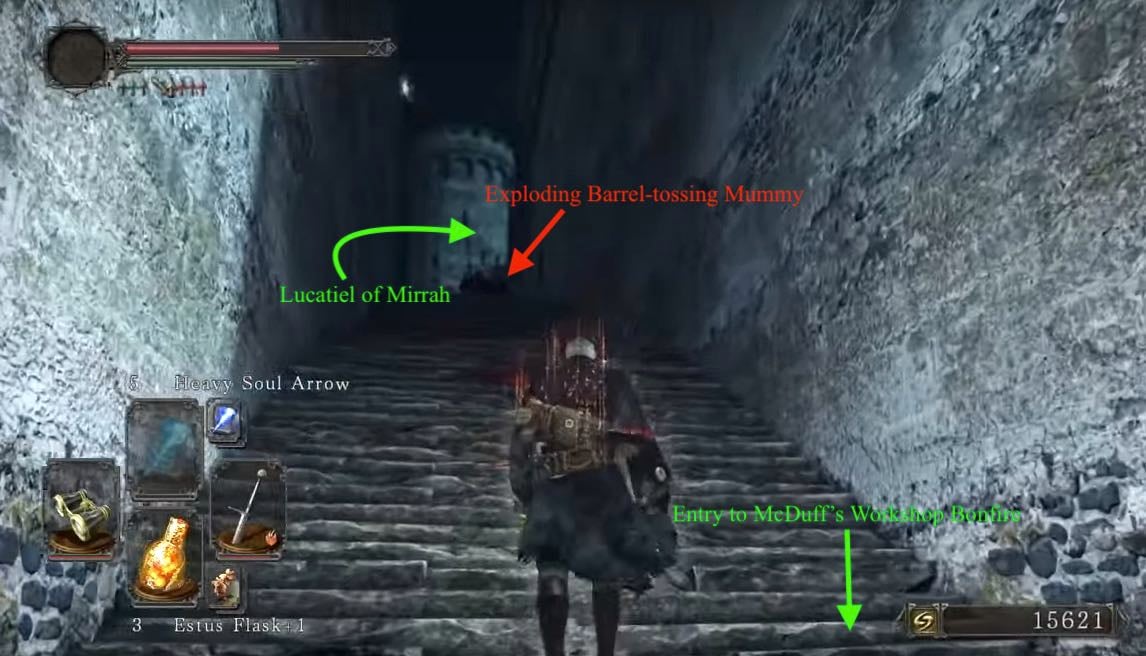
After killing the Gaoler, head through the hole in the wall created by the explosion or through the door to McDuff's workshop. Here you will also find the bonfire seen from the chest that contained the Estus Flask Shard and the Large Titanite Shard, don't forget to rest here so you can always teleport back here when you need McDuff's services. McDuff is a seemingly senile Blacksmith muttering about finding an Ember. There are several chests in this room that contain 10x Iron Arrow , 10x Heavy Bolt, 5x Titanite Shard and 2x Large Titanite Shard . McDuff is sitting on one chest which cannot be opened right away. Lighting the sconce in his room will prompt him to move to his anvil the next time you return. The chest can now be opened allowing you to pick up the Craftsman's Hammer and Twinkling Titanite, yet McDuff still refuses to interact in any meaningful way. Finding the Dull Ember in the chest near the Tower Apart bonfire and giving it to him will allow McDuff to work on weapons for you, including infusing elemental stats onto them.
Lucatiel of Mirrah
Exiting McDuff's Workshop, go up the stairs where the Gaoler was, a bit further down, you can take a right turn to a Gold Pine Resin on a corpse. You will also notice a window in front of you that can be used to shoot a couple Royal Swordsmen in the building across from you. This will make the coming battle slightly easier. If you look down into the chasm, you will see an odd closed door built into the wall. Opening that from the other side leads to a shortcut to the next boss fight. However, it is inaccessible at the moment. Once open, simply run forward toward the open door and continue pressing forward while falling.
For now, continue back along the walkway. Be carefull, as Forlorn might spawn as dark spirit here (even when hollow). Another Gaoler will present itself. At this point you can either, move forward*, or across a broken stone to another area to your right. Continuing along forward* leads to a tower with Lucatiel of Mirrah just hanging out. Carefully climb the broken section of the wall on the left side of the walkway, to access a ladder to take you to a platform directly above her. Here you can pick up an extra Large Titanite Shard. Drop down and speak with her and she will show you her true face and give you a Human Effigy if you met her at No-man's Wharf before. The chest beside her contains the Antiquated Key. Another door leads out but can't be opened from this side, until you destroy the obstruction on the other side of the door with a firebomb from the walkway just to the right of the door you came in.
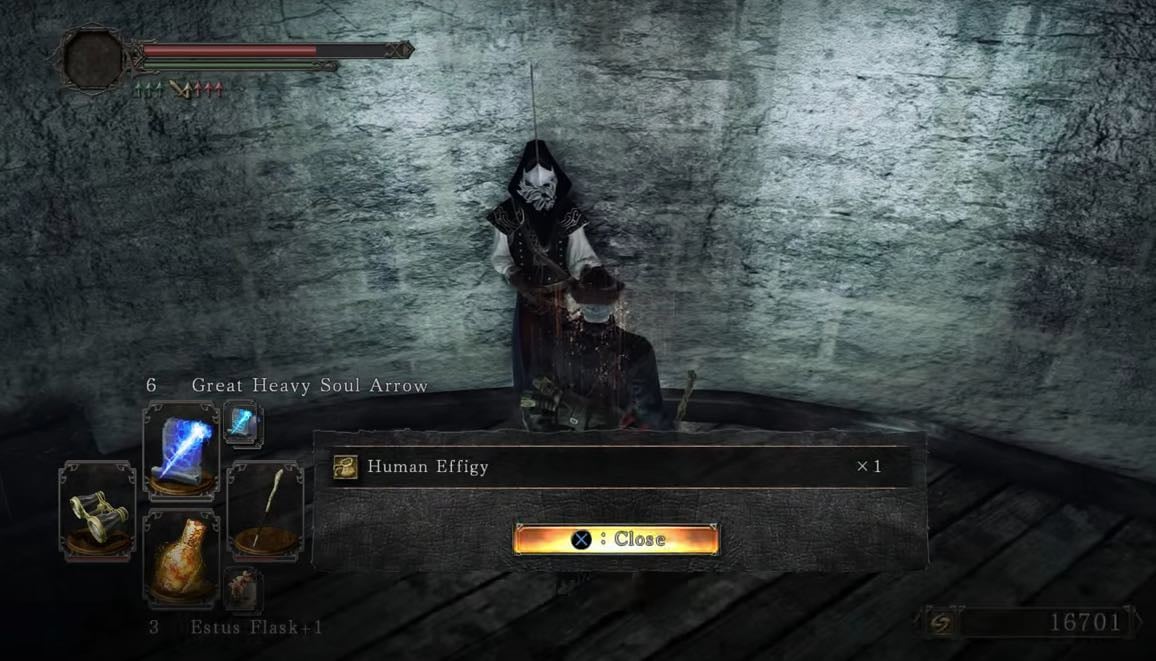
After clearing the obstuction, head through the door tand take care of the Gaoler patrolling the area. Following the way, you will notice a tower in front of you. In that tower is a bonfire and 2 metal chests, containing the Dull Ember and 2x Human Effigy. Unfortunately, we can't reach the tower from this side (we get there when we fly with the giant crow after the Pursuer fight in Forest of Fallen Giants). So instead, we go to the right into the building, where a Royal Swordsman with a crossbow and 3 Stray Hounds are waiting for us. Be carefull when fighting them, as there are several exploding barrels scattered around the area. After dealing with everyone, go through the door to see a chest in an open area containing a Human Effigy, a Fragrant Branch of Yore and the Covetous Silver Serpent Ring. A Pursuer will spawn when you get near the chest, kill it and it will drop a Twinkling Titanite. On the left of the chest there is a gap in the wall which leads to a dead end, go there and attack the wall, you will kill an undead stuck in that wall, it drops Smooth & Silky Stone. After getting everything, head back through the tower where Lucatiel is.
Royal Swordmen Swarm & Sentinel Approach
It's time to cross that broken stone to the small open area across the chasm! Make sure you have healing items and your weapon isn't about to break. You can return to the previous walkway by passing through a broken section of the small stone wall. This will provide a convenient retreat for the coming encounter. Two Royal Swordsmen wait for you in that area, kill them and head to the door blocked by a petrified hollow. Use a Fragrant Branch of Yore, kill him. then open the door. Upon opening that and stepping inside you will be swarmed by Royal Swordsmen. If you were able to kill the two earlier with projectiles through the window, that will be two less to the battle. A tactic you may want to employ:
- Before you step through the door, if you look carefully, you can see a Royal Swordsman straight ahead, in the distance (inside the building). Shooting it with a ranged attack will pull two of the Royal Swordsmen out, minimizing the upcoming swarm.
- Using the door as a choke point can be very effective. However, they use large two handed swords and can hit through each other meaning you need to be ready to backpedal and continue the fight.
After beating these guys you will find yourself in a large room with stairs heading down and a path to your left. Following the path to your left leads to more Royal Swordsmen in a small room (if they didn't all empty out before), a pull mechanism and a summon sign for Felicia the Brave. It's highly advisable to not pull this lever as it opens a gate which we'll discuss again later. If you do open the gate there are two more Royal Swordsmen and a short hallway filled with cells. Following the hall leads to the boss(es) of the area.
Heading down from the large room that prompted the knight swarm will lead to the door in the wall mentioned above as a shortcut--a shortcut to heaven! Do not enter this door or you will fall to death. A Royal Swordsman is here and a corpse that carries a Soul of a Proud Knight and a Human Effigy . A ladder off to the side of the room will lead you back up to the hallway before the boss fight. Once the door in the wall is open, it can be used to bypass the majority of Knights with the exception of the two directly in the hall. If you opened the gate I warned you not to, there will be a swarm in the hallway instead of just two. The lever can not be undone so once it's pulled you will face the Royal Swordsman swarm every time.
Note that some players report being able to walk past these two Royal Swordsmen, and the entire swarm, without them attacking at all. In any case, you can outrun them if you just want to fight the bosses. In a cell by the Mist Door there is also a skeleton with a Radiant Lifegem and if you're in human form you can summon the Phantom Pilgrim Bellclaire who will assist you with her sorcery. Head into the boss fog when ready.
BOSS FIGHT: Ruin Sentinels
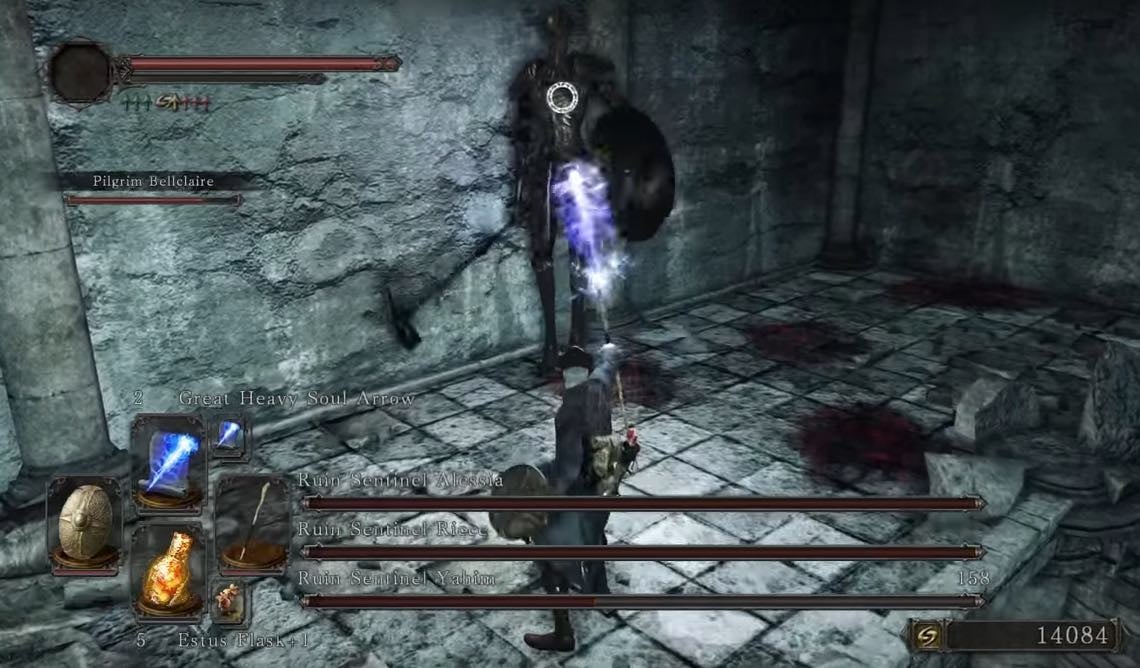
The Ruin Sentinels boss fight is a triple threat fight, pitting the player against three Sentinels. However, it is made slightly easier by the fact that you face Yahim first, on a ledge above the other two; Alessia and Ricce.
Ruin Sentinels to Belfry Luna
After defeating this boss, you can take the small door to leave the room. However, there are multiple secret doors among the walls here; facing the black doors as a point of reference, there is a hidden door at the back of the room to the right of them, and another on the wall directly across them. From the second, simply hug the wall and continue right (to the end), spamming the "X" button, to open up two more doors.
NOTE: Unlike the previous Dark Souls game, hitting the wall won't cut it. You need to press the "X" button (or whatever your "use" button is set to, open up the walls.
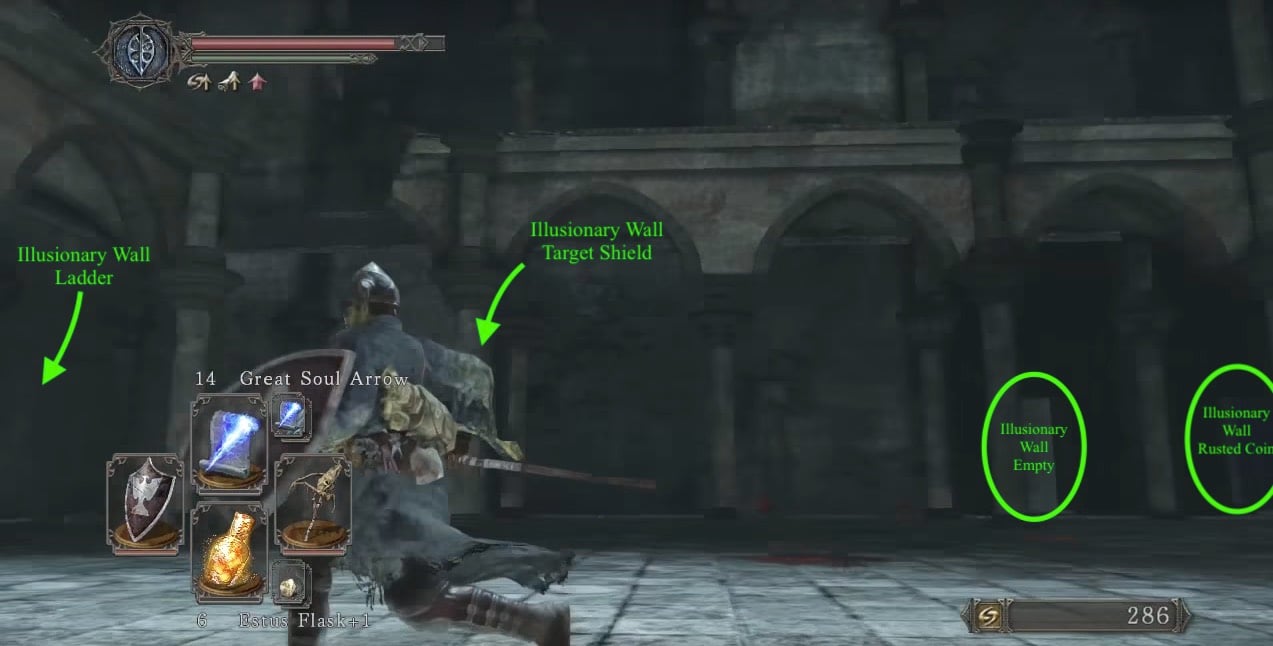
- The first room mentioned conceals a ladder, that takes you up to a chest containing Hush. If you think you're done there, you are mistaken, hug the walls on the left (facing the chest) to open yet another illusionary wall. This gives you access to a small balcony-like platform with a corpse holding 3x Homeward Bone on the right.
- The second room mentioned contains a chest holding a Target Shield.
- There is next secret door on this wall that leads to an empty room.
- The last one on this wall has a corpse with a Rusted Coin.
- When you are done you will find the aforementioned small doorway to proceed staircase leads to ledges seen when you fell into the arena and met Yahim up close. A secret door at the top of these stairs (left hand side) opens up on an exploding Rupturing Hollow and a chest with Rouge Water (NG+: Crimson Water).
Head out onto the ledge and there will be a doorway from the main ledge leads to a short corridor with cells on either side. You'll find a corpse with a Soul of a Nameless Soldier. A Rupturing Hollow in the last cell on the left explodes, causing moderate damage. This leads into a room with the Servants' Quarters bonfire, a ladder down, and a set of steps leading to a door. The ladder leads to a small room a corpse with the Large Club you'll also find a chest that holds a Priest's Chime. A Pursuer will also spawn at the end of the room as soon as you step out of the ladder. A Pharros' Lockstone can be used which does the normal ghostly visage on a wall. This leads to the area Belfry Luna.
Rupturing Hollow Swarm to Sinners' Rise
The door up the stairs, leads to a parapet. To the left, behind the crates and barrels is a corpse with the Bastille Key, but be carefull, as a Royal Swordsman is going to try to abush you from behind once you go near the crates. The other way is a tower with two paths: a doorway to the left and stairs leading up. The doorway path will net all possible loot: it leads to a short walk with a broken wall at the end on the right; the break in the wall leads to a roof with a corpse holding 3x Flame Butterfly . This roof overlooks a courtyard with four Stray Dogs as well as a well, the area accessible on the ground from the Boarded-Up Room using the Antiquated Key. You can jump a gap here which takes you to another roof where rests a corpse with a Large Soul of a Nameless Soldier, guarded by a Royal Swordsman. You cannot return by jumping but via ladder leads up to a one-way drop to a hallway, where a yellow-bellied Rupturing Hollow is already waiting to greet you. To the right is a exploding Rupturing Hollow lying in wait in a large room with many barrels. Continuing through this room leads to the stairwell in the tower where the paths split before. A door in the room with barrels opens into a wall of dirt with a skeleton inside. The skeleton can be smashed but this appears to be a dead end.
Around the corner, back near the on-way drop from the ladder, a pull mechanism opens a gate with three exploding Rupturing Hollows waiting for you. One of the Rupturing Hollows has a yellow glowing chest and will cause petrify build up with his explosions. Take care of them and you can enter a room filled with caged urns that look like Russian nesting dolls. The large pile of urns in the center of the room holds two exploding Rupturing Hollows. There's another on a ledge just above the door as you enter the room. There's a caged area in the room that you cannot access from here. Straight across the room from the entry is a doorway leading to a hall with an illusory walls at the end. This leads to another hallway with a corpse containing 2x Green Blossom and another illusory wall on the left hallway wall, which in turn leads to some ramparts above the entry to Lost Bastille from the Exile Holding Cells bonfire. You'll see an item glinting across a jumpable gap, but head left beforehand. This will spawn a Pursuer, so be carefull. After you have taken care of him or made him despawn, continue the way to find the Royal Swordsman who shot arrows at you at the beginning of the map and a Bracing Knuckle Ring. Head back and do a jump (hard to jump back!) across the gap where you'll find a Flame Butterfly and a Torch. Instead of trying to jump back, take a one-way trip to the right and drop down to a narrow ledge running along the wall. Keep following it all the way to the end, where you'll find a Soul of a Brave Warrior and a Golden Wing Shield. Drop down here to land on the stairway above McDuff's Workshop bonfire. The run back from here's not too bad: use the shortcut to the Ruin Sentinels arena, and you're halfway there.
Back in the room with the caged urns, head up the stairs to another room with two exploding Rupturing Hollows. A shackled corpse holding a Skeptic's Spice is housed behind the door on this level. Continuing up the stairs, you'll reach an open-air room with 5x Rupturing Hollows, one of which is a yellow-belly petrifier. They can be fought individually by pulling one at a time. After clearing the enemies you will notice Straid's Cell bonfire in one of the cells, but it is blocked by a petrified NPC. He is Straid of Olaphis, and you need a Fragrant Branch of Yore to free him and unblock the bonfire. The locked door to the right can be opened with the Bastille Key.
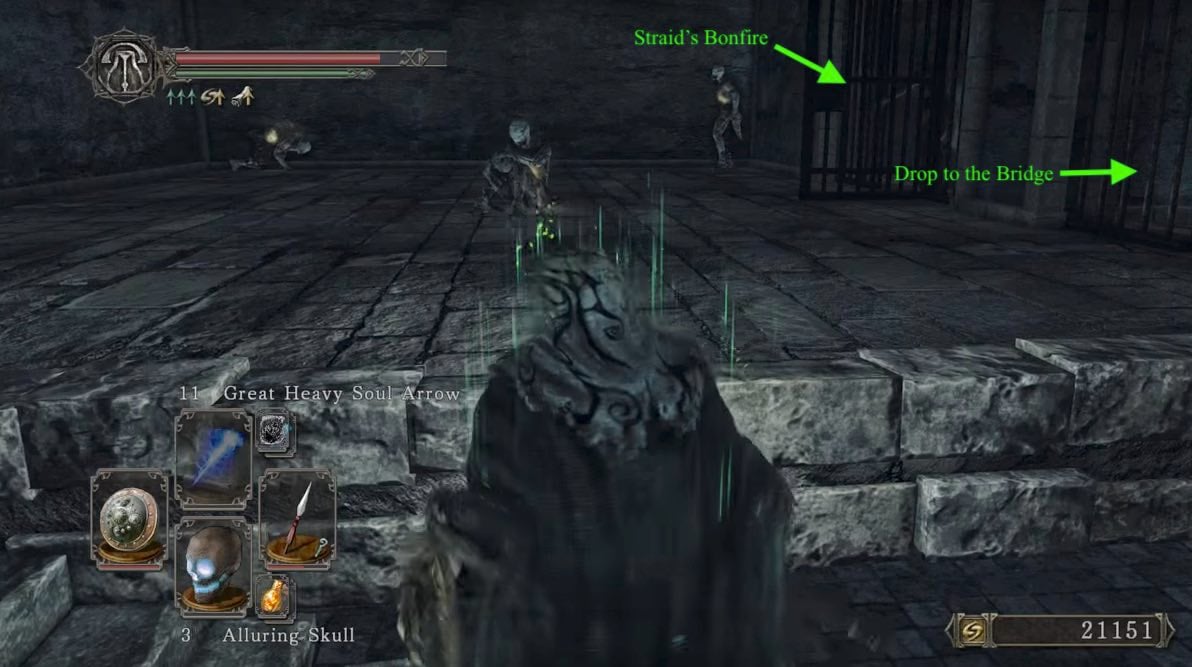
Inside the cell is a skeleton with a Petrified Dragon Bone (Resplendent Life in NG+) and 3x Firebombs. The door in the cell leads to a hole dropping you down onto the bridge below. You can get to the same bridge from back in the room below Straid's Cell bonfire; here, at the bottom of the stairs, a pull-lever opens an archway gate to the bridge, which is protected by crossbow using Royal Swordsman. Just outside this gate and to the right is a short path to a Royal Soldier, protecting a corpse with 8x Lifegem. After killing the soldier, you can sprint across the bridge to the fog gate and kill the Gaoler waiting there. Enter the fog gate to enter Sinners' Rise. But, before that, if you haven't already, go back down the stairs.
Cell Elevator Top
Back in the room below Straid's Cell Bonfire, there's a door opening to a room with a cell elevator. A corpse has a Skeptic's Spice x1. A corpse on a ledge below can be accessed by jumping (or rolling), and has a Bonfire Ascetic. Continuing to drop down leads to Cell Elevator Bottom.
Cell Elevator Bottom
This room is accessible from the Cell Elevator Top. This room holds a small torture cell, which is actually an elevator which leads to Cell Elevator Top. This room has a chest with a Wilted Dusk Herb. There is a corpse holding a Bonfire Ascetic when you take the elevator up. Take the elevator to the top, roll and land to pick it up. Note: Very risky, best equip a Ring of Life Protection or the Silvercat Ring before trying the jump.
<< Previous: No-man's Wharf Next: Belfry Luna >>
 Anonymous
I severely dislike the pursuer in this area. I was stuck on this dude for a whole 40 minuets having to do the runback every time i died. Not one of my proudest moments.

 Anonymous

The fact that this area locks you out of the first bonfire is so ****ing frustrating. Lost a ton of souls because I wasn't able to return and level up. :/
2
+10
-1