

General Information
- Previous: Grave Of Saints
- Next: Black Gulch
- Recommended Levels: 65 to 75
- Bonfires: Central Gutter, Upper Gutter
The Gutter Map

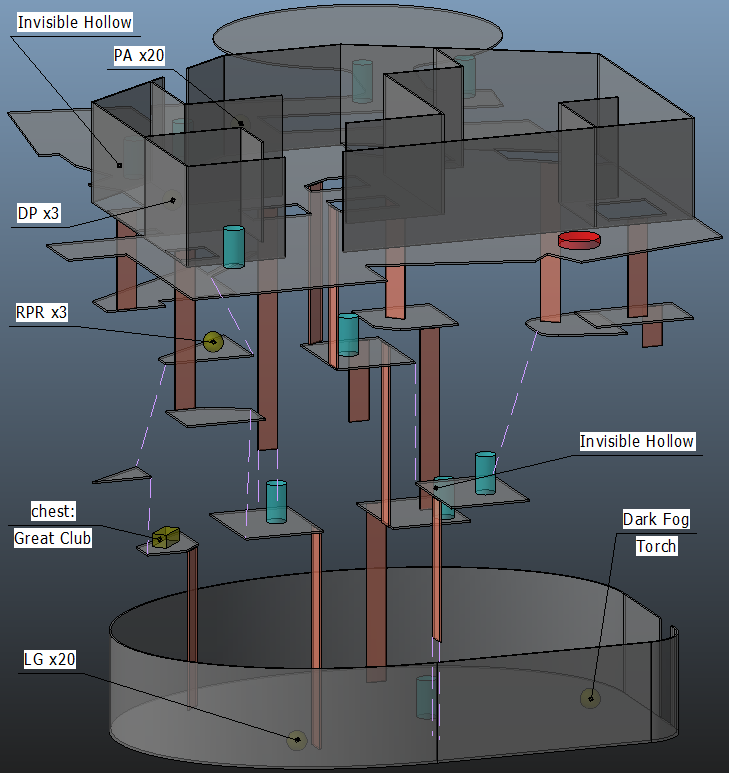
Central Gutter Map (3D)
Made by Antediluvian
NPCs in The Gutter
- Rotten Vermin (Giant Ant) - Will not attack the player, produces a corrosive blue gas that cures poison but damages equipment.
Items
Consumables- Estus Flask Shard
- Twinkling Titanite x1
- Fragrant Branch Of Yore x2
- Dark Pyromancy Flame
- Flame Butterfly x2
- Titanite Chunk x1
- Dark Fog
- Smooth & Silky Stone x2
- Havel's Armor Set (Forgotten Key)
- Black Witch Armor Set (Gutter Denizen)
- Tattered Cloth Armor Set
- Aurous Set
- Great Club
- Wicked Eye Greatshield
- Ring Of Soul Protection
- Bandit's Greataxe
- Dark Armor
- Heide Lance
- Heide Knight Iron Mask
- Lightning Winged Spear
Enemies
Non-Hostile
- Rotten Vermin (Giant Ant)
NPC Invasions
- Melinda The Butcher
- Gutter Denizen
Tips
- It is a good idea to turn your TV's brightness, contrast and background settings to as much as possible (without having to wear sunglasses to play) if you are playing this area without any sconces lit. You'll be able to avoid unnecessary falls and spot enemies.
- Before coming to this area stock up on anti-poison items and Flame Butterflies, and equip your shield in your right hand as you will want your shield always up and a torch prohibits this if it's in your left hand.
- Alternately, if you have Cast Light, you can skip a torch, but it's still helpful for lighting sconces.
- A whip is handy for destroying the statues. It can be used to break statues from a distance, and the attack also goes through walls, allowing you to destroy them from behind cover.
The Gutter Walkthrough
From the Grave to the Gutter
Immediately after emerging from the tunnel from the Grave of Saints, you'll find yourself on a ledge with multiple stone statues that can and will spit poison at you; these will be scattered all over the area and should be destroyed to avoid taking unnecessary damage that can potentially be a matter of life and death down here. Destroy them before they get the chance to, then drop down to the wooden ramp below before dropping off again onto the highest side of the wooden ramp.

You'll land on a stone platform holding a Hollow and a few jars. There doesn't appear to be a way back onto the ramp so wear the Silvercat Ring, and drop to a larger wooden structure, where you can light a sconce and find the Bonfire across a small bridge (hug the edges of the platform to get to the bridge). From the bonfire, there's a jar, on the left, hiding 2x Dung Pie next to a sconce you can light. Head back to the bonfire and walk back up the the wooden bridge. If you continue in the middle of this platform the floor will collapse under you, only this time you'll land in a room with multiple Hollows. This is one of the many split paths in this place so let's cover one scenario at a time.

Meeting Melinda
Assuming you haven't fallen through, head up the ramp to the right to fight three Hollows, then light the sconce at the end and kill the lurking Hollow. There is another one of those poison statues so break it, then head up the multiple ramps here to find more poison statues, yet another Sconce and Hollow at the top, and an area you can drop down to below. Down here are multiple Hollows and a Coal Tar hiding in one of the tar pools (the one furthest from the sconce). Break vases and loot a Large Soul Of A Nameless Soldier.
Off the right side is a wooden ramp leading up, but we're heading off the far left side , hugging the the wall with a Sconce, drop onto the side of the building then down to the ground level and circle the building to find a ladder. Next to it, is a room blocked by 3 vases separating you from the 3 Hollows and 2 Rupturing Hollows inside. Take them out, then circle around the building to destroy the poison statues and light the sconce. Up the ladder, light another sconce before jumping onto the area to your left containing a chest containing Ring Of Soul Protection. Still on this platform on the right, you'll find a Sconce and a Poison Statue (BEWARE: lighting this Sconce will most likely trigger Melinda the Butcher invasion).

Treasures
From the Sconce you can drop back down to the original platform we were at before we dropped off to the stone pathway (where we encountered the Coal Tar). But before we do that, return towards the chest and face the building we arrived from to see a small ledge below which you can jump to. Inside the room resides a Mimic, items dropped from him usually fall through the floor, down to the lower room. Use the hole in the floor to reach the lower room and loot the items dropped: Lightning Winged Spear and Dark Armor. Once that's done, return outside and drop back down to the ground level, and climb up the ladder once more to return to the chest and sconce. Turn left and past the Sconce off the edge onto the wooden ramp we skipped earlier. Head up to soon reach 3 Jars, one of which, holds a Lifegem. Past the jars is a ledge leading down to the first bonfire. Go back up the small bridge and move towards the middle of the platform to have the floor break under you. Defeat Hollows and head to the doorway blocked by a jar. From here you can see quite a remarkable platform with 6 Sconces.

Give yourself a long-enough run up and do a long jump. If you released him from his prison in Aldia's Keep, Royal Sorcerer Navlaan could invade you after making this jump. After lighting all Sconces, head up to the ladder. Upstairs is a Sconce and a cave with multiple Poison Statues, and a Large Locked Door, on the far end. Behind it lies lots of Poison Statues guarding a few jars, containing the best physical defence set in the game - Havel's Armor Set. To open the door you need to acquire the Forgotten Key, which is located in Black Gulch, so we have to ignore this door for now, and head back out. Return to 6 Sconces and proceed to the next platform. Light the two Sconces out here, and look to snipe the Rupturing Hollow on the bridge, before you drop down through the hole in the floor. Continue through the doorway to reach a ledge with 3 jars, but be carefull of the Hollow jumpin behind you when you go near them. Break them to reveal a corpse holding Dark Pyromancy Flame and 3x Rotten Pine Resin. Enter the doorway you passed before and you will find yourself in the room full of weird looking jars closely resembling a heart (breaking them causes armor durability degradation). A Hunting Dog can be found among the jars in the far left corner of this room as well as some Hollows, kill them, light the sconce, then climb the ladder.

There is nothing interesting on the second floor apart from a Hollow and a Sconce. Climb the ladder to reach the final floor of this building. Up here there are 3 jars, one of which contains a Soul Of A Nameless Soldier and a group of 5 corpses, each holding a treasure. Loot the Twinkling Titanite, Human Effigy, Fragrant Branch of Yore and 2x Smooth & Silky Stone from them. Behind the Sconce, there is an outside ledge, DON'T proceed too far on this ledge (past big group of Posion Statues) as the floor may break and you will get yourself killed (NOTE: From this ledge, it's a short jump back to the first bridge near the first bonfire. Helpful if you fell through the trap floor in the beginning). From this floor make a small drop down to the platform with 3 Sconces. Light them, then cross the bridge.
Heide Fight (K)Night
On the other side, there is another sconce to light, and are multiple Hollows and a Hunting Dog which may (or may not) come from neighbouring room across the small ramp to the right. Kill them and go up the ladder to find a Poison Statue and a chest containing 3x Black Firebomb. Go back down the ladder. Face the bottom of the ladder and move around to light another sconce, as well as a Invisible Hollow. Head straight to a small wooden ramp hanging over the far right side. From it, drop down carefully to the wood below, then drop again to the platform with a Hollow. Circle around the structure to find 2 Jars hiding a corpse and a Titanite Chunk, with a sconce nearby. Move back around the structure and through the hole in the wall to drop down into the next room. Ahead you'll find another sconce and 2 more jars on the far left containing the Tattered Cloth Set. From here you can see a Heide Knight sitting on the ledge. Kill him to obtain Heide Lance and Heide Knight Iron Mask. Be careful though, as there is a Hanging Poison Statue that you cannot reach, try to snipe it with Firebombs or avoid it entirely. Light a Sconce on one end of the ledge and the chest containing Aurous Set, on the other end. There is also a long ladder to climb when you've covered these three things.

Atop, right next to you is a corpse holding Estus Flask Shard. Ahead you'll find a sconce, and to your right are jars containing a Soul Of A Proud Knight. Circle around the structure to find 2 more Jars containing a Bandit Greataxe. From here you can make a small drop to a slanted platform with 2 Hollows. Then, drop down to another platform with one Poison Statue. From there follow the wall to the right to drop down again to a path that leads to an urn containing 2x Flame Butterfly. Now you can drop to the platform with the chest that previously contained Firebombs. Make your way back to the top platform, and climb up to the roof of the structure. Up here, there is a zip line that will transport you to the top of the 3-story building with heart-like jars that you visited previously.
Reaching the Giant Ant Queen
After riding the zip-line, go straight ahead and light the Sconce, then proceed forward and drop down through the hole. Drop to platform with 3 Sconces again and cross the bridge. Now turn right and cross the small ramp. There might be a Hunting Dog, only if you did not kill it before. Climb up the ladder and proceed to the bridge. You may find yourself standing on a big open platform with another bridge connected to it. Mind the hole in the floor to the left, as it drops you into a room with another Hunting Dog, a jar containing 2x Black Firebomb and another sconce; it's not worth dropping down now because there is a jump to a ledge full of Poison Statues to get away from this area. If you do decide to jump down, move to the outer ledge and jump across towards the multiple Poison Statues to reach the Bonfire platform, as will be mentioned later in this guide.
NOTE: You won't be able to get back to the bridge mentioned next without fast traveling all the way back to the start.
Ignore the hole and head across the bridge with the Exploding Mummy, and continue forward. Take a right to the entrance of a cave. Inside are multiple Corrosive Egg Crawlers waiting to ambush you. Wipe them out to safely loot the Wicked Eye Greatshield from the chest. Make your way out of the cave and drop down to the platform with Fog Gate (before dropping down its a good idea to snipe an Exploding Mummy down there).

Clear the area of Poison Statues and Hollows, and smash the jars in the middle of the area to get 20x Poison Arrow . Head to a small cave with blue fog coming from it. Inside is a Rotten Vermin (Giant Ant Queen) that emits constant blue gas. DO NOT KILL THIS GIANT ANT, no matter how terrifying it may seem. This giant ant is actually friendly and will not attack the player, and the gas released will cure poison (at the cost of slight equipment durability damage). She is guarded by Poison Brumer that you can lure out or take from a distance to avoid doing damage to the Queen. After killing them, move deeper into the room and break the Poison Statues and the 2 Jars to collect 4x Poison Moss.

Big Black Gulch
Before heading through the fog gate, light up the sconces in this area and take care of another Invisible Hollow a the right sconce at the fog gate. Let's head through the fog door to find a few Hollows and Poison Statues. There are multiple ladders, but most of them are pointless so we will focus on the important ones. First, ignore everything and head straight to the opposite wall in the room, with some Hollows to the left. On this wall, there is a breakable section that leads outside to a Bonfire. Use the bonfire as you please, then head back into the room with all the ladders. Upon entering from the bonfire, head straight and towards the jars on the upper left. These hide a ladder as well as 3x Dung Pie. Climb down and drop off the edge ahead onto a rock platform holding 2 jars. One of which holds another 3x Rotten Pine Resin. Drop down once again, off the left side, onto another rocky platform to find a chest containing the Great Club. Continue to take the next ladder down, but be careful as there are many Hollows waiting at the bottom. If you have lit all the Sconce in the Gutter, an NPC invasion will occur here (if you have been following the guide so far and light up all the sconces, there will be a few remaining ones, which can all be reached by climbing up the ladders from here. Be careful though, as one of the remaining sconces is near an exploding Rupturing Hollow). The invader is Gutter Denizen, a mage, who drops the Black Witch Veil Set.
Explore this area, break all jars to obtain a total of 20x Lifegem, 1x Dark Fog and 1x Torch. Finally, find a hole in the wall blocked by more heart-like jars, and drop down onto the ledge. Light the Sconce and grab the Fragrant Branch Of Yore. Deal with more poison statues and head through the fog gate into the Black Gulch.
