Shrine of Amana
 Shrine of Amana is a Location in Dark Souls 2. Hidden away far below Drangleic lies the Shrine of Amana, upon entering the area the player can hear singing throughout the area, this area features several mages with long range attacks as well as dark waters with hidden chests and cliffs. Use of a Torch is recommended to avoid falling to your death and a bow with poison arrows to target the casters from a distance.
General Information
- Previous: King's Passage -from Drangleic Castle
- Next: Undead Crypt
- Recommended Levels: 95 to 105
- Boss: Demon of Song
- Bonfires: Tower of Prayer, Crumbled Ruins, Rhoy's Resting Place, Rise of the Dead
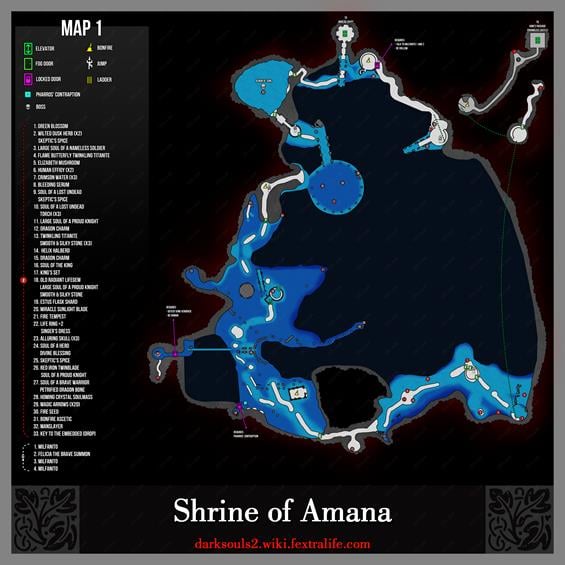
Shrine of Amana Map
NPCs in the Shrine of Amana
- Milfanito
- Two of three Milfanito sisters found through the area (Gives you Smooth & Silky Stone).
- Will reward you for helping them.
- After defeating the Demon of Song, immediately return to the 2 Milfanito to receive a Divine Blessing from each of them as a reward. Afterwards, free the Milfanito with the Key to the Embedded in Drangleic Castle and return to the 2 Milfanito. The Milfanito at the shrine will give you a Fire Seed as a reward, the other will give you another Divine Blessing.
- WARNING: Homing Soulmass and Crystal Homing Soulmass will auto-lock onto Milfanito as an enemy and kill them upon getting close to them (not sure if it's a glitch or not but it does do it as of 6/13/2014.)
Summons
Items
Consumables- Skeptic's Spice x2
- Soul of a Lost Undead x2
- Torch x3
- Large Soul of a Proud Knight x2
- Old Radiant Lifegem
- Wilted Dusk Herb x2
- Crimson Water x3
- Elizabeth Mushroom
- Flame Butterfly
- Twinkling Titanite x2
- Smooth & Silky Stone x5
- Dragon Charm x2
- Estus Flask Shard
- Fire Seed
- Sunlight Blade
- Soul of the King
- Fire Tempest
- Homing Crystal Soul Mass
- Alluring Skull x3
- Soul of a Hero
- Divine Blessing
- Petrified Dragon Bone
- Soul of a Proud Knight
- Green Blossom x2
- Large Soul of a Nameless Soldier
- Key to the Embedded (dropped from boss)
- Magic Arrow x20
- Bonfire Ascetic x4
- Manslayer
- Human Effigy x2
Enemies
- Basilisk
- Archdrake Pilgrim
- Amana Priestess
- Aldia Warlock (Prowling Magus)
- Amana Aberration
- Ogre
- Poison Brumer
- Great Poison Brumer
NPC Invasions
Boss
Notes
- In NG+ there is also a black phantom between the Priestess and the Ogre. *1
- Putting your Human Effigies in your Item Box doesn't seem to work, when trying to get your Hollowing reversed at the Milfanito Shrine; it appears you must really be out to get a free human restore.
Shrine of Amana Walkthrough
Access
From the Mirror Knight boss fight, head straight to the area with the circular platform ahead. Standing on the crest in the middle will activate it and send you down a long way. However before doing this, hug the short barrier on the left until you can turn into it and make a U-turn on it, to find a chest. This chest contains a Soul Bolt, Spell Quartz Ring +2, and 3x Bonfire Ascetic. At the bottom, proceed through the hole in the wall, and take a right at the torch. Here you'll find a Green Blossom, inclosed by roots -take your weapon to it, and claim your loot, then head in the other direction. Continue until you reach the Tower of Prayer Bonfire.
Meet-o Milfanito
From this bonfire, head down the stairs and take the door to your left. Through here you'll notice an item on some branches on your left that you cannot pick up, so break the branches that hold it up, so you can claim it later on. Right ahead you'll also find an Archdrake Pilgrim, and a trail leading to an opening on the right. In here you'll find a chest with 2x Wilted Dusk Herb and Skeptic's Spice, and a Basilisk. Head back to the ruined tower, and proceed down the staircase into an area, mainly submerged in water, and find a Large Soul of a Nameless Soldier under the stairs. There is also a Amana Aberrations by the exit that leads to the next area.
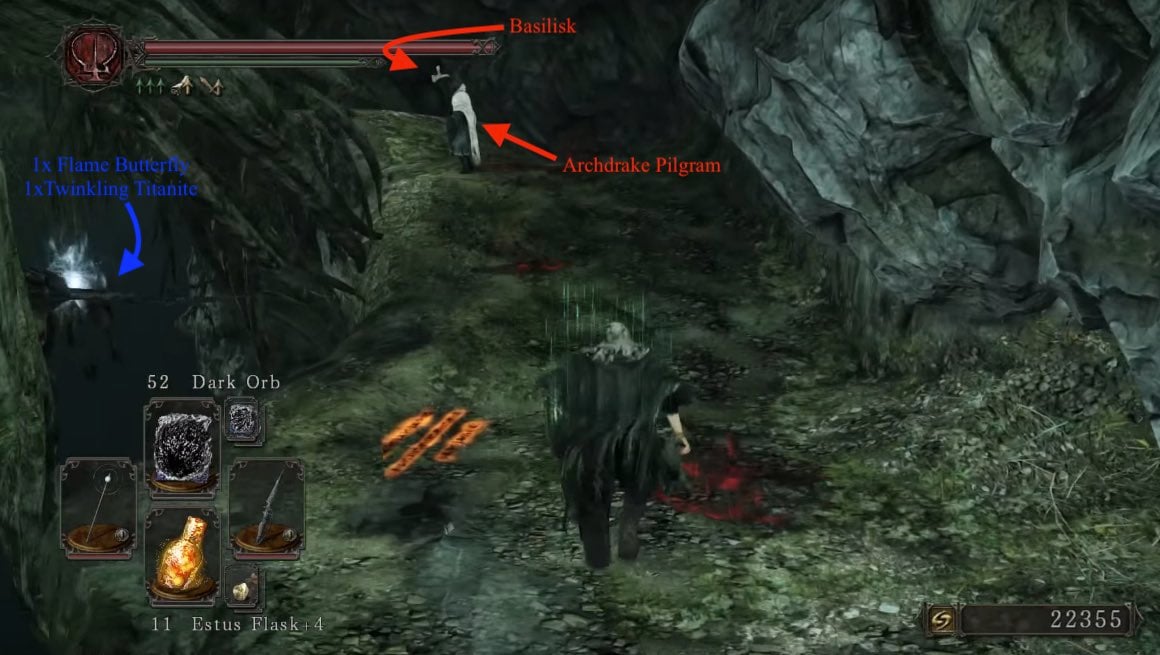
This room, and the coming ones are filled with partially submerged, walkable areas. You can walk into the water, but be careful not to fall through the deep pits. While these ledges are tough to see under the water, you can use a torch to see them more clearly; however, the light from the torch will attract any surrounding Amana Aberrations, so try to use Cast Light instead as it does the job without the added trouble.
Upon entering, you will see an Archdrake Pilgrim ahead and on the right, who will attack you on sight, and Amana Aberrations hiding in the water along the rocky trail for the rest of the area. Some noteworthy notes on these enemies:
- They are being kept calm by the beautiful song you've probably noticed by now.
- Beware though that going close to them or carrying a torch will aggro them.
- You can see the tops of their heads peek out of the water.
- If singing is present, a yellow sparkle effect over their locations.
- You can also lock onto them from a distance before they aggro.
To the right of the path, you'll notice some rocks sticking out of the water. Go to them and hug them -or use a light source to check where you can walk- and make your way around them to find a Flame Butterfly and a Twinkling Titanite. Head back and notice the left of the rocky path, if you search carefully, you'll find a chest containing Elizabeth Mushroom (the chest on the very left border before the deep water begins, start at the beginning of the rocky path, move to the left till you are at the border, and then move the border a bit upwards to find the chest). More obviously and still on the left, you'll find a small rocky platform holding a corpse with 2x Human Effigy. At the end of this path, you'll find a hut.
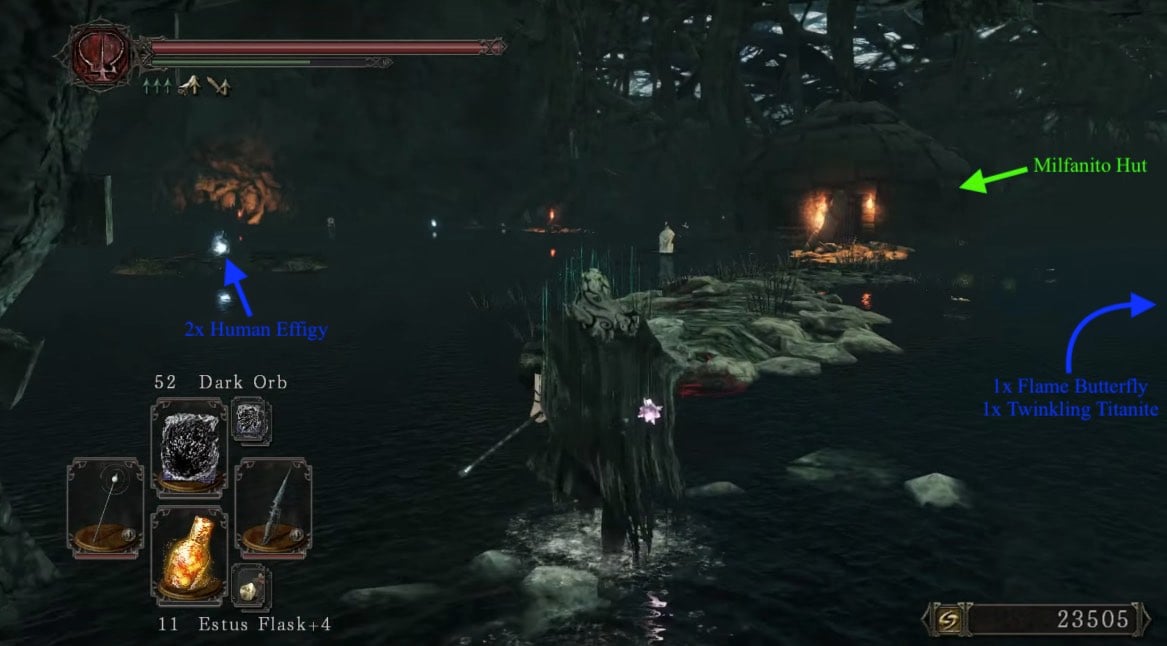
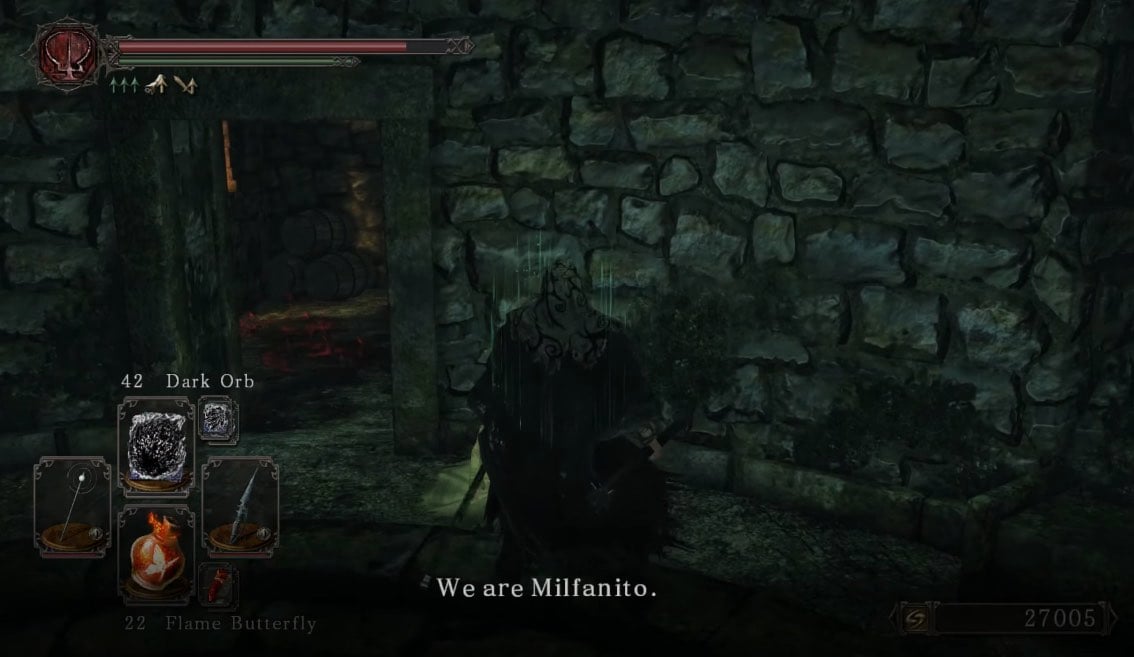
Once you get in close to the hut, the song will stop and any remaining Amana Aberrations will attack you. Inside the hut you will find Milfanito. She will tell you about her sisters, some lore, and will give you a Smooth & Silky Stone if you exhaust her dialog. If you circle around her hut, you'll find a chest with 3x Crimson Water and some curse jars. However tempting it may seem, do not kill any Milfanito! Antagonizing her or her sisters will revoke your ability to seek help from them to turn you human when you're out of Human Effigies!
Misty Cave
Proceed through the hut and open the door in the back to continue. This path will show several drops, Amana Aberrations, and three Archdrake Pilgrims at the far end of the cavern. The first drop you come across is a Bleeding Serum on the right, in the water. Right by it on the main path, you'll find a total of 2x Soul of a Lost Undead and a Skeptic's Spice, a Large Soul of a Proud Knight and 3x Torch. The Pilgrims mentioned earlier also attack you when you've reached this point. Right before abandoning the path, and heading into the cave, to the left you'll find an Amana Aberration guarding a partially submerged-chest in water, containing a Dragon Charm.
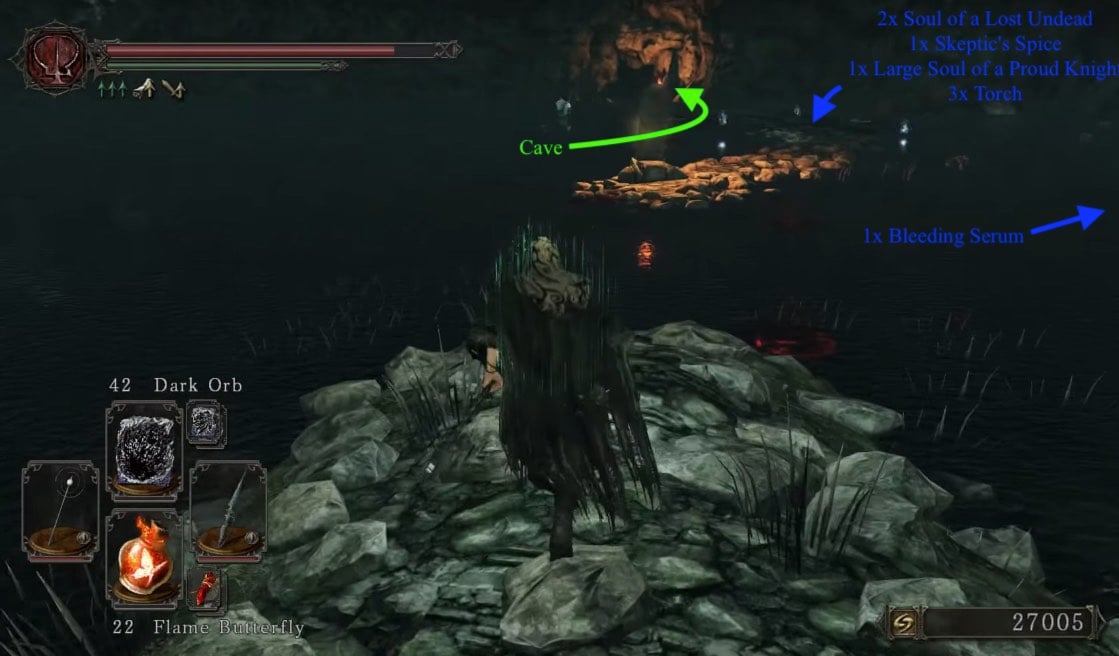
Inside the tunnel, the first cave-room on the left contains four Amana Aberrations and a chest containing a Twinkling Titanite and 3x Smooth & Silky Stone. A lone Poison Brumer will approach you around this mini cave. Come back out to the tunnel you were traversing, and continue until you hit a mist wall.
Another Dragonrider?
Upon exiting the mist and tunnel, ahead is another similar stone path with the crumbling ruins to your right, providing the Crumbled Ruins Bonfire inside. The smartest move right now is to go and rest at the bonfire since a death here is not so uncommon, and having to traverse the whole area you just did again, would not be ideal. Back on the path and way down the line is a new enemy type, the Amana Priestess, that will shoot homing soul arrows at you from a long distance which deal a lot of magic damage. They also usually have Amana Aberrations somewhere around them, so be careful when approaching them. Avoid fighting in the water unless it's absolutely necessary, ideally rushing the nearby Priestesses and pulling all the Aberrations onto the stone path before dealing with the further Priestesses.
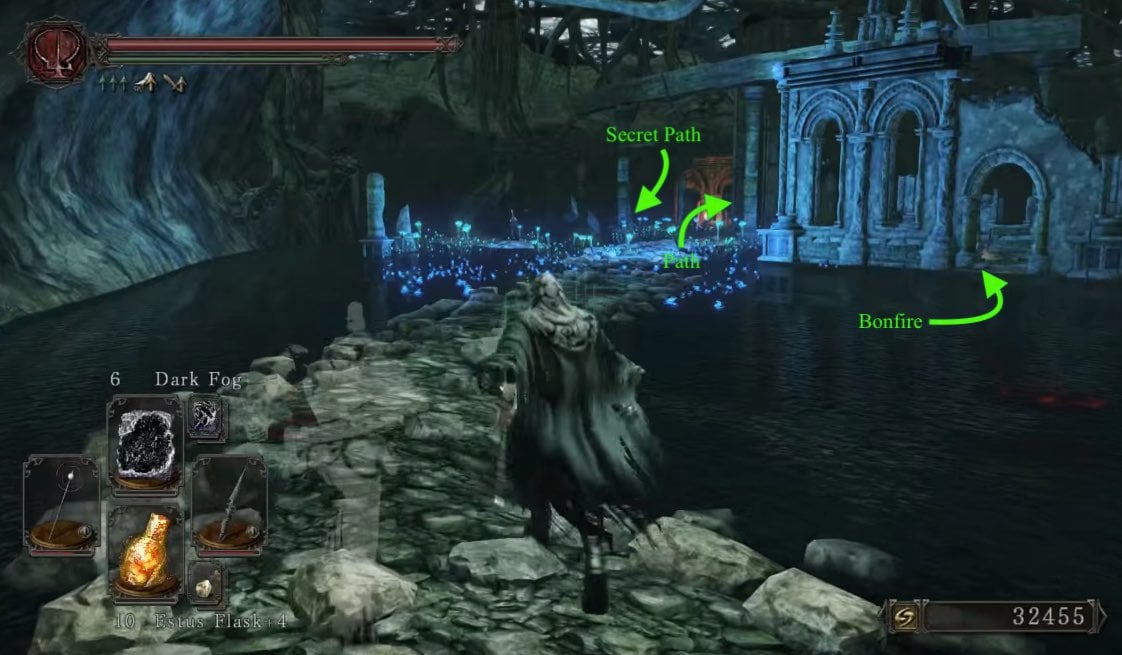
Near the area with the first Amana Priestess, you should notice a ramp leading into the air. Just past it and to the left, near the big gate, is a submerged Pharros' Contraption. Activate it to reveal a hidden wall, leading to a little cave with a chest containing the Helix Halberd. Also when passing the ramp on the right, an Old Knight wielding a hammer will approach and attack you. After dealing with this, look to the left for a hidden pathway in the water, close to the third Priestess. Ignore that path for now, as you need to find King Vendrick first and be in human form to open the door at the end of the path. There will also be a DragonRider guarding this path.
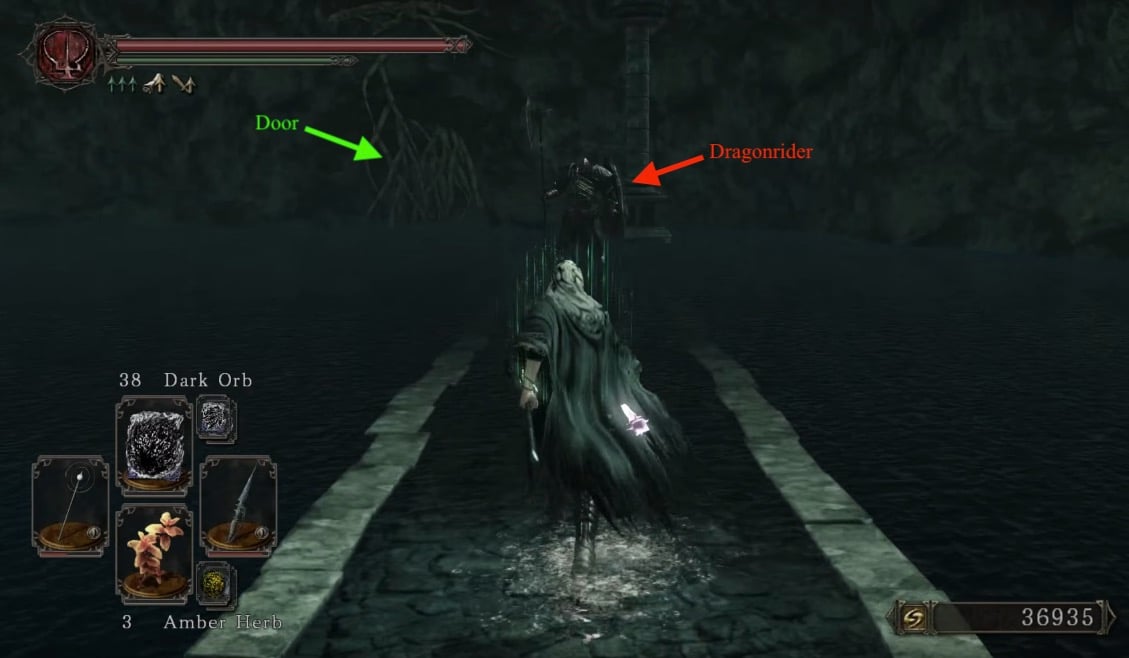
This is Getting Tricky
In the opposite direction of that path is another Amana Priestess waiting, with a corpse containing a Fire Seed next to her. Ahead on the left, you will notice a path with a Priestess who may or may not be already attacking you, next to an Ogre. Try to snipe her with a bow from here, then proceed towards the platform she was standing on, killing the Aberration that pops up before dealing with the Ogre. There will also be another Priestess by the upcoming hut that could do with some killing too. Follow the path killing any Aberrations that jump out, until you reach the second hut. Inside the hut there is an Old Radiant Lifegem, a Large Soul of a Proud Knight, and a Smooth & Silky Stone; as well as an summon sign for Lone Hunter Schmidt.
Quick Detour (Can be Skipped)
There is another more hidden and dangerous pathway in the water after the Ogre. The pathway is under the columns, is guarded by two Priestesses and a couple of Aberrations, and is very narrow so watch your step. An Estus Flask Shard and the Miracle Sunlight Blade (in the Chest behind the Corpse) is waiting there. The narrow path will begin on the right of the second column, after that, the path is going left of the columns. As with the other paths, a torch is not required, but helps finding the path.
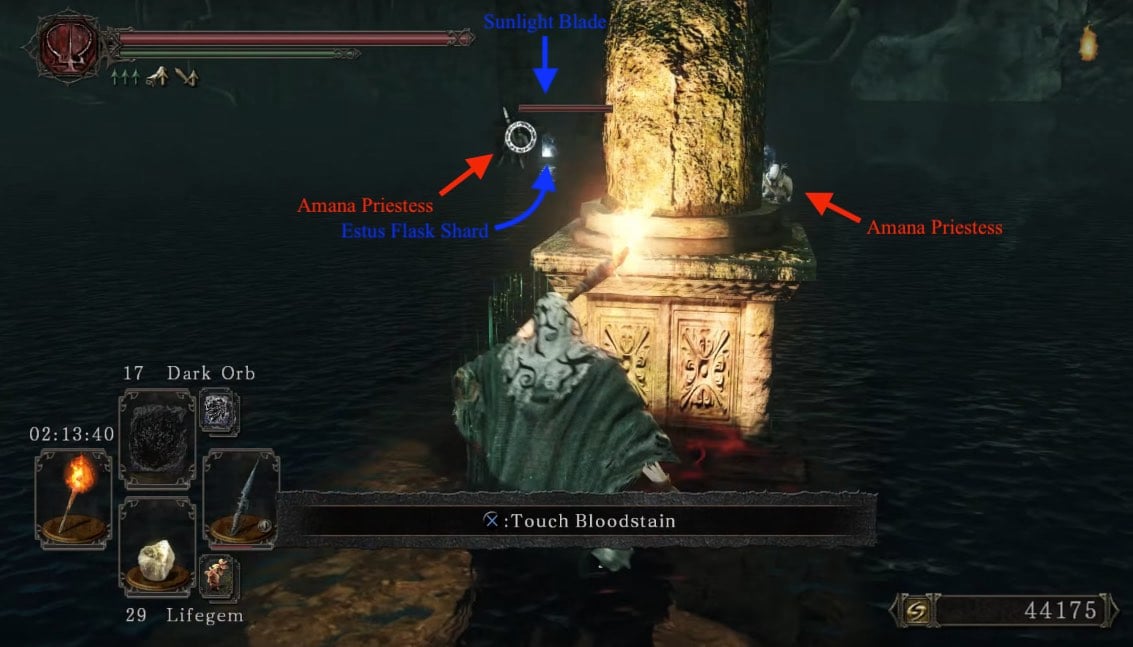
Back to Tricky
Once you leave the hut, there will be an Archdrake Pilgrim a few meters ahead. Lure him then kill him, then before moving to the left, carefully check the right side. There is a hard-to-see chest which contains Fire Tempest. From the door, carefully head about stright-right, if you can't find it immidiately, circle around the border carefully. Be carefull to not go too close to circle of Cursed Urns, if they are in your way, get rid of them (a Bow and Iron Arrows works best here).
After that, going left from the hut, you will find yourself near the ruins. Come close to them but don't go any further as there are -you guessed it- another two Priestesses on the other end who will snipe you with Soul Arrows. Use cover and try to shoot them down. Be aware of Amana Aberrations and Archdrake Pilgrims that might pose a melee threat to you as well. There will be also one Priestess ahead who heals other enemies and herself instead of attacking you. After dealing with all threats, head a bit back, while looking to the walls on the right. You will eventually come across an cave opening with another Priestess and a Archdrake Pilgrim in front of it. Deal with them, then destroy the roots with your weapon. Inside, another Ogre and a corpse with Singer's Dress and a Life Ring +2 are waiting inside.
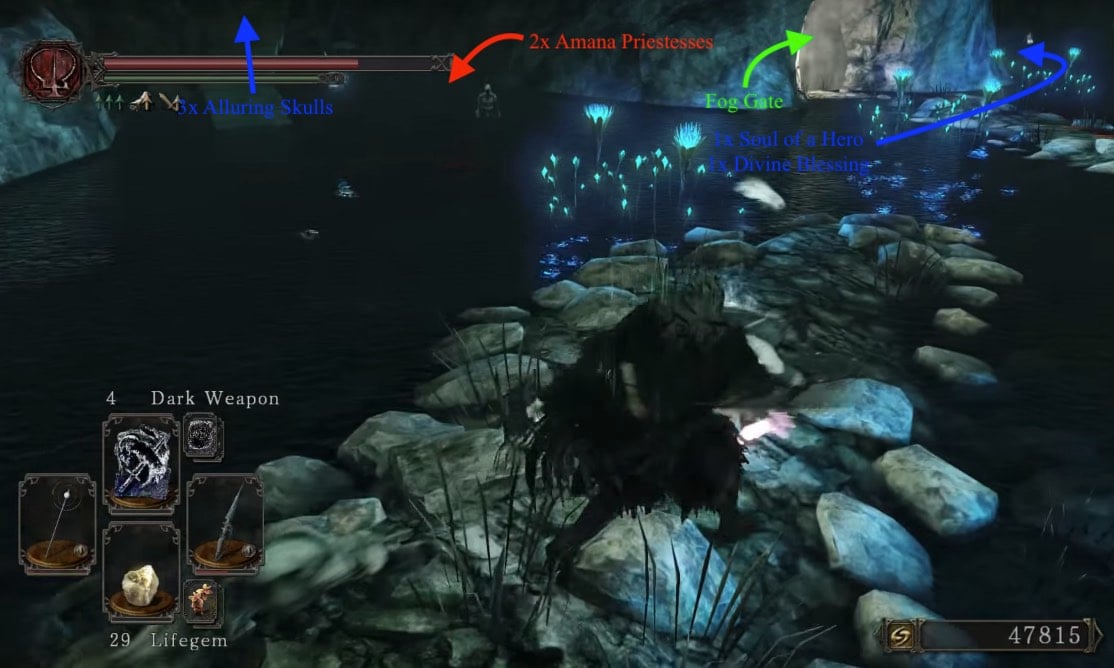
You may notice a fog gate but head to the left side of the area to find another two Priestesses next to a upward-sloping column holding a skeleton with 3x Alluring Skull, at the top. While to the right of the fog gate, is a very thin ledge with a corpse holding a Soul of a Hero and a Divine Blessing -HUG THAT WALL. There is another item visible from here, but we can't reach it from here.
Boss Fight: The Musical
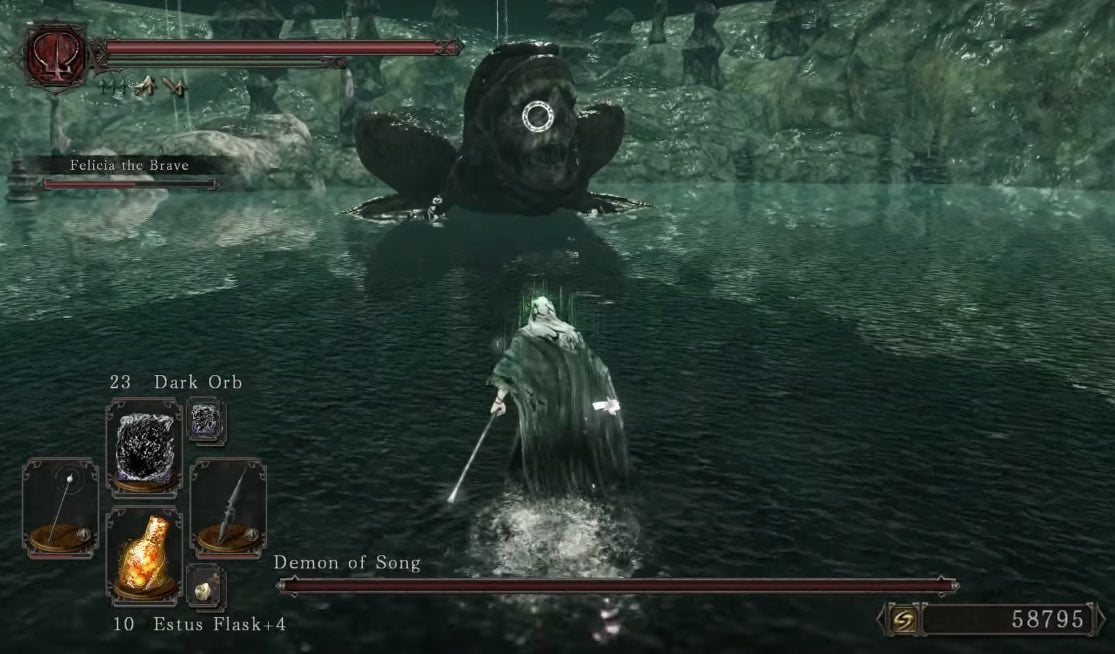
Once you have cleared the area, enter the mist into a cavern with a single file line of Poison Brumers; deal with them and use Rhoy's Resting Place bonfire on the left. You can summon Felicia the Brave her if you like, she is very helpful for the upcoming battle. On the way to the exit, more Poison Brumers as well as a Great Poison Brumer will be in the way. Once you exit the cavern, there will be a mix of Priestesses that will start shooting you from a distance and Archdrake Pilgrims that will attack you as well. Run forward towards the column that has a torch on it and snipe them from behind it. Moving to the right, continuing behind the columns, you will come across a corpse holding Homing Crystal Soul Mass. Moving to your left, kill the Amana Aberrations along the way, and Priestesses. Here you should pick up quite a bit of loot, this should include :
- 1x Sceptic's Spice
- Red Iron Twinblade
- 1x Soul of a Proud Knight
- 1x Soul of a Brave Warrior
- 1x Petrified Dragon Bone
- Homing Crystal Soul Mass
Head back to the exit of the cave and before going in, turn to the left. Follow the thin path (hug the wall) to retrive the item we ignored before: a Large Soul of a Proud Knight and a Green Blossom. Continue forward down the path and you will be invaded by Peculiar Kindalur. Make sure not to have homing soul mass or crystal homing soul mass as it will autolock onto the Milfanito as an enemy and kill her, as you want to free her. At the end of the path, near a pillar with a torch is another corpse with a Large Soul of a Proud Knight and a Green Blossom. After taking the items, go into the hut to free the second Milfanito (just "talk" with her and she will disappear into a cloud of light particles). Continue down and through the fog gate to face the boss.
BOSS FIGHT: Demon of Song
Path to the Crypt
Killing this boss grants you 19,500 souls, the Demon of Song Soul, and the Key to the Embedded. From where you came in, head into the cave on the right, until you return to a stone path in a submerged area. Follow this path to the end then continue straight, through the two doorways, and you will shortly arrive at a staircase and find a few Basilisk lurking. After taking care of them, head to the chest of them were guardiang to find 20x Magic Arrows. Take the stairs up the tower to find a petrified Hollow blocking your way. Use a Fragrant Branch of Yore to unpetrify him, then go inside to the Rise of the Dead bonfire.
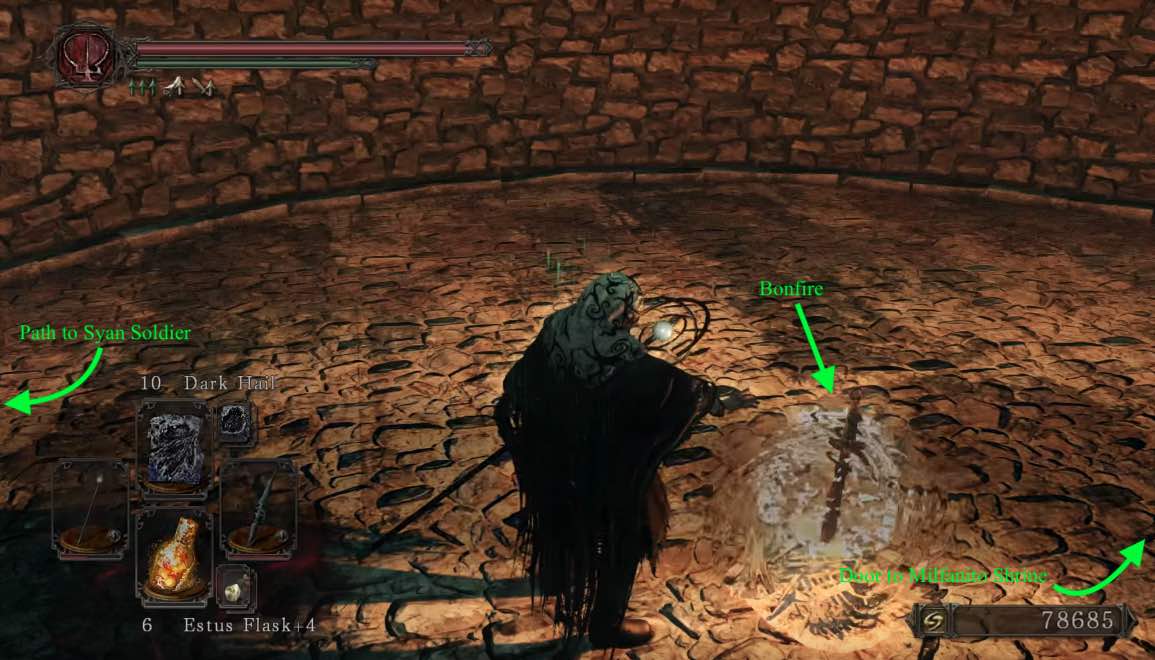
At the top of the stairs above the bonfire is a door that can only be opened when you are hollow. Behind the door, 3 Hollow Crawlers will greet you. After taking care of them, follow the path ahead, soon meeting a Hollow Pyromancer. Praying at the Altar in front of you lets you become human again, if you don't have any Human Effigys anymore (having any in your Inventory, Storage Chest and dropped them, the Altar does nothing).
Behind the Altar is another Milfanito, who whill reward you with a Fire Seed for rescuring her sister, as well as a Divine Blessing for defeating the Demon of Song. Exhausting her dialog, she gives you a Petrified Something.
Down the stairs by the altar you will find a Fire Seed in a cave at the bottom guarded by another Hollow Pyromancer, with another one waiting outside. On the left of the staircase outside is a chest, containing the Manslayer; following the thin ledge on the right of the staircase leads to a chest containing a Bonfire Ascetic.
Head back to the previous bonfire, then follow the rock path to the big door, guarded by a Syan Soldier. There's an elevator here that will get you to Undead Crypt.
General Information
- Previous: King's Passage -from Drangleic Castle
- Next: Undead Crypt
- Recommended Levels: 95 to 105
- Boss: Demon of Song
- Bonfires: Tower of Prayer, Crumbled Ruins, Rhoy's Resting Place, Rise of the Dead
Shrine of Amana Map
NPCs in the Shrine of Amana
- Milfanito
- Two of three Milfanito sisters found through the area (Gives you Smooth & Silky Stone).
- Will reward you for helping them.
- After defeating the Demon of Song, immediately return to the 2 Milfanito to receive a Divine Blessing from each of them as a reward. Afterwards, free the Milfanito with the Key to the Embedded in Drangleic Castle and return to the 2 Milfanito. The Milfanito at the shrine will give you a Fire Seed as a reward, the other will give you another Divine Blessing.
- WARNING: Homing Soulmass and Crystal Homing Soulmass will auto-lock onto Milfanito as an enemy and kill them upon getting close to them (not sure if it's a glitch or not but it does do it as of 6/13/2014.)
Summons
Items
Consumables
- Skeptic's Spice x3
- Soul of a Lost Undead x2
- Torch
- Large Soul of a Proud Knight x4
- Old Radiant Lifegem
- Wilted Dusk Herb x3
- Crimson Water x3
- Elizabeth Mushroom (chest in water)
- Flame Butterfly
- Twinkling Titanite x2 (can be farmed as most of the enemies drop these at a decent rate)
- Smooth & Silky Stone x3
- Dragon Charm
- Estus Flask Shard
- Fire Seed
- Soul of the King
- Fire Tempest
- Homing Crystal Soulmass
- Alluring Skull x3
- Soul of a Hero
- Divine Blessing
- Petrified Dragon Bone
- Soul of a Proud Knight
- Green Blossomx2
- Large Soul of a Nameless Soldier
- Key to the Embedded (dropped from boss)
- Magic Arrow x20
- Bonfire Ascetic x1
- Manslayer
- Human Effigy (can also be farmed with a high drop rate)
Equipment
Enemies
- Basilisk
- Archdrake Pilgrim
- Amana Priestess
- Aldia Warlock (Prowling Magus)
- Amana Aberration
- Ogre
- Poison Brumer
- Great Poison Brumer
NPC Invasions
- Peculiar Kindular (NPC Invader)
Boss
Notes
- In NG+ there is also a black phantom between the Priestess and the Ogre. *1
- Putting your Human Effigies in your Item Box doesn't seem to work in getting a free hollowing-reversal from the Milfanito, it appears you must really be out to get a free human restore.
Shrine of Amana Walkthrough
Access
From the Mirror Knight boss fight, head straight to the area with the circular platform ahead. Standing on the crest in the middle will activate it and send you down a long way. However before doing this, hug the short barrier on the left until you can turn into it and make a U-turn on it, to find a chest. This chest contains a Soul Bolt, Spell Quartz Ring +2, and 3x Bonfire Ascetic. At the bottom, proceed through the hole in the wall, and take a right at the torch. Here you'll find a Green Blossom, inclosed by roots -take your weapon to it, and claim your loot, then head in the other direction. Continue until you reach the Tower of Prayer Bonfire.
Meet-o Milfanito
From this bonfire, head down the stairs and take the door to your left. Through here you'll notice an item on some branches on your left that you cannot pick up, so break the branches that hold it up, so you can claim it later on. Right ahead you'll find a trail leading to an opening on the right. In here you'll find a chest with 2x Wilted Dusk Herb and Skeptic's Spice, and a Poison Brumer. Head back to the ruined tower, and proceed down the staircase into an area, mainly submerged in water, and find a Large Soul of a Nameless Soldier under the stairs.
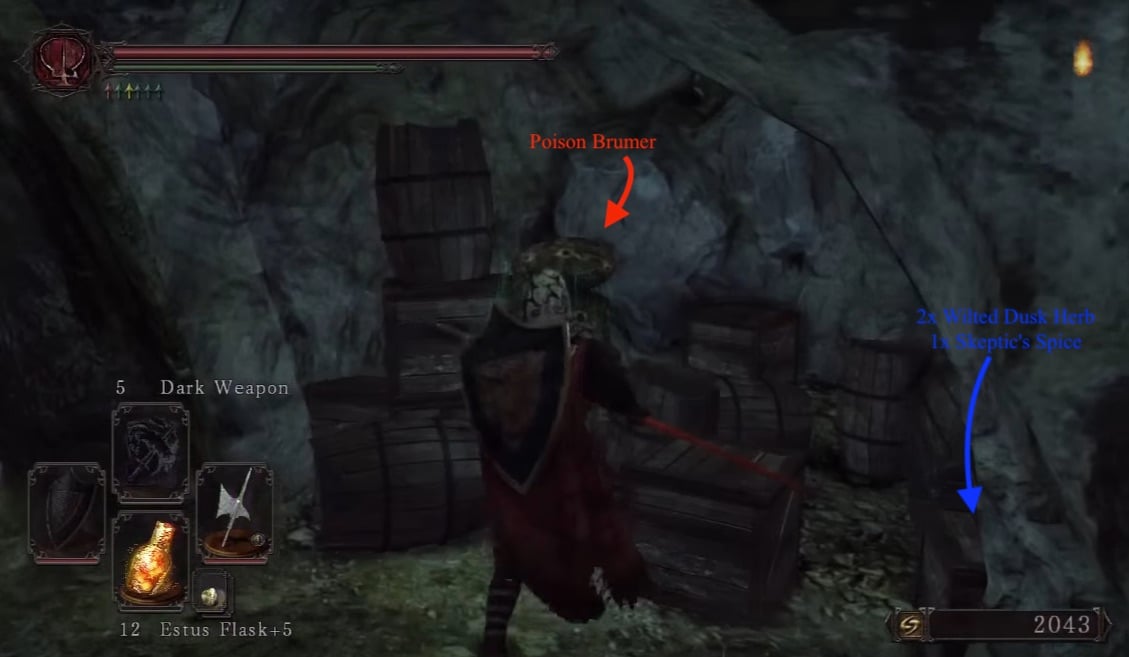
This room, and the coming areas consist of partially submerged, walkable areas. You can walk into the water, but be careful not to fall through the deep pits. While these ledges are tough to see under the water, you can use a torch to see them more clearly; however, the light from the torch will attract any surrounding Amana Aberrations, so try to use Cast Light instead as it does the job without the added trouble.
Upon entering, an Archdrake Pilgrim will attack you from the jump. This entire watery area is also riddled with Amana Aberrations hiding in the water along the rocky trail for the rest of the area. Some noteworthy notes on these enemies:
- They are being kept calm by the beautiful song you've probably noticed by now.
- You can see the tops of their heads peek out of the water.
- If singing is present, a yellow sparkle effect over their locations.
- You can also lock onto them from a distance before they aggro.
To the right of the path, you'll notice some rocks sticking out of the water. Go to them and hug them -or use a light source to check where you can walk- and make your way around them to find a Flame Butterfly and a Twinkling Titanite. Head back and notice the left of the rocky path, if you search carefully, you'll find a chest containing Elizabeth Mushroom. More obviously and still on the left, you'll find a small rocky platform holding a corpse with 2x Human Effigy. At the end of this path, you'll find a hut.
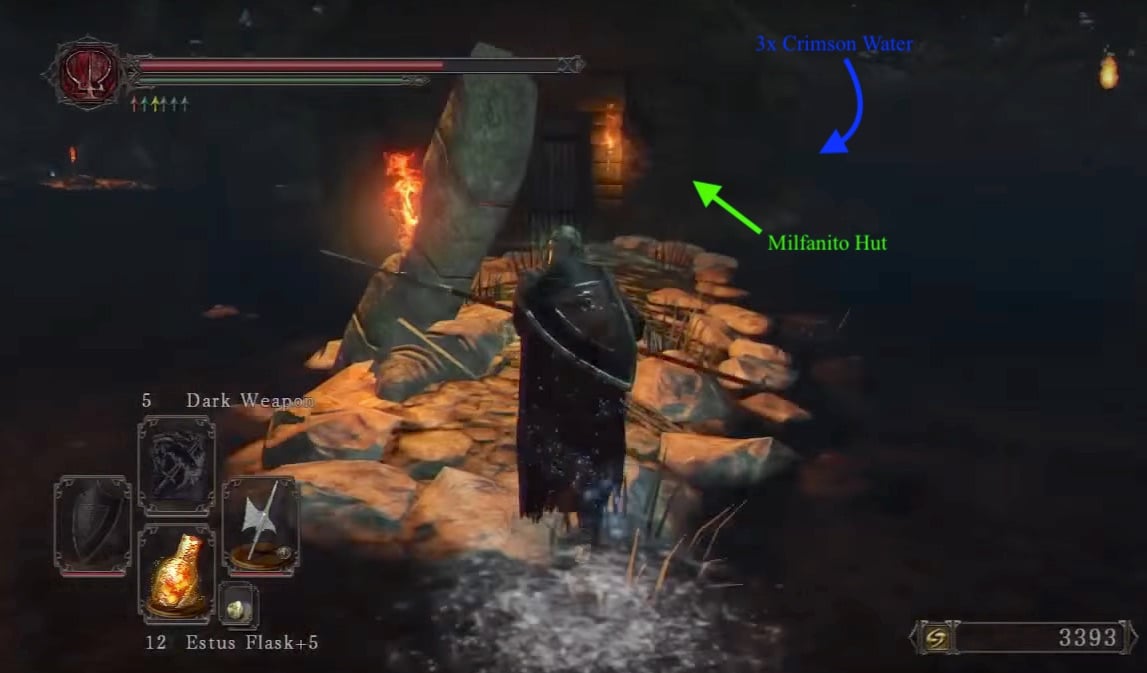
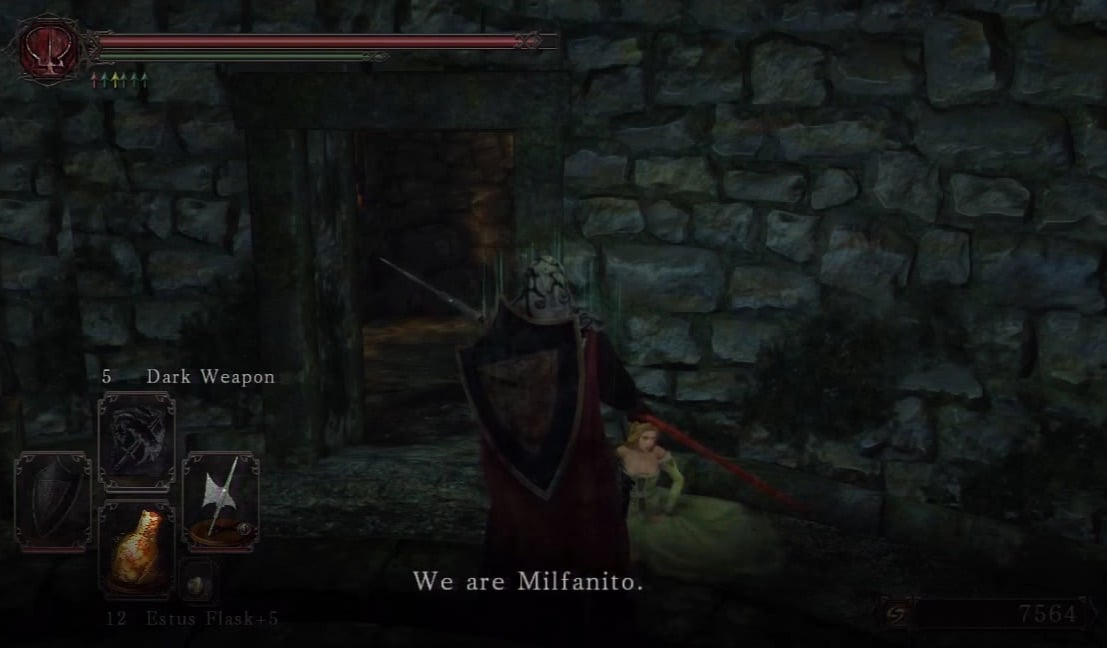
Once you get in close to the hut, the song will stop and any remaining Amana Aberrations will attack you. Inside the hut you will find Milfanito. She will tell you about her sisters, some lore, and will give you a Smooth & Silky Stone, if you exhaust her dialog. If you circle around her hut, you'll find a chest with 3x Crimson Water and some curse jars. However tempting it may seem, do not kill any Milfanito! Antagonizing her or her sisters will revoke your ability to seek help from them to turn you human when you're out of Human Effigies!
Misty Cave
Proceed through the hut and open the door in the back to continue. This path will show several drops, Amana Aberrations, and three Archdrake Pilgrims at the far end of the cavern. Right on the main path, you'll find a total of 2x Soul of a Lost Undead and a Skeptic's Spice, a Large Soul of a Proud Knight and 3x Torch. The Pilgrims mentioned earlier also attack you when you've reached this point. Right at the entrance to the cave, to the left you'll find an Amana Aberration guarding a partially submerged-chest in water, containing a Dragon Charm.
Inside the tunnel, the first cave-room on the left contains four Amana Aberrations and a chest containing a Twinkling Titanite and 3x Smooth & Silky Stone. A lone Poison Brumer will approach you around this mini cave. Come back out to the tunnel you were traversing, and continue until you hit a mist wall.

Another Dragonrider?
Upon exiting the mist and tunnel, ahead is another similar stone path with the crumbling ruins to your right, providing a second bonfire inside. The smartest move right now is to go and rest at the bonfire since a death here is not so uncommon, and having to traverse the whole area you just did again, would not be ideal.
Back on the path and way down the line is a new enemy type, the Amana Priestess, that will shoot homing soul arrows at you from a long distance which deal a lot of magic damage. They also usually have Amana Aberrations somewhere around them, so be careful when approaching them. Avoid fighting in the water unless it's absolutely necessary, ideally rushing the nearby Priestesses and pulling all the Aberrations onto the stone path before dealing with the further Priestesses. Near the area with the first Amana Priestess, you should notice a ramp leading into the air. Just past it and to the left, near the wall, is a submerged Pharros Lock Contraption. Activate it to reveal a chest containing the Helix Halberd.
After dealing with this, look to the left for a hidden pathway in the water, close to where the third Priestess. Use it to get the cave that holds the Soul of the King and King's Set. While hidden, the path is quite easy to spot as it is a straight path, and is guarded by a DragonRider. The door that separates you from the goodies mentioned earlier, is only unlocked once the optional boss King Vendrick in the Undead Crypt, is killed, and you are in human form.

This is Getting Tricky
Once back at the spot of the third Priestess, you should be able to se an item on right as well as another Priestess -this item is a Dragon Charm. Ahead on the right, you will notice a path with a Priestess who may or may not be already attacking you, next to an Ogre. Try to snipe her with a bow from here, then proceed towards the platform she was standing on, killing the Aberration that pops up before dealing with one-eyed shrek there *1.
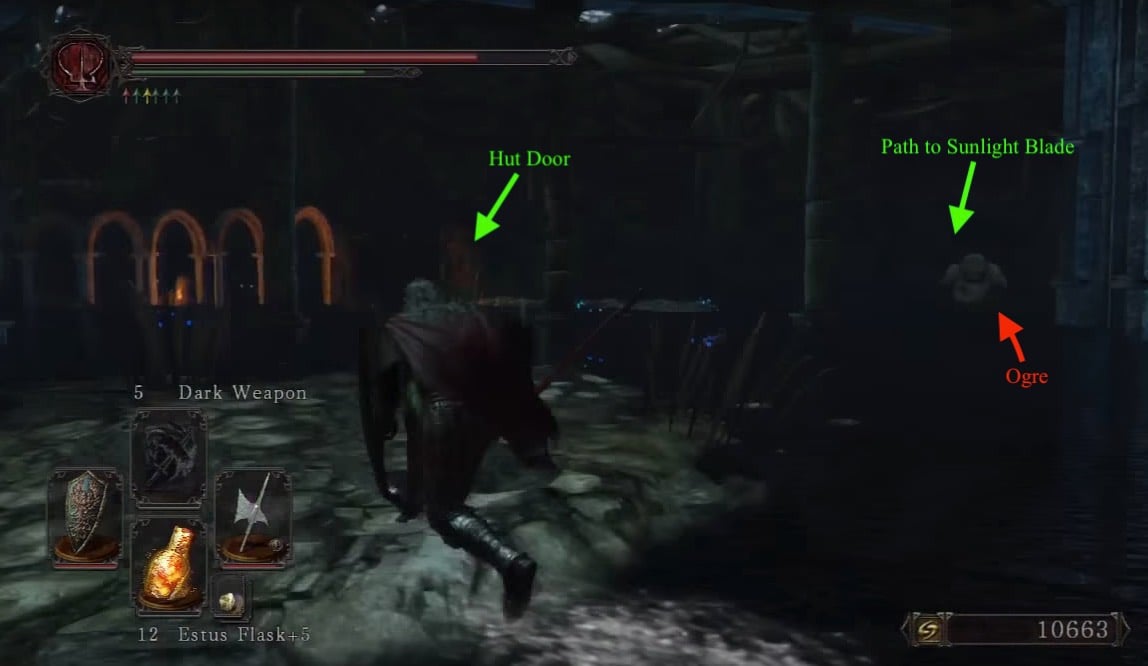
There will also be another Priestess by the upcoming hut that could do with some killing too. Follow the path killing any Aberrations that jump out, until you reach the second hut. Inside the hut there is an Old Radiant Lifegem, a Large Soul of a Proud Knight, and a summon sign for Felicia the Brave; the summon is quite helpful for the upcoming fight.
Quick Detour (Can be Skipped)
There is another more hidden and dangerous pathway in the water after the Ogre. The pathway is under the columns, is guarded by two Priestesses and a couple of Aberrations, and is very narrow so watch your step. An Estus Flask Shard and the Miracle Sunlight Blade (in the Chest behind the Corpse) is waiting there. Where in other areas you could get away with not using a torch, here it is absolutely vital as the path becomes tricky and not so straightforward; to avoid having to pop a Flame Butterfly every 10 seconds, make sure you get the offensive advantage on the Aberrations and use the pillars to block the damage from the Priestesses.
Back to Tricky
Once you leave the hut, there will be an Archdrake Pilgrim that will attack immediately. Move to the left, carefully check the right side. There is a hard-to-see chest which contains Fire Tempest. You will not see any messages, as it will be submerged, but sometimes, a prompt will appear on the screen. This lets you know you're getting close. Be aware of the bunch of Cursing Urns around! From the Cursed Urns, if you have your back to the hut, the chest is located a good walk northwest (Seeing as a clock, it would be at about 10-11 hours. Use a torch or Cast Light for better visibility).
After that, going left from the hut, you will find a spot covered by branches. Hack the branches down and kill the Ogre to find a Life Ring +2 and a Singer's Dress. Now head back out and be aware of Amana Aberrations and Archdrake Pilgrims that might pose a melee threat to you.
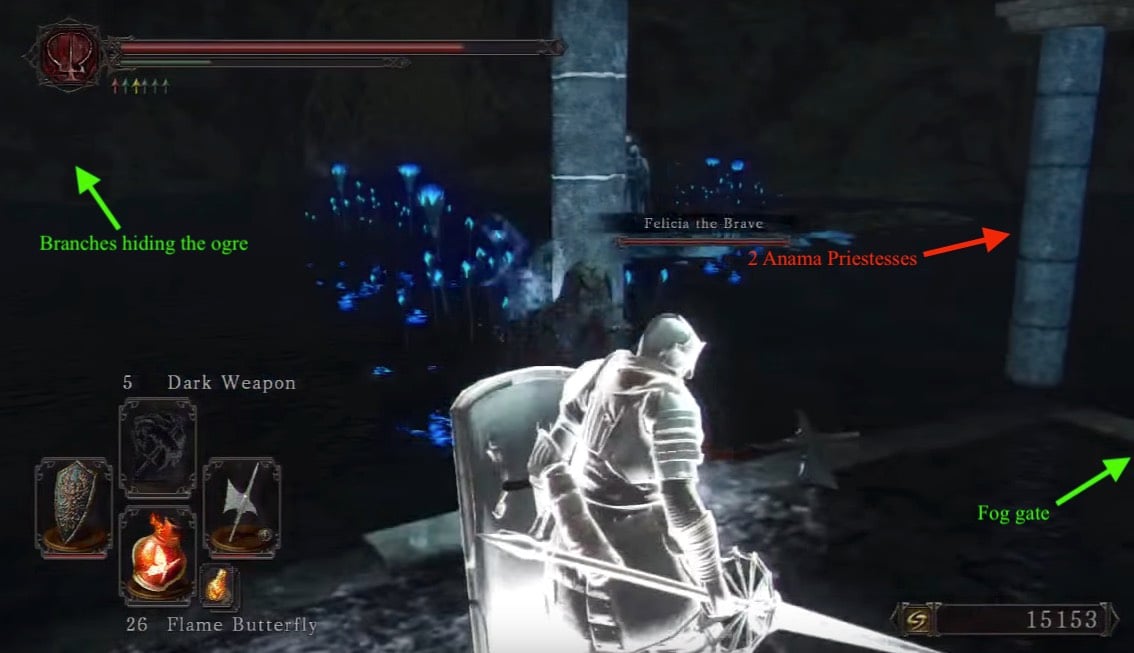
You may notice a fog gate but head to the left side of the area to find another two Priestesses next to a upward-sloping column holding a skeleton with 3x Alluring Skull, at the top. This part might be a little tricky since they always snipe you from a long distance, so use cover. While to the right of the fog gate, is a very thin ledge with a corpse holding a Soul of a Hero and a Divine Blessing -HUG THAT WALL.
Boss Fight: The Musical
Once you have cleared the area, enter the mist into a cavern with a single file line of Poison Brumers and a giant one; deal with them and use Rhoy's Resting Place bonfire on the left. Once you exit the cavern, there will be a Large Soul of a Proud Knight on the right of the exit. There will also be a mix of Priestesses that will start shooting you from a distance and Archdrake Pilgrims that will attack you as well. Run forward towards the column that has a torch on it and snipe them from behind it. Moving to the right, continuing behind the columns, you will come across a corpse holding Homing Crystal Soulmass. Moving to your left, kill the Amana Aberrations along the way, and Priestesses. Here you should pick up quite a bit of loot, this should include :
- 1x Sceptic's Spice
- Red Iron Twinblade
- 1x Soul of a Proud Knight
- 1x Soul of a Brave Warrior
- 1x Petrified Dragon Bone
- Homing Crystal Soulmass
Continue forward to another hut and you will be invaded by Peculiar Kindular. Make sure not to have homing soulmass or crystal homing soulmass as it will autolock onto the Milfanito as an enemy and kill her, as you want to free her. Continue down to face the boss.
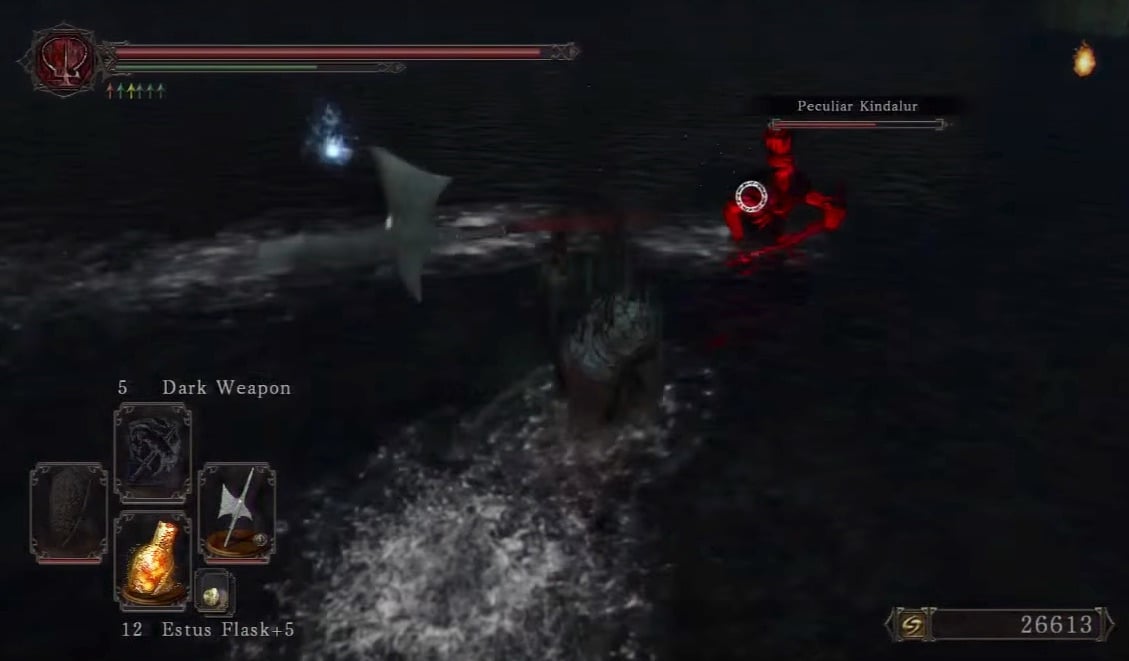
BOSS FIGHT: Demon of Song
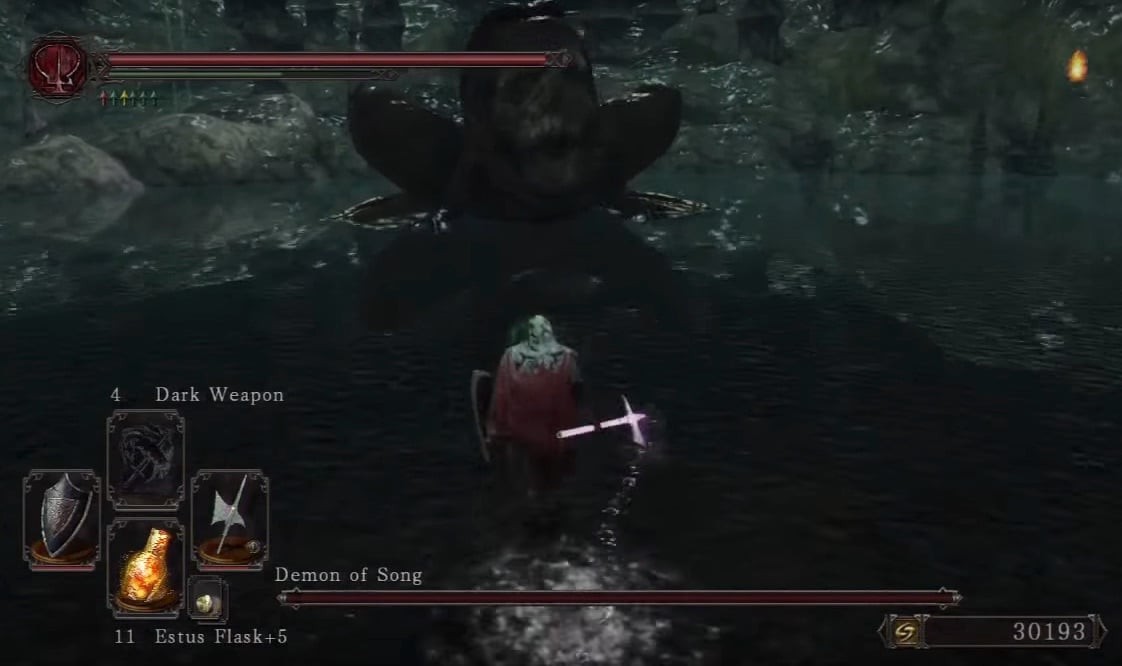
Path to the Crypt
After the boss fight, off to the right when you face the undead crypt door, is a semi-hidden path to a tower. Inside the tower is the Rise of the Dead bonfire, and near to the bonfire entrance is also a chest with 20x Magic Arrows.
At the top of the stairs above the bonfire is a door that can only be opened when you are undead- so if you want access but you're human, kill yourself-, and have talked to all the Milfanito to open it or come back here later. Behind the door are some undead worshippers and Aldia Warlock. Beyond them is the shrine with a Milfanito. Talk to the lady to get rewards, and when you run out of Human Effigies you can revive here using the burning altar as long as you are on good terms.
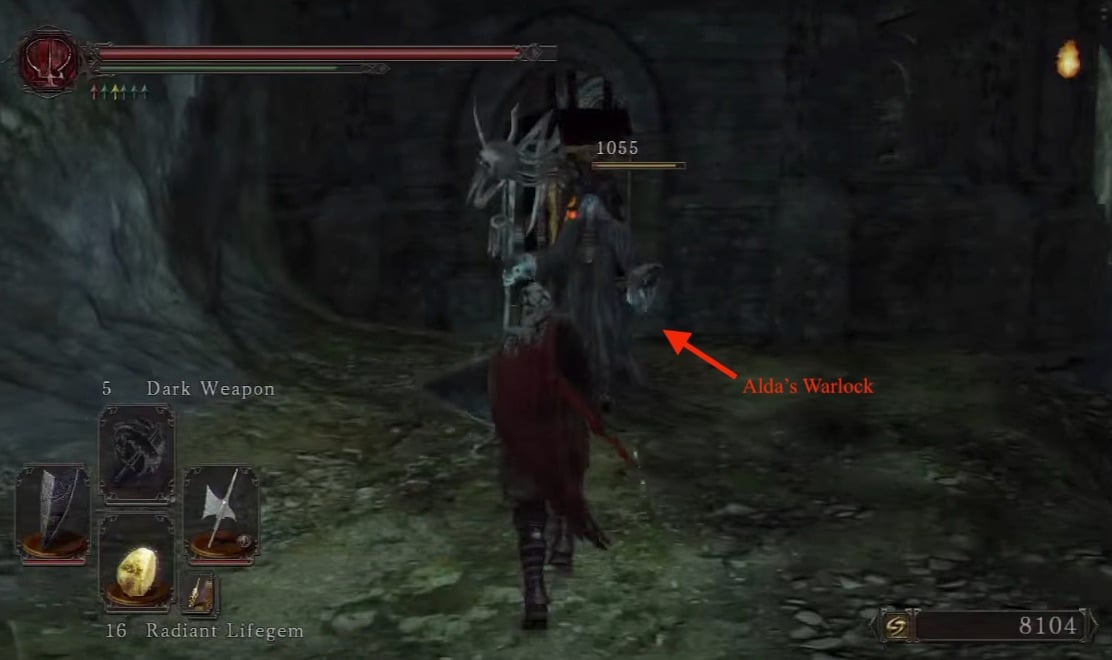
Down the stairs by the altar you will find a Fire Seed in a cave at the bottom guarded by another pyromancer enemy, and outside another pyromancer enemy. On both sides of the staircase are chests, one with the Manslayer katana and on the opposite side is a ledge that leads to a chest containing a Bonfire Ascetic. Careful though, as the ledge is quite thin.
Now , go back to the previous bonfire, then lead your way back to the big door ahead, guarded by a Syan Knight. There's an elevator that will get you to Undead Crypt.
 Anonymous
This place only sucks if you refuse to use ranged combat or if you're playing vanilla unpatched

 Anonymous
When I learned about Shrine of Amana, I dreaded my arrival in this area. But, IMO, it's OK. Maybe I skipped something (because I didn't find the second bonfire), but running from the first to the third bonfire was alright— a slow walk without rushing. Boss run is fine too. For the first time, it's better to kill priestesses with bow and clean the area for invasion fights. On consecutive runs, you can just go left to hide behind pillars and not trigger knights. IMO, there are WAY WORSE areas in DS2

 Anonymous
Dam Havel's Set/Shield + UGS Greatsword made this way easier

 Anonymous
The worst F*cking area in the entire game holy **** this is worse than Farron, worse than Blighttown, worse than anythig they have ever come up with.

 Anonymous
2nd area isn't that bad. You've just obtained a ring of magic protection. Use it. Use ring of steel protection too if needed. Just concentrate on getting to the next bonfire. Go slowly and use the protection afforded to you by the environment. Take plenty of healing. Use poison arrows. I've been through at 400k sm and no bow. Take your time.

 Anonymous
I swear to god Miyazaki loves making that one area in every soulsborne game where every player screams ”get ducked Miyazaki" at the top of their lungs.

 Anonymous
Would legit take standing in the frigid outskirts and fighting infinite reindeer bastards before ever attempting this place once

 Anonymous
I could put up with everything in this godforsaken murderditch if it weren't for the underwater ledges. I can't spot them unless I'm at the very edge, staring at my feet.

 Anonymous
this area was easy seriously the only hard part was the part when you are invaders by some mage npc , i mean monster are slow and predictable they die in 2-3 hit with longsword and mage spell are easy to dodge and you have pillar to help you , you can also summon to help you sadly many people suffer from skills or build issue , the only frustating thing was the part when you can fall

 Anonymous
 Anonymous
Was going through this area and looked at this page to figure out why there was a giant well in the middle of this area. No info on it, then I looked at the comments, and everyone was complaining about this area. I made it through most of this area pretty nicely, so I was like "what's the fuss about?" only to close this tab, enter DS2 again, then die to 1 sorcerer and 1 knight after I spent 20 minutes clearing all the enemies. I believe it is time to hang myself

 Anonymous
Sorcery doesn't melt enemies here like everywhere else. Tried Pyromancies, they're all junk tbh. At the 2nd bonfire I said screw it and dug out a bow and some poison Arrows from my item box.

 Anonymous
 Anonymous
 Anonymous
 Anonymous
don't worry DS2 players, we removed anor londo but we promise you there's still gonna be homing missle firing at you at some point in the game

 Anonymous
Worst area in the game -555/0 would not recommend even worse then explosive diarrhea at 5 am

 Anonymous
IMO, the run from the ruins bonfire to the cave bonfire is the worst. I've found that how hard this area is largely depends on the path you take. I'm probably the worst player here, and I did it almost fully melee. Some tips:
Tip #1: don’t try to collect all the items in the area right away. Make it to the cave bonfire first and then backtrack. Most priestesses face the ruins bonfire, so coming from the opposite end means they can't see you coming = easy backstabs = easy exploration.
Tip #2: their projectiles are easy to evade if you're not locked in combat with someone else. Don't use lock-on so you can see what's going on around you. As the projectile is about to hit you, roll towards and underneath it. I've made it my priority to deal with melee enemies first while dodging projectiles instead of beelining for the priestesses the moment I saw one, and had a much easier time compared to when I was trying to rush the priestesses.
Tip #3: probably obvious, but use the environment to your advantage. Sometimes there are pillars or walls that you can stand behind and heal where the projectiles can't hit you.
Tip #4: always check the floor for underwater enemies before moving forward and dispatch them before going for the priestesses, otherwise they might sneak up on you. You want to avoid being in the worst case scenario, which is having melee enemies attacking you while 2 priestesses are firing projectiles at you. There's a few spots on this level where that can happen.
Now, as to the actual pathing through the level (writing from memory so may not mention all of the enemies):
Starting at the ruins bonfire, dispatch the 3 underwater enemies around it as they will follow you otherwise. There will be a priestess close to you, get ready to roll under 2 sets of projectiles as there's another priestess to your right. Standing on a small island, you can see a giant knight. Do NOT go around the fallen pillar to your left, or you will end up in the situation #4 describes. Take out the knight instead, and go towards the circular ruins. There will be underwater enemies and the priestess firing at you from the other end. Ignore the priestess for now, take out the underwater guys and hide behind the wall to heal if needed. Ignore the ogre. Make your way along the wall and take out the priestesses standing among the columns to your left. There will be a small house ahead, with a priestess next to the rightmost wall of the house. Ignore her and run to open the door, her projectiles can't reach you when you're right next to the door. Go through the house and come out on the other end, circle to your right to backstab that priestess. From now on, you will have to fight pilgrims in addition to priestesses. Same strategy applies, take out the melee enemies first while rolling through projectiles, then take out the priestesses. It can actually be worse to fight melee enemies close to the priestesses as having the projectiles cast next to you makes them harder to avoid. Take out the pilgrim ahead of you, then take a look around. There's a pilgrim and a priestess on a small island ahead, but once you go there and dispatch them, you can and possibly will get rushed by 2-3 more pilgrims. So take care of them first before going to the island, there's a few enemies standing around the area that can aggro during the island fight. After that, there should only be an enemy or two between you and the cave. Activate the bonfire there and backtrack to collect all of the items, sneaking up on and backstabbing priestesses, making the area much easier for yourself. Good luck.
 Anonymous
The pyromancers on the side path right after the boss are worse than the entire rest of the level--how on earth are you even meant to fight these guys? They cover the entire area around themselves with constant AoE spells so you have almost no chance to get close, and if you ever do they fast-roll away from your attacks. The two at the bottom often both aggro on you together which makes them LITERALLY unapproachable. No I will not accept "use a bow hurrrrrr" as an answer, by the way.

This game is made long before 2020
I wonder how did they manage to perfectly recreate 2020 as an area in the game
 Anonymous
 Anonymous
 Anonymous
I'm sure it's been said before but this area is just flat out ANNOYING. Once you've run through it once it isn't necessarily hard but it's tedious to get through. Move forward, find caster, shoot arrow, shoot another arrow, wait for stamina to regen, shoot another arrow etc. There are lots of places to fall to your death, very high enemy density, an annoying boss runback that features durability destroying enemies you ALSO have to kill from range, it's just annoying and bad game design.

 Anonymous
 Anonymous
What a beautiful area with such magnificent views. Oh, the magic arrow spam from every angle possible is approaching me, I must hurry. I found a little house to stay for a while, I feel safe now. I come out and goddamnit! These knights don't get slowed down by the water like I do, what is this sorcery? I swing my sword like a madman and I get the job done. In the blink of an eye, an hippo cyclops, adorable and frightening at the same time, comes to join the party. I panic, therefore I tend to make mistakes more often than not, but somehow, I manage to get away. Exhausted and dehydrated from this constant persecution, I accidentally roll into the abyss. A single splash culminates my journey. Water wins.

 Anonymous
the place that'll make you finally realize that bows r actually viable

 Anonymous
Went through this area blind with sword and shield around sl100 and I found it very fun personally, I guess that's unpopular. Trying to run back to an area is kinda hard though due to the magic missiles. Demon of song is alright too.

 Anonymous
I was right at the boss door with all of my heals and spells and i fell in a god d..n hole god i love this game bud damn

 Anonymous
I'm playing SotFS and there is no Aldia Warlock, only 3 pyromancer.

 Anonymous
This area is only bearable because of the despawning mechanic.

 Anonymous
 Anonymous
 Anonymous
Has anyone managed to make the Ogre or the Dragonrider fall to the death?

 Anonymous
For some reason the Dragonrider respawns, but only gives 2700 souls.

 Anonymous
 Anonymous
 Anonymous
Is Heide Knight Sword good here ? (because of lightning damage + water)

 Anonymous
 Anonymous
Damn, it's like some people forget they're playing a Dark Souls game... Imagine complaining that a DS game is difficult. Like, you specifically opted into playing a DS game. Do you feel entitled to find DS2 easy because you're able to breeze through DS1 after two dozen playthroughs? I really don't get it. If you don't like hard games there are plenty of easy ones out there.

 Anonymous
This area is almost completely dragged down by the section right before the third bonfire that spams Archdrake Pilgrims and Priestesses like no tomorrow, and to make it worse NG+ adds MORE to an already excessive amount of enemies. Everything before or after that is manageable, but the fact that Archdrake Pilgrims cannot be parried, have insane poise, walk through water at regular speed, and fast combos combined with healing and homing magic from the priestesses, means that last section is earnestly one of the most dangerous and frustrating to get through in the game. It's a shame because if it weren't for that the Shrine of Amana is not a bad area and definitely among the best visually in the game.

 Anonymous
Thank you for putting enemies that break my stuff in the cave, From Software. I wasn’t having enough fun

 Anonymous
 Anonymous
Which shield I should use in this area? (Against the magic attacks)

 Anonymous
Some bosses are so easy they had to make the path to the boss as tedious as possible. The whole area is a boss its sell, the Demon of Song is just a decoy for the real boss.

 Anonymous
Really beautiful dungeon, but my god do the enemies suck in this

 Anonymous
This is a tricky place, but it's not so difficult to pass. It is, indeed, very easy, IF you take care of your surroundings. A tip? get rid of the damn mages, they are the reason why this place **** you up, specially if you are melee, and get rid of those long tongue monsters lurking underwater as well. As for me, I just one bonked them all with my Dragon Tooth, that's why this place was easy for me :D

 Anonymous
To all the lifers playing this game who think it’s cool to invade on levels like this, you’re pathetic. Patiently making it almost to the end just to have some over leveled wizard one shot you when you’re out of estus and clearly don’t wish to engage is ridiculous. “Git gud”, sure. Get a life, also.

 Anonymous
Unpopular opinion, this area is very manageable with patience, planning, and speed

 Anonymous
Initial reaction to this level: I love it! I love how it looks! What’s this mysterious beautiful song?
One hour later: @&€£ this €@&£$ hellhole.
 Anonymous
There is zero ways of making this area enjoyable. If you play as melee it's probably the worst area in the entire game. If you have a bow, it's very easy but also very very tedious. It speaks volumes that the only praise I've ever heard for this area is "it looks nice".

by far the worst area in the game, however. it is very easy with a bow. b u t, i dont wanna use a bow so i just take my time with my silly spells and greatswords

 Anonymous
Is there any other door in the game that you need to be human to open?

 Anonymous
 Anonymous
Yeah, this area is relatively easy. I don't think anyone would argue that. With a bow and a bit of patience, any idiot, even an SL1 can clear it.
The reason it's horrible design is because this place is so god awful without a bow. The mages with infinite range, typical gank squads of highly aggressive enemies, and those horrendous underwater cliffs that make a torch basically mandatory for a new player are horrid.
It's easy, but the way in which you have to make it easy is pretty slow and suffocating. If Frigid Outskirts didn't exist, this place would have to take the cake for worst area in the game.
 Anonymous
A lot of people here really need to git gud. Just use arrows lol

 Anonymous
whoever designed this location most be hanged alongside their entire family

 Anonymous
Why can't I open the door that is up the stairs?
I'm hollow and I can't open it, I tried in human and nothing, again in hollow and I can never, in any of my games I can never open it
 Anonymous
Welcome to Shrine of Amana!
We have:
-Gank squads
-Tracking spammer mages
-Slow water environment
-terrible boss run
-underwater cliffs
-and more I can go on forever!
 Anonymous
Dark Souls 2 is definitely not on the list when we talk about the best souls games but this area... dude??? It's just the most unpleasant area in any souls game I've ever played so far, I really dislike this one... It's lazy and completely unnecessary.

 Anonymous
 Anonymous
I recommend killing the snipers with poison arrows, it takes 4 arrows to proc even at very long ranges

 Anonymous
The quintessential Dark Souls 2 experience is thinking "This is the worst area in the game" just to be greeted by an even worse area right after.

 Anonymous
Have patience, watch your every step, prioritize the sorcerers whenever it's possible and, most importantly, do not haste with anything.
Otherwise, you shall not pass.
 Anonymous
I finally completed this area by pancaking all the priestesses and not kill any of them. Kind of a big achievement if I say so myself.

My entire day got ruined when i was playing a new character of ds2 and remembered this area

 Anonymous
 Anonymous
 Anonymous
There are some paths one can take to remain unseen from most of the enemies. Most pillars can be used for cover from the spellcasters. One can make it due without arrows; I made it with a +10 Great Club, and a bit of patience.

 Anonymous
 Anonymous
My first time here I had to kill nearly everyone enemy in the long section until they stopped spawning...

 Anonymous
 Anonymous
God awful level design and enemies. The range on the mage attacks is ridiculous.

This area is actually fairly easy with poison arrows and a **** ton of patience. Use your poison arrows on the humanoids and use a melee weapon on the things in the water.
It takes roughly an hour to do this patiently but you can get a **** ton of souls to buy more poison arrows with. Go to gavlan to get poison items
 Anonymous
 Anonymous
this place makes me want to play russian roulette with a glock

 Anonymous
Monsters chasing you through the whole area - Check
Monsters spamming homing missiles through the whole area - Check
Swamp that prevents you from running and jumping - Check
Invisible underwater cliffs - Check
Poisonous swamp - Not found
Not possible to carry on without a torch - Not found
Looks like it could even be worse... thanks god it's not
Not yet completed the game but i hate this area more then earthen peak and gutter together
 Anonymous
The developers were 100% twirling their mustache designing this area

 Anonymous
 Anonymous
Great drops from mobs here. Don't rush it, never mind the other comments.

 Anonymous
Just ... Why? Who is thought this was good? This single area ruins my plan to replay all the dark souls games before Elden Ring

 Anonymous
I'm overleveled as f and I thought this area will be a breeze. But those casters have different ideas.

 Anonymous
touhou in dark souls doesn't exist it cant hurt you.
touhou in dark souls:
 Anonymous
Before I play the game I saw pictures of this place where there are glowing blue plants and a lake, which made me think this will be a relatively peaceful and elegant area. After I cleared the game, all I want to say is **** this area.

 Anonymous
From Software were like: Lets put all the cancer from DS2 to same place and call it the day! Movement lowing water, check. Hiding, enemies with funky hitboxes, check. Mobs who run like Usailt Bolt in water, check. Mobs who fire homing, relatively high dmg spells which also do poise dmg, check.
Well at least that beautiful singing will keep you calm, right?!
 Anonymous
genuinely, an area that shows the importance of patience in dark souls. i feel like its notable that most of the threats here don't rush you (the limited ones that do are easy to deal with), but it's all about chaining how you deal with the casters. high magic res shields, long range weapons, skillful rolling - lots of options, but you have to take your time first time through. like other commenters, i was afraid due to the reputation of the area but found it more manageable. still not fun to play, though, esp after how hard drangleic castle rules.

 Anonymous
 Anonymous
This page could use an update. While available items are correctly listed whoever wrote this page didn't take much care to explain where certain items are. For example, I've read the page ( Scholar Of The First Sin ) and it only speaks of a single Ogre guarding a hidden path. But it doesn't say anything about a second Ogre guarding the Singer's dress and a Life Ring + 2.
Also, I know the page has an option to switch between the base version and the Scholar Of The First Sin version and I would like to point out that the Aldia Warlock is incorrectly listed as an enemy in the updated version of the game.
 Anonymous
You can kill Peculiar pretty easily when you are in human form. From the bonfire, enter the area final water area. Circle around and kill the caster on the right side. Then double back and go clockwise along the area, outside of the pillars. You will come fact to face with a caster who can be killed easily, and at the same time trigger Peculiar to show up. Just run back to the bonfire and summon Felicia. Between the two of you Peculiar should go down pretty quick.

 Anonymous
Take a bow and arrows if you can, you are able to snipe almost everything from across the map either

 Anonymous
 Anonymous
 Anonymous
Running into the THIRD area full of speed reducing water and random drops of instant kill, with hiding creatures that seem to whiff under certain attacks, and homing missiles from other side of the map, I said nope nevermind I'm done. Shame, really wanted to finish the game for the first time but HOLY ****. Who thinks poison levels and water levels are fun? What ****ing programmer believes that?

 Anonymous
Yo i don't know if anyone still messages here, but today I went to the part before the Demon of Songs boss fight but just after the hut. There are like wooden branches with a ogre. If you attack the ogre it attacks behind it.
Then you get a singing dress +2 item. Does the ogre insta kill one of the sisters if you attack it? I can't find info about this anywhere on the net.
 Anonymous
save yourself some trouble and fight with a ranged weapon, the casters' sightlines overlap with one another and usually has one of those lizard guys next to them, still gonna be tedious but way less frustrating than dodging between projectiles for the whole area

 Anonymous
Hearing how bad his place was made me scared of coming here. After beating the area I can say that the Gutter and also Tseldora (just bc of my fear of spiders) were far worse for me. Like someone else said, turning your water reflections to low meant I didn't have to use a torch at all (also seeing the abberations easily). Bring a bow and every challenge here can be trivialized.

 Anonymous
Rhoy's Resting Place isn't too bad for a farming spot. From the bonfire, drop all the mushrooms, kite the ywo melee guys up to where you won't be dodging spells, kill them, then get the two casters with a bow, then the healer.

 Anonymous
**** this area, **** this game, **** everything AAAAAAAAAAAAAAAAAAAAAAAAAAAAAAAA

 Anonymous
 Anonymous
Shrine of Amana: The Salty Spitoon
You, coming here to complain: Weenie Hut Jr
Advice: Maybe a series like Legend of Zelda is more suitable for you

I understand I might be in the minority with this perspective, but if you have a good bow and take your time, this area isn't so difficult. The only really irritating part is dealing with the priestess who heals the other enemies.
0
+11
-1