General Information
- Previous: Things Betwixt
- Next: Forest of Fallen Giants
- Recommended Levels: Any
- Bosses: N/A
- Bonfires: The Far Fire
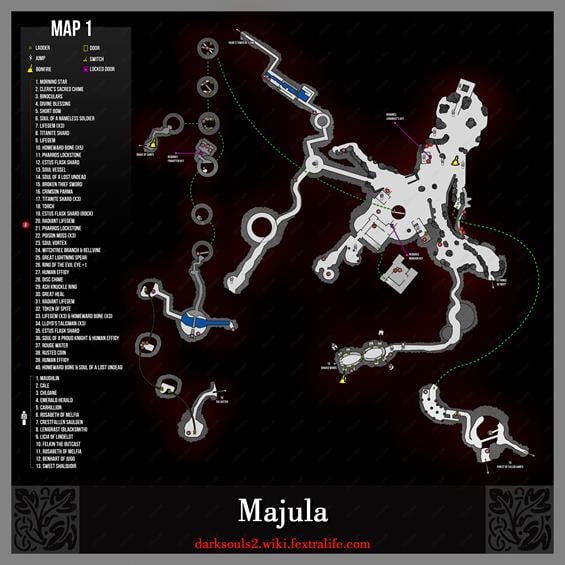
Majula Map
NPCs in the Majula
- Emerald Herald
- Crestfallen Saulden
- Blacksmith Lenigrast
- Sweet Shalquoir
- Merchant Hag Melentia
- Maughlin the Armourer
- Carhillion of the Fold
- This NPC joins Majula after the player meets him in No-Man's Wharf .
- This NPC sells Sorceries and will upgrade your Pyromancy Flame.
- Next to the large tree to the right of Lenigrast house.
- Rosabeth of Melfia
- This NPC joins Majula after the player saves her using a Fragrant Branch of Yore.
- Cale the Cartographer
- Stone Trader Chloanne
- Chloanne is found almost immediately upon entering Harvest Valley. Exhausting her dialogue will prompt her to move to Majula, outside Lenigrast's workshop where the two of them will then discuss the fact that they know each other already
- Laddersmith Gilligan
- Gilligan is found on a ledge near the windmill in Earthen Peak (you must break some guard rails and walk carefully along the ledge. He will move to Majula after defeating the Earthen Peak boss
- Gilligan will offer to rent some of his ladders to use in the pit in Majula (so you don't need the Silvercat Ring to access Grave of Saints and The Gutter, although the ladders don't reach all the treasures). After purchasing the most expensive ladder he offers, he will give you his Melu Scimitar which unlocks a trophy/achievement
- Licia of Lindelt
- Licia sells Miracles, a chime and a Ring of Prayer.
Items
Consumables
- Estus Flask
- Estus Flask shard x2
- Titanite Shard
- Divine Blessing
- Lifegem x7
- Homeward Bone x8
- Lloyd's Talisman x3
- Soul of a Nameless Soldier
- Soul of a Lost Undead
- Soul Vessel x2
- Rusted Coin
- Pharros Lockstone
- Torch x3
- Titanite Shard x3
- Radiant Life Gem (Pit, could be considered Grave of Saints)
- Pharros Lockstone (Pit, could be considered Grave of Saints)
- Ring of the Evil Eye +1 (Pit, could be considered Grave of Saints)
- Homeward Bone (Pit, could be considered Grave of Saints)
- Poison Moss x3 (Pit, could be considered Grave of Saints)
Equipment
- Cleric's Sacred Chime
- Crimson Parma (Area between Majula and Heide's Tower of Flame)
- Morning Star
- Binoculars
- Short Bow
- Broken Thief Sword (Area between Majula and Heide's Tower of Flame)
- Ring of Steel Protection
Enemies
Notes
- You are advised to never ever kill an NPC. All their items are obtainable without killing. All the quests that involve killing can be done without killing. Killing NPC's usually just screws up your game and gives you Sin.
Full Majula Walkthrough
Cavern Detour
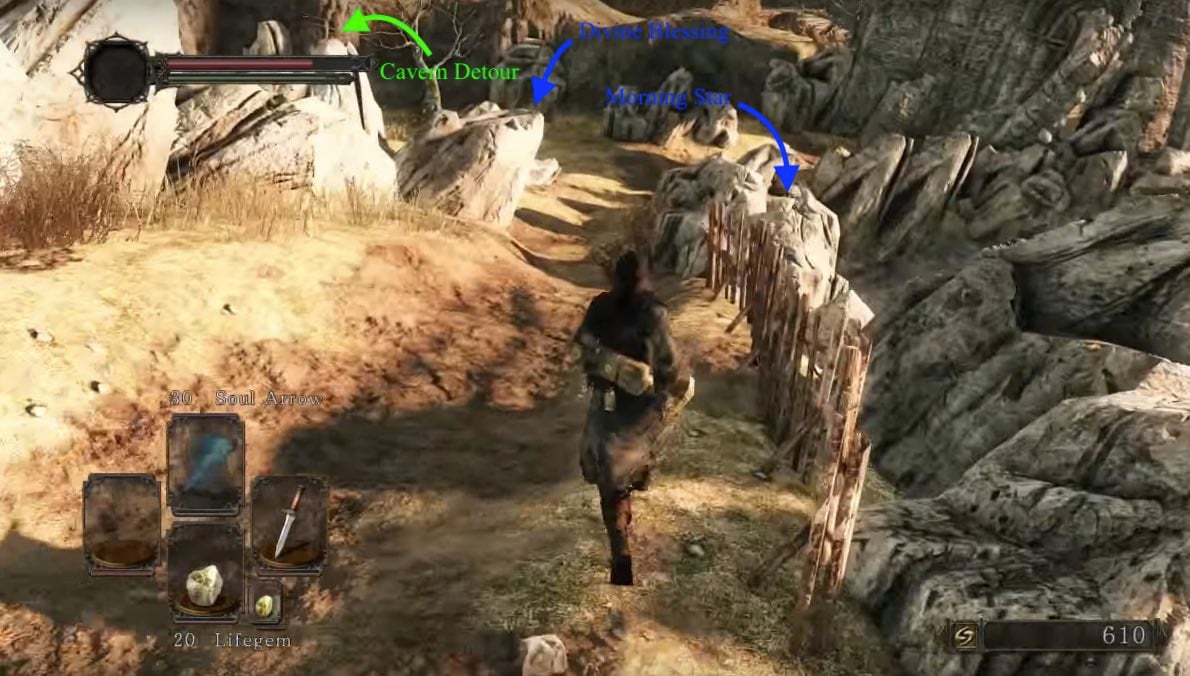
From Things Betwixt walk down the narrow path. Start by taking a left after the stones end and going up the hill to arrive at a cave, tunneling you to a room of archways. Entering the last open archway brings you down a leaf littered path where you encounter an NPC sitting by a column. This character is named Benhart of Jugo. There's little reason to interact with him until the path ahead is unblocked, but no penalty for stopping to chat either. Ahead of him is a structure with a doorway with its lever’s use blocked by a statue. Before entering the structure, to the left of the stairway you'll find a corpse with 3x Lifegem and 3x Homeward Bone.
Inside the structure you come into a round and open room with a doorway straight ahead, and one cell on either side. The lever to operate the doorway is blocked by a statue that appears to be a petrified woman. Upon examining, you are told that a statue blocks your way. From the cell to the left, a Festering Hollow -wielding a poisonous axe-like weapon made of bones- paces back and forth and will burst through the gate after some time. In its cell, lies a corpse with 3x Lloyd’s Talisman. The other cell holds an unarmed Festering Hollow who uses fists to attack.
Once obtaining a Fragrant Branch of Yore, you can un-petrify the statue which allows access to the pull mechanism. Rosabeth of Melfia (the ex-statue) will ask for clothes which can be donated to her using her menu. Giving her at least one item of clothing will prompt her to move to the main area of Majula where she will proudly display the results of you playing Dark Souls NPC dress up. Giving her clothes also gives you a trophy/achievement. She is a pyromancy trainer and can upgrade your pyro gloves, as well as sell you useful items. The now accessible door she prevented you from opening leads to the Shaded Woods. If you don't have a Fragrant Branch of Yore at the moment (and you don't since we're assuming this is your first playthrough), back track to return to the initial cave entrance. Down the hill, if you hug the wall to the left, is a corpse in front of a tree with a Divine Blessing.
Scenic Route to the Bonfire
You can enter Majula down a path lined with stones on either side, however we're going for 100% completion so up you go, back to the narrow path as if we are reentering from Things Betwixt. This time, instead of heading left or straight, look for a ledge on the cliff to your right; but don't just jump off willy-nilly. Instead look for a platform you can drop to (should be the second ledge). You'll notice nothing on this level, so drop off once again to find a corpse carrying a Morning Star and Cleric's Sacred Chime, directly under the platform you just dropped from. Continue along the path, making sure to hug the wall as you go, to find another corpse where the Binoculars can be found. Take this path until you find the Bonfire.
Meeting the Locals
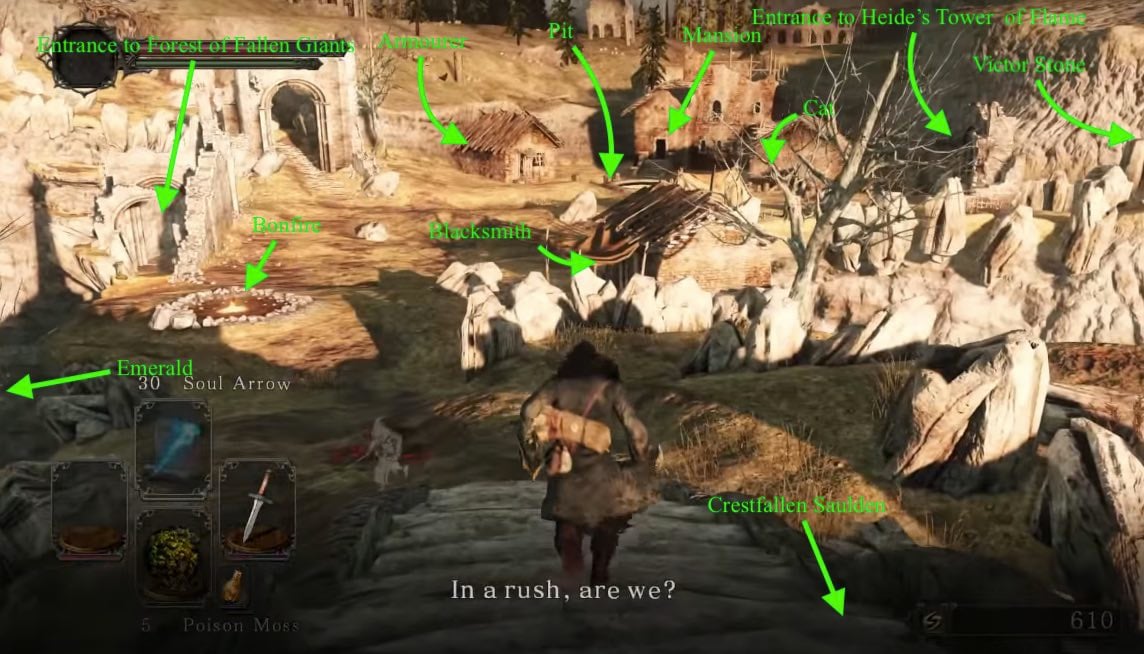
Proceed to the right cliff to find the Emerald Herald, speak to her to receive an Estus Flask, and trigger her to move to the bonfire where she can provide leveling and Estus upgrades. Killing her nets you a grand total of 0 souls, however scores you the Aged Feather and will likely screws up your game, considering that she is the only way to level up and reinforce your Estus.
Behind that are a set of steep steps that lead to a statue where Crestfallen Saulden sits. He grants you the chance to join his covenant, 'Way of Blue' which allows you to receive help from the Blue Sentinels; join his covenant and he'll give you a Blue Seal Ring which increases your health ever-so slightly. He will also teach you the gesture “Welcome” and gives hints about how to reach nearby areas from Majula if you keep talking to him. He also briefly explains the bonfire, messages (Online play feature), and summon signs.
Back down the steps and to the right find the village with a few houses. Blacksmith Lenigrast sits outside his workshop, unable to get in without Lenigrast's Key; you can purchase the Key from Melentia in the Forest of Fallen Giants. Inside his house, there is a chest that contains a Short Bow. This also allows him to access his tools, and upgrade and repair equipment as well as become available as a merchant. Killing him yields 1350 souls and Blacksmith's Hammer (which is not crap like the first game), however you obviously lose everything else that he offers and he'll later give you the hammer anyway. On the right side of his house, find a Soul of a Nameless Soldier and 3x Lifegem.
Another house is home to the cat Sweet Shalquoir, who sells items, and provides info on covenants and allows you to abandon them. Right outside her house, there is a corpse with a Lifegem. Attacking Shalquoir leads to her taunting you; she cannot be hurt and will not aggro, and will still interact normally after being attacked. Go past Shalquoir's house and up the cliff on the right, where you will approach a large stone. A corpse to the left has 5x Homeward Bone. Standing in front of the Victor’s Stone prompts you to kneel and you can enter the covenant Company of Champions, and offer awestones to increase covenant rank. New players are advised not to join this covenant, because joining it will make every enemy in the game stronger. It also disables cooperative play.
A mansion here is locked for the time being, and another house is home to Maughlin the Armourer who sells armor and related items. If you enter his house and go up the ladder there is a chest with a Titanite Shard. His stock is lackluster now, but will expand the more you buy from him and as you defeat certain enemies.
Many NPCs you meet will relocate to Majula after you encounter them, adding to the shops and services available. Two of the earliest are Melentia, a merchant from the Cardinal Tower bonfire in the Forest of Fallen Giants, and Licia of Lindeldt, from Heide's Tower of Flame. She can open a path to the Huntsman's Copse for 2000 souls.
In the corner by the house, is a mud patch where 3 Undead Devourers (the pigs) can be found. They are immediately hostile when approached and have a chance to drop Cracked Red Eye Orbs. These small pigs are surprisingly strong for their size and new players may find it hard fighting them.
The Mansion of Majula
In front of the locked mansion is a well. Hitting the rock drops it into the well, raising a corpse with an Estus Flask Shard. It's advised to get this shard as soon as possible. After talking with Cale the Cartographer in the Forest of Fallen Giants, he will provide you with a key to this Mansion.
Entering the mansion there are paths straight back and to the right. Heading straight back leads to a small library where a Pharros' Lockstone can be found. Heading to the right leads around the mansion and to another split. The player can choose to go upstairs or further back into the mansion:
- Heading up the stairs leads to a small second floor room and a balcony-like area outside. Inside the room is a chest containing 3x Titanite shard and 3x Torch.
- Heading back downstairs and toward the back of the mansion, the player enters a large chamber with what appears to be a map carved into the floor. A single small flame appears on the map at this time. A short staircase leads to another chamber where a single Skeleton awaits. It does not revive and drops a Human Effigy when killed. A smaller chamber inside this area contains a chest that holds a Soul Vessel. There is a skeleton corpse with an Estus Flask Shard in front of the door, with the chest.
The Pit to the Gutter
This is the pit in the middle of Majula. Buying the Silvercat Ring from Shalquoir for 13,400 souls, allows you to drop to the first board walkway in the pit without dying, as long as your VGR is 5 (768 HP). NOTE: You must be wearing only the Silvercat Ring, have 0.5% equip burden, and not have any forward momentum while dropping. It will still cause MAJOR damage. Recommended to go to the Forest and/or the Tower first, and return to the pit at a higher level.
The first set of boards you drop onto has a corpse with a Radiant Lifegem. The second has a corpse with a Pharros' Lockstone. The third has 3x Poison Moss. At this point you can jump to a small ledge with torches that leads directly to the Grave of Saints area or continue down to another ledge with a ladder. The ladder leads to a locked door that accesses The Gutter. More jumping from board to board will arrive at a corpse with a Ring of the Evil Eye+1, and another ledge lined with torches. This marks the bottom of the pit that can be explored and leads to a tunnel. A Crystal Lizard will run off a bridge with a gap in the middle, and the lack of enemies to thwart you here should make this very easy to get. Jumping across the gap leads to a chest with the Ash Knuckle Ring. A corpse holding the Disc Chime is visible to the left but is inaccessible for now.
The pit below you can be jumped into but with extreme caution. There is water that will slow your movement so attempt to gain land as soon as you can. A group of exploding Small Mummies will rush you. They have low health but will try to trigger an Area of Effect explosion when nearby. Unlike the ones in the Lost Bastille, these mummies die upon exploding. There are two tunnels from which the Mummies came from. One has water covering the floor while the other does not. The watery path leads to a skeleton who holds Great Heal. The other leads to scaffolding. Be careful here as once you go down the first ladder, you cannot go back up it (due to it being incomplete). Looking toward the ladder you fell down, move left to a series of two ladders. A corpse with a Human Effigy waits for you there. Climb back up and move to the right which begins a series of ladders down. Look for another corpse holding a Radiant Lifegem near the bottom. Once you use the last ladder, there is no way back up again. A chest at the base holds a Token of Spite. Following the tunnel out leads to The Gutter.
Entrance to Heide's Tower of Flame
To the left of the cliff where the Victor’s Stone is, there is a large stone archway, with a staircase going down a tunnel. Coming to a circular room, there is a pillar in the center with a symbol on it. Examining it mentions that the the contraption does not move. Licia of Lindeldt is able to later open a path to Huntsman's Copse after encountering her in Heide's Tower of Flame.
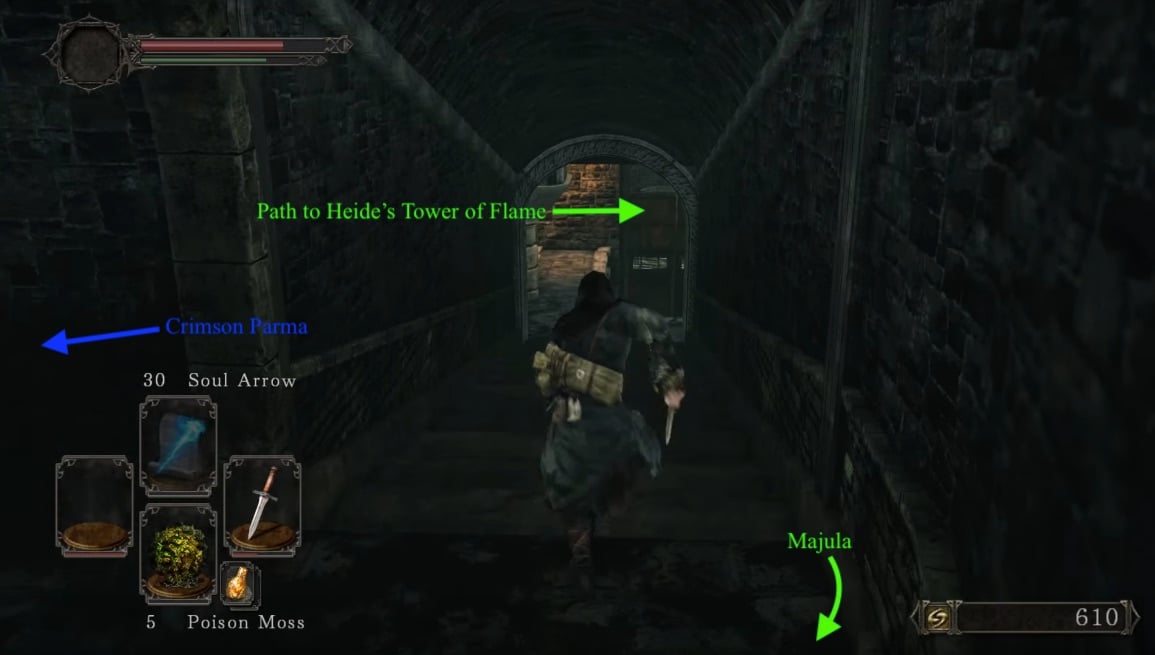
Going to the right down the hallways to a spiral staircase, on the left there is a chest with Crimson Parma. Continuing down the stairs takes you to a room with a large door, which entering and staying to the ledge on the left, will bring you to a pull chain which opens the door. Going through the door leads to a waterway, and up the stairs is another pull chain to open the door should you wish to go back and further on a corpse with Soul of a Lost Undead and Broken Thief Sword. Going down the hallway takes you to the entrance of Heide’s Tower of Flame.
Entrance to Forest of Fallen Giants
Starting at the bonfire, looking out over the ocean at the cove with all of the spiky rocks sticking up, look to your right along the coast. ~10 strides away you'll see a crumbling wall; on the sea side of the wall is a torch sconce marking an entrance that leads down to an underground stone rampway. To the right of the main path in, you'll find an iron chest (chest is a Mimic in NG+) with a Rusted Coin. Proceeding down the hallway, there is a dead end to the right and to the left a large gated door. Pulling the lever to the right opens the gate.
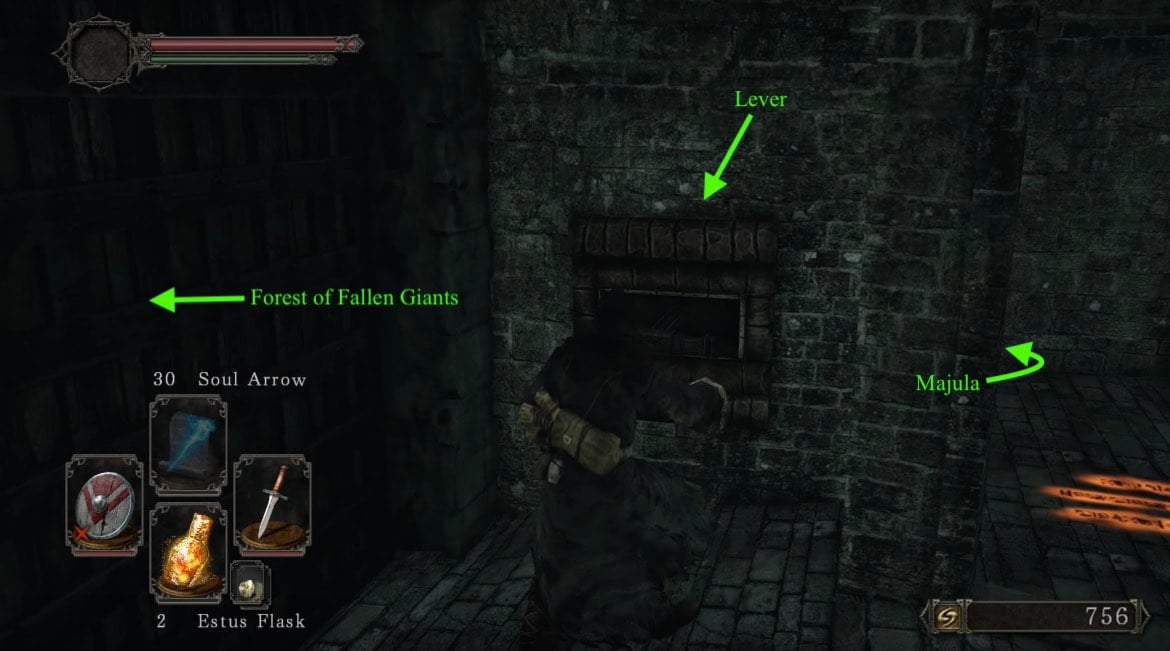
The path opens up to a cave with a wooden bridge that spans a stream. Once past the bridge going to the right leads to the Forest of Fallen Giants and to the left there are two long planks to a large stone with a chest that contains Human Effigy x1. Beyond in the stream is a corpse with a Homeward Bone and Soul of a Lost Undead.

