

This page serves as testing ground for community users to share their work in progress regarding mechanics and obscure aspects of Dark Souls 2. The information on this page is not conclusive, and is to be taken as a springboard for others to join the testing and share data, helping reveal information.
Please be considerate of others when editing and sharing data.
=========== USER TESTING AND REPORTING BELOW ===============
Drop rate
Someone on the forums had claimed that "PC master race is sleeping at work", as there's no extensive test of drop rate and item stacking (there wouldn't be a need for one, had FROM not decided to hide drop rate / luck / item discovery stat in this particular installment of the series). Here's one attempt to fill the void.
Test conditions
- Cycle: NG
- Area: The Old Chaos (fresh after boss)
- Enemy: Charred Loyce Knight
- Number of enemies per run: 3
- Number of runs until saves are reloaded / loot table refreshed: 16 *1
- Total number of runs per any set of items: 64 (numbers are averaged from 4 x16 runs) *2
- Total number of kills per any set of items: 192 *2
- Bonfire is used every time *3
- Rusted Coins are consumed before bonfire is used
- Humanity is restored on death *3, next kill counted (with multiple deaths, total number of souls is used as reference)
- Approximate number of souls (start–end): 100k–238k (242k with Symbol of Avarice)
- Soul Level: 229
- Soul Memory: 8,1–8,2M
- No covenants *3
- Patch: Version 1,02 / Calibration 2,02
Notes
- Occasional despawn begins at ~20th run. Complete despawn happens by ~60th run.
- Base values for single items are tested 3 x64 times, values for pairs and modifiers are tested 2 x64 times. Any weird numbers are re-tested 2 x64 times for consistency.
- See "modifiers".
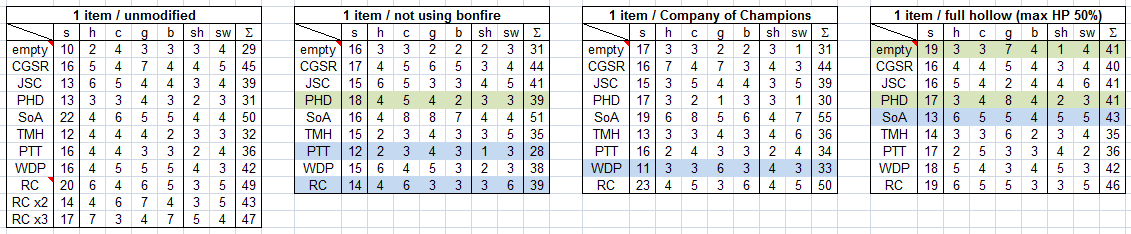
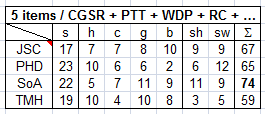
Lucky items
- Ring: CGSR = Covetous Gold Serpent Ring +2
- Helmets
- JSC = Jester's Cap
- PHD = Prisoner's Hood
- SoA = Symbol of Avarice
- TMH = Traveling Merchant Hat
- Armor: PTT = Prisoner's Tatters
- Shield: WDP = Watchdragon Parma
- Consumable: RC = Rusted Coin
Loot
- S = Loyce Soul
- H = Charred Loyce Helm
- C = Charred Loyce Armor (chestpiece)
- G = Charred Loyce Gauntlets
- B = Charred Loyce Leggings (boots)
- Sh = Charred Loyce Shield
- Sw = Charred Loyce Greatsword
Numbers (boring!)
No items or 1 item / modifiers
Effect of modifiers on each item
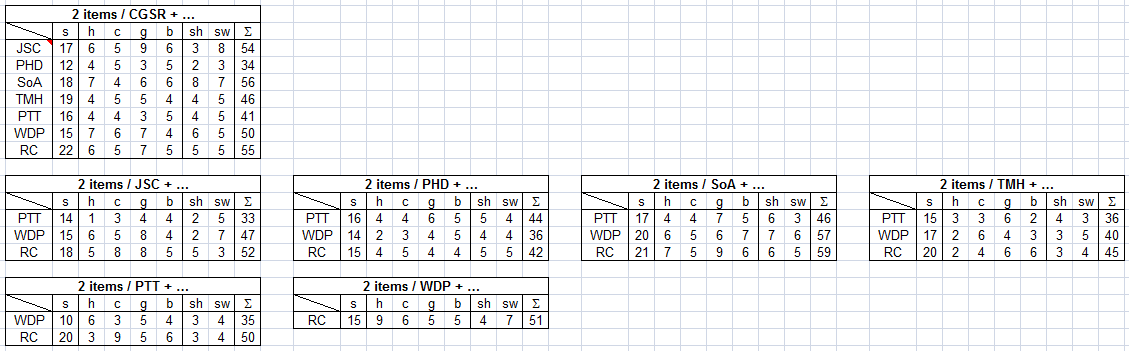
Combinations of 2 items
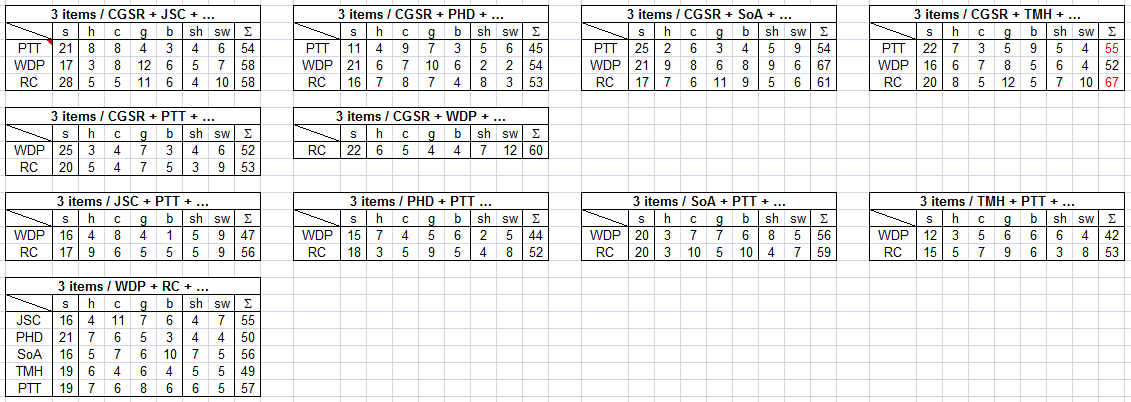
Combinations of 3 items
Combinations of 4 items

Combinations of 5 items
Notes
- If no items of certain type drop in 64 runs, 1 is taken from the maximum number (total number is kept).
- Rusted Coins do not stack. On the contrary, using more than one coin often lowers drop rate. (Note: coin's effect is reset on fast-travel.)
- No bonfire runs: in case of death souls are picked up, then Aged Feather is used at once and next run is counted.
- Modified runs: green highlight = better results, blue = worse. All such numbers are tested 4 x64 times in total.
- Combinations of 3 items: numbers highlighted in red are unusually high for how items stack / override each other in pairs.
- Numbers in each set of 16 runs vary up to ±4 from median, so anything within that range is seen as lack of further improvement ("> override").
- Numbers for individual loot items don't seem to have any connection with certain luck-modifying items and vary up to ±10 from median.
Analysis
To see the picture behind the numbers, explore the following diagram:
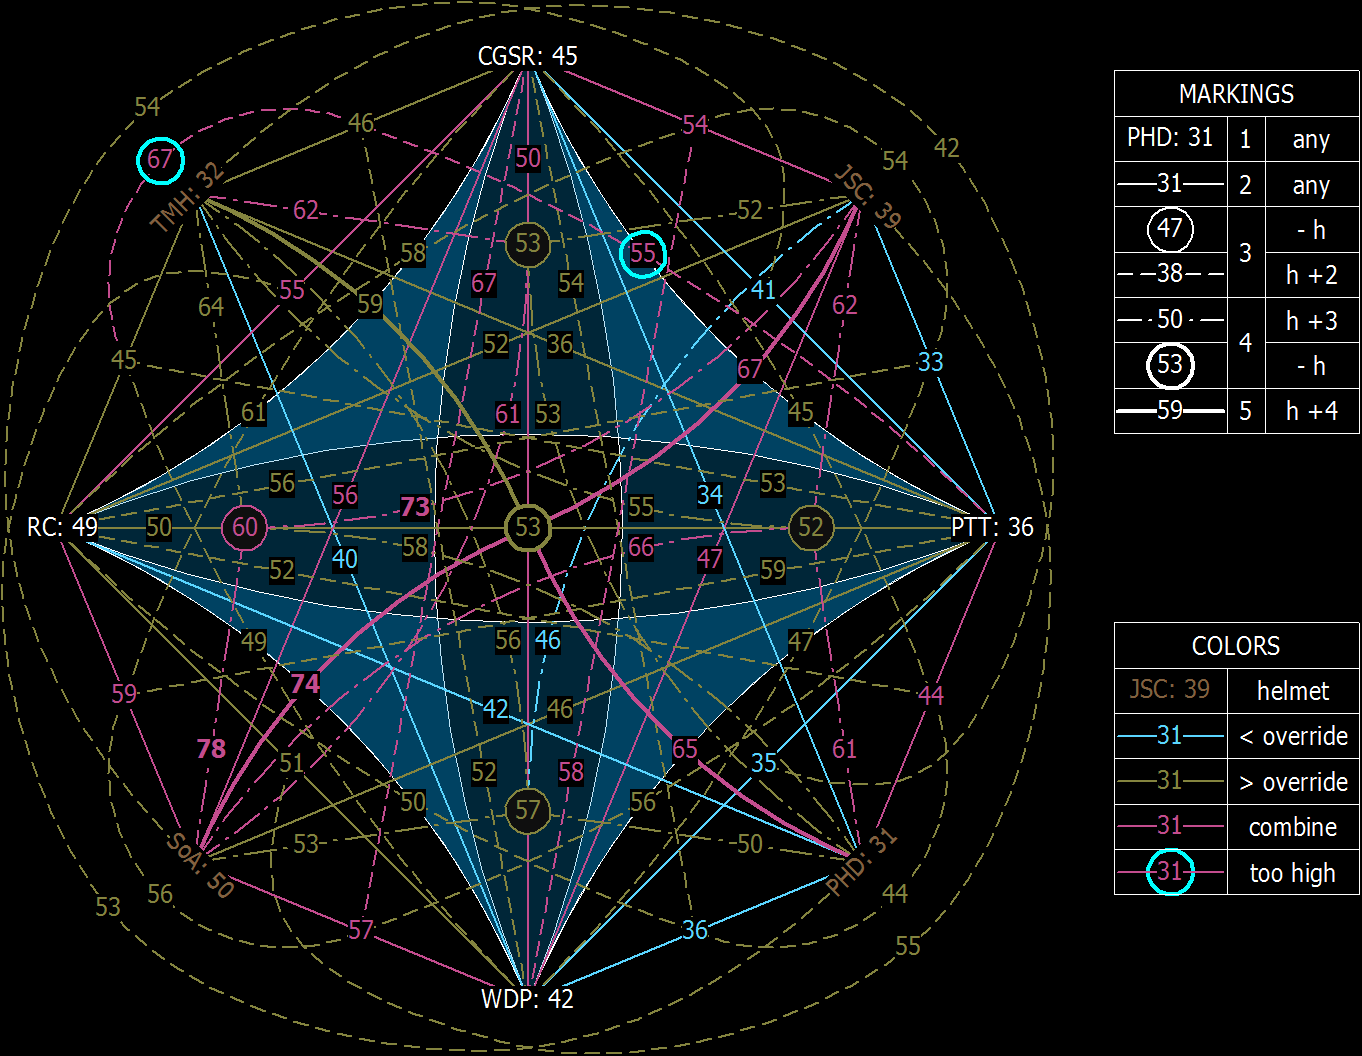
Note: blue triangles are added to highlight which 3 non-helmet items form each encircled number (4 items in bold central circle).
Conclusion
- Prisoner's Hood and Tatters only combine with each other and still yield numbers lower than most single items.
- Traveling Merchant Hat doesn't seem to combine with any other item in pairs, but somehow produces a spike in drop rate when used in triplets along with Covetous Gold Serpent Ring +2 and Rusted Coin.
- Covetous Gold Serpent Ring +2 combines with Jester's Cap, Watchdragon Parma and Rusted Coin, but results are only slightly better than with single items.
- Symbol of Avarice performs best among single items and combines with most other items, often resulting in the highest numbers. Coupled with Rusted Coin, it forms the base for the best combinations.
- Using 5 items at once makes little sense as some items override each other – the same or even better result can be achieved with 4 items.
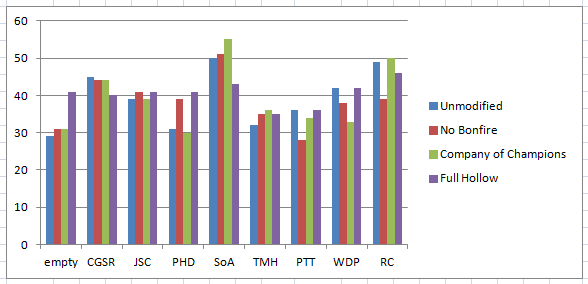
- In short, best options are:
- 1 item: WDP < CGSR < RC < SoA
- 2 items: CGSR + JSC/RC < SoA + WDP/RC
- 3 items: CGSR + WDP + JSC/RC < CGSR + TMH + RC (somehow) / CGSR + WDP + SoA
- 4 items: CGSR + WDP + RC + JSC/SoA
- Numbers are given for certain loot pool, but it doesn't mean they cannot be applied to other loot; it's item discovery and stacking power described here, not the chance of obtaining certain item. The chance gets higher with items and combinations that yield higher numbers, that's for sure.
Effectiveness of dark catalysts
The following bit of research might prove useful to those who play as (dumb) warriors with little knowledge of magic. Among the spells with low stat requirements, Dark Orb seems to be the best option: decent damage (or even high against some enemies, compared to damage dealt with fire and magic arrows) and high number of casts (20 by default), plus some stun power against humanoid enemies.
Test conditions
- Cycle: NG+2
- Upgrade: full (+5/+10)
- Infusion: dark
- Stats: minimal stat requirements are met
- Area: Forest of Fallen Giants – Crestfallen's Retreat
- Enemy: Ogre
- Patch: Version 1,02 / Calibration 2,02
Numbers
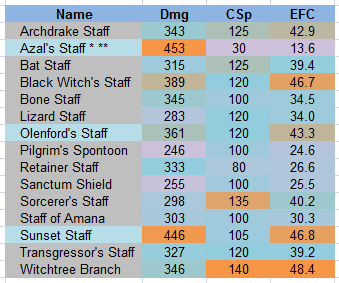
Notes
- Effectiveness is expressed simply as a product of damage and casting speed.
- Sorcerer's Twinblade cannot be used to cast Dark Orb even though spell icon is not dimmed with this catalyst equipped.
- * No infusion is available for Azal's Staff.
- ** Azal's Staff limits the number of spell casts to ~25%.
Analysis
- Azal's Staff, despite dealing the highest single-shot damage, has the lowest effectiveness due to lowest possible casting speed. Remember about drastically limited number of spell casts and see that this staff is only fit for quickly killing a single target. Also, it has high stat requirements (35+18) and is found rather late in Ivory King DLC.
- Black Witch's Staff and Sunset Staff both have equally high effectiveness and are equal in combined stat requirements as well (20+20 vs 22+18). Sunset Staff offers higher single-shot damage while Black Witch's Staff has higher casting speed. Both staves are available early, though Black Witch's Staff requires fighting a nasty invader in The Gutter and is NOT a guaranteed drop. One more thing: Sunset Staff is upgraded with Twinkling Titanite, so it's only a viable option for late game.
- Sorcerer's Staff is available almost at once (Forest of Fallen Giants – Cardinal Tower) and has very low stat requirement (10 INT), but given its moderate effectiveness, it's better not to spend upgrade materials on it and obtain Witchtree Branch instead, which has the highest effectiveness and casting speed (with moderate single-shot damage), low stat requirement (16 INT) and is available rather early (Majula pit > Grave of Saints > The Gutter > Black Gulch – Forgotten Key > Majula pit again) with only one minor boss fight on the way.
- Once again, even though tested on a certain enemy, results can be used as reference in any fight – with damage numbers being lower or higher, relative power (catalyst "a" > catalyst "b") will remain the same.
Effectiveness of bows and greatbows
How to tell which bow performs better? How to tell if a bow is worth the effort of developing certain stats and using upgrade materials? I didn't know, so I had to check. See the results below.
Test conditions
- Cycle: NG+
- Upgrade: full (+5/+10)
- Infusion: none
- Stats: STR 40*, DXT 50, FTH 18** / END 60 (160 Stamina Points)
- Area:
- Test 1: Iron Keep – Threshold Bridge
- Test 2: Forest of Fallen Giants – Crestfallen's Retreat
- Enemy:
- Test 1: dark spirit Alonne Knight Captain (forge)
- Test 2: Ogre
- Patch: Version 1,02 / Calibration 2,02
Notes
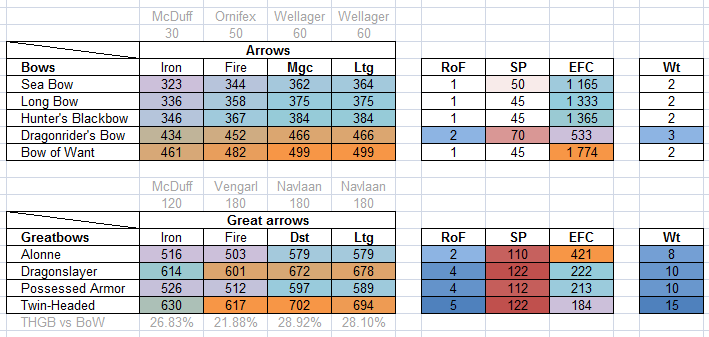
- Effectiveness is expressed as a product of damage dealt per second (single-shot damage / fire rate in seconds) and arrows fired per given amount of stamina (total stamina / stamina consumption per shot).
- Maximum damage is used for EFC calculation.
- Stamina consumption per shot is measured with a ruler applied to the screen.
- Short Bow is not included because it's inferior to other bows (same idea with wooden arrows), but mostly because I kinda forgot about it and then was too lazy to redo the test. Maybe I'll update the numbers when I get back to the game, but not anytime soon.
- * STR 45 for Twin-Headed Greatbow.
- ** Only for Bow of Want.
Numbers
Test 1

Test 2
Analysis
- Among regular bows, Bow of Want shows the best results in both single-shot damage and overall effectiveness. Following closely in terms of damage, Dragonrider Bow is only half as effective due to lower rate of fire and higher stamina consumption. It's also heavier and has shorter range (35 vs 50-60 of other bows).
- Among greatbows, Alonne Greatbow is the most effective and the most lightweight (but still 4 times heavier than most regular bows) with damage ~20% lower compared to the most damaging Twin-Headed Greatbow, which, in turn, falls far behind in effectiveness due to extremely low fire rate (one arrow in 5 seconds) and is two times heavier.
- In cross-category comparison, Bow of Want outperforms both regular and greatbows while offering fastest firing speed and single-shot damage that is only 13–30% lower (that needs more testing) compared to the best greatbows.
- All in all, greatbows have the advantage of stun/push effect, but are heavy, slow and use insane amounts of stamina (only one arrow fired at full power).
 Anonymous
- Anonymous
I didn't know I would learn how to navigate galactic space when I visited this wiki page, but here we are....
Why in the blazes are there only 2 mechanics that have been explored down to the quantum particles that are moving about in the matrix when determining whether or not an item drops, and no other mechanics testing? I know of some pretty good tests that have been done on equip loads, defense and damage negation, roll distances down to the pixel, but none of those things are here, but I have to know rocket science to understand what is going on when I equip a ring?
- Anonymous
- Anonymous
I looked up the wiki not the fukin cloning formula of an orange.
- Anonymous
- Anonymous
russian wiki says that every item adds a bit of item discovery just like in ds1 and ds3, is that true? which wiki is right?
- Anonymous
- Anonymous
I find out something pretty strange when I farm the covenant items:
Awestone will be dropped more from 1 to 3, 1 and 2 is more common than 3, around 15 to 30 minutes, from the Forest guard, the invisible enemy, if I equip 4 item: Right Shoulder Prison Tatter, Watchdragon Parma Shield, Symbol of Avarice, and Covetous Gold Serpent RIng +1
However, Sun Medal and Rat Tail will be dropped more from 1 to 2, 1 is more common than 2, around 15 to 30 minutes if I equip 3 item: Right Shoulder Prison Tatter, Watchdragon Parma Shield, and Symbol of Avarice.
I not farm the Dragon Scale yet so I don't know.
- Anonymous
- Anonymous
What is this horses**t? Seriously, this is not how statistics works. You would have to have at least thousands of results to get accurate data. This is just someone putting anecdotal evidence in tables and distorting the data to look like what they want to believe is true.
- Anonymous
- Anonymous
Although the tables make it look terrible, the Dragonrider Bow is actually great in terms of pulling aggro or sniping enemies that can't reach you when you have a build that uses minimal Dex, like a UGS warrior. It's available super early and has great Str scaling, it's only hampered by the fact that it uses dragon bones to upgrade, but if you don't plan on using other boss weapons early on, you can consider upgrading it to deal even more damage when pulling aggro.
Is there any information on Bosses being effected by clearing all the enemies in a level? For instance; if I go through Iron Passage a multiple times so that there are no longer any enemies between the bonfire and the Smelter Demon, would this change the fight at all?
- Anonymous
- Anonymous
- Anonymous
Please be aware folks that stacking item discovery may hinder your ability to gain items . Let me explain with a basic example.
In Harvest Valley, Undead Steelworkers have three possible drops:
Titanite Shards with a probability of 20
Small Smooth and Silky Stones with a probability of 3
And Mundane Stones with a probability of 1
Titanite Shards have the highest probability and therefore drop the most often and without item discovery gear at that. The other two are rare and VERY rare. What does this mean? The more item discovery gear you use pushes the probability for you to get a common drop DOWN while just slightly increasing the probability of getting that ultra rare drop. What this actually translates into (using these guys as an example) is if you go full on item discovery gear on these guys your chances of getting items will drop dramatically because now your gear is aiming specifically for thoses rare items, bypassing the common titanite drop.. meaning the ultra rare drops remain ultra rare, but by aiming for THEM you miss the common drops. So if you were farming for titanite with full gear on these guys you'd spend hours frustrated and occassionally getting a mundane stone and a few smooth and silkies. Take the gear off and bingo, watch how often they drop. So I think it's HIGHLY important to understand the drop rates of the SPECIFIC ITEM you are farming for so you can use the appropriate DEGREE of upping your item discovery to get the drop yoy WANT.
Another great example are the Loyce Souls. I, and many people have found that they are more commonly dropped if you go for simply a jester hat alone, rather than full on gear. Again, it *may* be because the loyce soul has a higher drop probability than the charred loyce pieces so overusing item gear might bypass it. Speculation here, but definitely based on observation.
- Anonymous
- Anonymous
wow really good man. Although I dont really understand the diagram
OMG I'm speechless... My head is spinning. Did you make the graphs yourself? I'm trying to wrap my head around this but it looks like absolutely remarkable work. Amazing!

i'm blocking this website solely due to the retards who actually wrote all this bullshit. kill yourself you trannies.
1
+18
-1